
Measure and Plan Your Lighting Layout
Installing string lights under your cabinets can brighten up your kitchen or workspace and add a touch of ambiance to the room. Before you begin the installation process, it’s essential to measure and plan your lighting layout to ensure that the lights are placed where they will have the greatest impact.
1. Start by measuring the length of the cabinets where you want to install the string lights. Use a measuring tape to get precise measurements and write them down.
2. Consider the placement of your power source. You’ll need to have an electrical outlet nearby or install a plug-in transformer if you don’t have one in close proximity. Take this into account when planning the layout of your lights.
3. Decide on the spacing and positioning of the lights. String lights can be installed either in a straight line or in a more decorative pattern, such as zigzag or curved. Consider the overall aesthetic you want to achieve and plan accordingly.
4. Take into account any obstacles or obstructions that may interfere with the installation process. For example, if there are cabinets or appliances that may restrict the placement of the lights, make note of it and adjust your layout accordingly.
5. Think about the desired brightness level. If you want brighter task lighting, you may need more lights or higher wattage bulbs. If you prefer a softer, more ambient glow, fewer lights may be sufficient.
6. Consider the color temperature of the lights. String lights come in various options, ranging from warm white to cool white. Determine which color temperature suits your personal preference and the overall mood of the room.
By taking the time to measure and plan your lighting layout, you can ensure a smooth installation process and a visually pleasing end result. This step is crucial in creating a well-lit and functional space that enhances both the aesthetics and functionality of your under cabinet lighting.
Gather the Necessary Tools and Materials
Before you begin the installation process, it’s important to gather all the necessary tools and materials. Having everything at hand will help you complete the installation smoothly and efficiently. Here are the essential items you’ll need:
1. LED string lights: Purchase high-quality LED string lights that are suitable for under cabinet use. They should be long enough to cover the desired area and come with an adhesive backing for easy installation.
2. Power source: Determine whether you’ll need a plug-in transformer or if you have an existing electrical outlet nearby. If a transformer is necessary, make sure to purchase one that matches the voltage and wattage requirements of your LED string lights.
3. Mounting clips or adhesive tape: Depending on the type of cabinets you have, you’ll need either mounting clips or adhesive tape to secure the string lights in place. Mounting clips are ideal for cabinets with a lip or if you prefer a more secure installation. Adhesive tape works well for cabinets without a lip and offers a simpler installation process.
4. Wire connectors: If your LED string lights come in multiple sections, you’ll need wire connectors to join them together. These connectors ensure a secure connection and allow you to customize the layout of your lights.
5. Wire cutter and stripper: These tools are essential for cutting and stripping the wires of your LED string lights as needed. Make sure to use the appropriate size wire cutters and strippers to avoid damaging the wires.
6. Screws or nails (if necessary): If you prefer a more permanent installation method, you may need screws or nails to secure the mounting clips or other fixtures. Ensure that the screws or nails are the appropriate size and compatible with your cabinets.
7. Ladder or step stool: Depending on the height of your cabinets, you may need a ladder or step stool to comfortably reach the installation area. Safety should always be a priority, so choose a sturdy and stable ladder or step stool.
8. Safety equipment: It’s always a good idea to have safety equipment on hand, such as gloves and safety glasses, to protect yourself during the installation process.
By gathering all the necessary tools and materials before starting the installation, you can save time and prevent any unnecessary frustration. Having everything within reach will allow you to focus on the task at hand and ensure a successful outcome.
Prepare the Cabinets
Before you can begin installing the string lights under your cabinets, it’s important to properly prepare the cabinets to ensure a smooth and secure installation. Follow these steps to get your cabinets ready:
1. Clean the surface: Start by thoroughly cleaning the underside of the cabinets. Use a mild cleaning solution and a soft cloth to remove any dirt, grease, or debris. Ensure that the surface is dry before proceeding to the next step.
2. Measure and mark the placement: Use a measuring tape to determine where you want to position the string lights. Mark the spots with a pencil or tape to guide you during the installation process. Take into consideration any corners or ends where the lights will start and end.
3. Secure the mounting clips or adhesive tape: Depending on the type of mounting method you’ve chosen, carefully attach the mounting clips or apply the adhesive tape to the marked spots. Make sure they are evenly spaced and aligned with your desired lighting layout.
4. Test the placement: Before permanently attaching the mounting clips or adhesive tape, perform a quick test placement of the LED string lights. Check if the spacing and positioning align with your desired lighting effect. Make any necessary adjustments before proceeding.
5. Remove the backing: If you’re using adhesive tape, carefully remove the backing to expose the sticky side. Take care not to touch the adhesive with your fingers, as this can reduce its effectiveness and make it harder to install the lights.
6. Press and secure the lights: Gently press the LED string lights onto the mounting clips or adhesive tape, following the marked placement. Ensure that the lights adhere properly and are securely attached. Take care to align them straight and maintain even spacing.
By properly preparing the cabinets, you set the stage for a successful installation of the string lights. Taking the time to clean the surface, measure and mark the placement, and securely attach the mounting clips or adhesive tape will ensure a neat and durable installation. This preparation step is crucial in creating a visually appealing and long-lasting under cabinet lighting system.
Install the Power Source
Installing the power source is a critical step in ensuring that your under cabinet string lights are powered and ready to illuminate your space. Follow these steps to safely and effectively install the power source:
1. Choose the location: Determine the best location for the power source. Ideally, it should be close to the cabinets and have easy access to an electrical outlet. Consider factors such as aesthetics and convenience when selecting the spot.
2. Turn off the power: Before you begin any electrical work, turn off the power to the area where you will be installing the power source. Locate the circuit breaker that controls the power to the outlet and switch it off to prevent any accidents or electrical shocks.
3. Mount the power source: If you have a plug-in transformer, simply plug it into the nearby electrical outlet. However, if you have a hardwired transformer, securely mount it to the wall or cabinet using screws or mounting brackets. Ensure that it is properly grounded for safety purposes.
4. Route the power cable: Carefully route the power cable from the transformer to the designated area where the string lights will be connected. Keep the cable neatly tucked away and avoid any sharp edges or potential damage points.
5. Make the electrical connections: If you have a hardwired system, you will need to make the necessary electrical connections. Strip the ends of the power cable to expose the wires, and connect them to the corresponding wires of the string lights according to the manufacturer’s instructions. Use wire connectors and electrical tape to securely fasten the connections.
6. Double-check the connections: After making the electrical connections, double-check to ensure that everything is properly connected and secured. Inspect for any loose wires or exposed connections, and fix or cover them if necessary.
7. Restore the power: Once you have completed the installation and checked all connections, it’s time to restore the power. Go back to the circuit breaker and flip the switch to turn the power back on. Use caution when testing the lights and ensure that everything is functioning properly.
By following these steps, you can safely and effectively install the power source for your under cabinet string lights. Taking the time to choose a suitable location, properly mount the power source, route the power cable, and make the necessary electrical connections will ensure a smooth installation process and provide you with a reliable lighting solution.
Mount the LED Strip Lights
Mounting the LED strip lights is the next crucial step in the installation process. Properly securing the lights ensures that they stay in place and provide the desired illumination. Follow these steps to mount the LED strip lights under your cabinets:
1. Prepare the LED strip lights: If your LED strip lights come in a roll, carefully unroll them and straighten them out. It’s important to ensure that the lights are not tangled or kinked before mounting them.
2. Clean the mounting surface: Before attaching the LED strip lights, clean the underside of the cabinets with a mild cleaning solution. Make sure to remove any dust, grease, or debris that could prevent the adhesive from sticking properly. Dry the surface before proceeding.
3. Position the LED strip lights: Starting at one end of the cabinet, position the LED strip lights along the marked placement or mounting clips. Take care to align them straight and evenly, following the desired layout. Press the lights firmly against the mounting surface to ensure a secure bond.
4. Cut the LED strip lights (if necessary): If your LED strip lights are longer than the available space, you may need to cut them to the desired length. Refer to the manufacturer’s instructions for guidance on how to cut the lights properly without damaging them or compromising functionality.
5. Use additional adhesive (if needed): If the adhesive backing of the LED strip lights is not strong enough or if you have a cabinet surface that is not suitable for adhesive, you can use additional adhesive to secure the lights. Opt for a strong adhesive tape or adhesive-backed mounting clips for added stability.
6. Apply pressure and let it set: After mounting the LED strip lights, apply firm pressure along the entire length to ensure a good bond with the mounting surface. Allow the adhesive to set completely before moving on to the next steps.
7. Check for any gaps or loose sections: After the adhesive has set, inspect the installed LED strip lights for any gaps or loose sections. If you find any, reapply pressure and make any necessary adjustments to ensure a secure and uniform installation.
By following these steps, you can successfully mount the LED strip lights under your cabinets. Taking the time to prepare the lights, clean the mounting surface, position the lights accurately, and ensure a strong bond with adhesive or additional mounting tools will result in a visually appealing and securely installed lighting solution for your space.
Connect the Lights to the Power Source
Now that you have mounted the LED strip lights under your cabinets, it’s time to connect them to the power source. This step will bring your under cabinet lighting to life. Follow these steps to connect the lights to the power source:
1. Locate the connection point: Identify the connection point on the LED strip lights where you will attach the power cable. This is usually located at the end of the strip or as indicated in the manufacturer’s instructions.
2. Strip the ends of the power cable: Prepare the power cable by stripping the ends to expose the wires. Use wire cutters and strippers to carefully remove the insulation, taking care not to damage the wires in the process. Make sure to strip an appropriate length according to the type of connectors or terminals you will be using.
3. Connect the wires: Match the positive and negative terminals of the LED strip lights with the corresponding polarity of the power cable. Typically, red represents positive (+) and black represents negative (-). Twist the exposed wires together, making sure that there is a secure connection.
4. Secure the connection: Once the wires are twisted together, use wire connectors or soldering to ensure a secure and reliable connection. If using wire connectors, place them over the twisted wires and squeeze them tightly to fasten the connection. If soldering, heat the soldering iron and carefully melt solder onto the twisted wires to create a permanent bond.
5. Insulate the connection: To protect the connection from any potential damage or electrical hazards, insulate it with electrical tape or heat shrink tubing. Wrap the tape or slide the tubing over the connection and make sure it covers the exposed wires completely. Secure it tightly to ensure a proper seal.
6. Double-check the connection: After completing the connection, double-check to ensure that it is secure and there are no exposed wires. Inspect for any loose connections or signs of potential issues. If everything looks good, proceed to the next step.
7. Test the lights: Before finalizing the installation, test the lights to make sure they are working properly. Plug in the power source or switch on the transformer, if applicable. The LED strip lights should illuminate, indicating a successful connection. If the lights do not turn on, double-check the wiring and connections.
By following these steps, you can successfully connect the LED strip lights to the power source. Taking the time to properly connect the wires, secure the connection, and test the lights will ensure that your under cabinet lighting functions as intended and provides a beautiful and functional illumination to your space.
Test the Lights and Make Any Necessary Adjustments
Once you have connected the LED strip lights to the power source, it’s vital to test them and make any necessary adjustments to ensure optimal performance. Testing the lights will help identify any issues and provide an opportunity to fine-tune the installation. Follow these steps to test the lights and make any necessary adjustments:
1. Turn on the power: Switch on the power source or plug in the transformer, if applicable, to supply electricity to the LED strip lights. Ensure that you have restored the power at the circuit breaker panel.
2. Check for proper illumination: Observe the LED strip lights to ensure that they are illuminating as expected. Pay attention to any areas where the lights might be dim or not functioning properly. This will help identify any potential connectivity issues or defective sections.
3. Inspect the lighting quality: Evaluate the overall lighting quality and assess whether it meets your desired level of brightness and ambiance. Consider factors such as the color temperature, intensity, and distribution of light. Make adjustments if needed to achieve the desired lighting effect.
4. Look for any flickering or unevenness: Watch for any flickering or inconsistent illumination along the LED strip lights. This can indicate a loose connection, faulty wiring, or a lower quality power source. If you notice any flickering or unevenness, double-check the wiring and connections to rectify the issue.
5. Make necessary adjustments: If you’re not satisfied with the positioning or alignment of the LED strip lights, you can make adjustments accordingly. Gently reposition the lights or secure them more firmly to achieve a straight and uniform appearance. You can also trim or extend the lights if needed to fit the space precisely.
6. Ensure safety and compliance: During the testing phase, ensure that the lights do not emit excessive heat or cause any safety hazards. Inspect the surrounding area for any potential fire risks, such as flammable materials or objects in close proximity. Make sure to abide by safety guidelines and regulations to prevent any accidents.
7. Take note of any needed repairs or replacements: If you identify any sections of the LED strip lights that are not functioning or require repair, take note of them. This will allow you to address these issues promptly by replacing faulty sections or seeking professional assistance if needed.
By thoroughly testing the LED strip lights and making necessary adjustments, you can ensure their proper functioning and enhance the overall illumination of your space. Taking the time to evaluate the lighting quality, rectify any flickering or unevenness, and address any repairs or replacements, will result in a visually pleasing and functional under cabinet lighting installation.
Conceal and Secure the Wires
After installing and testing the LED strip lights, it’s important to conceal and secure the wires to create a clean and professional-looking under cabinet lighting setup. Concealing and securing the wires not only improves the aesthetics of the installation but also helps prevent any tripping hazards or accidental damage. Follow these steps to effectively conceal and secure the wires:
1. Determine the best route for the wires: Assess the layout of your cabinets and determine the most efficient and discreet route for the wires. Consider spaces behind or between cabinets, along the underside of shelves, or inside cable management accessories. Choose a path that keeps the wires hidden from view and minimizes their exposure.
2. Use cable management solutions: Utilize cable management solutions such as adhesive cable clips, cable raceways, or wire channels to neatly hold and conceal the wires. Secure these management solutions along the designated route, ensuring that they are securely adhered or mounted.
3. Secure the wires with tape or zip ties: As you route the wires through the chosen path, use tape or zip ties to keep them in place. Avoid over-tightening zip ties to prevent damaging the wires. Use small pieces of tape at regular intervals to secure the wires to the cable management solutions or the underside of the cabinets.
4. Be mindful of spacing and organization: Ensure that the wires are arranged in a neat and organized manner. Avoid any excessive clumping or tangles that can lead to difficulties in future maintenance or adjustments.
5. Consider using wire channels: If you prefer a more concealed and streamlined approach, consider using wire channels that are specifically designed for wire management. These channels can be easily attached to the underside of the cabinets, offering a seamless hideaway for the wires while maintaining a clean and professional appearance.
6. Opt for wire concealment methods: If you desire a more discrete wire concealment, explore options such as installing a false bottom or a trim piece along the bottom edge of the cabinets. These methods can create a hidden pathway for the wires and make them virtually invisible.
7. Test functionality after wire concealment: Once the wires have been concealed and secured, double-check the functionality of the LED strip lights. Ensure that the wires are not pinched or obstructed in any way that may impact the performance of the lights.
By taking the time to properly conceal and secure the wires, you can achieve a clean and professional-looking installation of your under cabinet string lights. Concealing the wires not only enhances the overall aesthetics of the space but also minimizes potential hazards and ensures the longevity of the lighting system.
Finalize the Installation
As you near the completion of installing your under cabinet string lights, it’s time to finalize the installation and ensure that everything is in place for long-term functionality and enjoyment. Follow these steps to wrap up the installation:
1. Perform a thorough inspection: Take a step back and conduct a thorough inspection of the entire installation. Check for any loose connections, exposed wires, or areas that require adjustments. Address any issues promptly to ensure a safe and reliable lighting setup.
2. Secure any loose mounting clips or fixtures: If you notice any mounting clips or fixtures that appear loose or unstable, secure them properly. Use screws or adhesive reinforcement as needed to ensure that all elements of the installation are secure.
3. Trim any excess wires: If you have any excess wire length that is not concealed or secured, carefully trim it to an appropriate length. Leave a bit of extra slack to allow for future adjustments or maintenance, but avoid excessive lengths that may become tangled or cause clutter.
4. Clean up and organize the area: Clear away any installation debris, such as packaging materials or excess tape, to leave the area clean and tidy. Organize any tools or materials that were used, ensuring they are safely stored away.
5. Connect to a switch (if desired): If you prefer to control your under cabinet lights with a switch, you can install a switch between the power source and the LED strip lights. This will allow you to easily turn the lights on or off without relying on the power source alone.
6. Consider adding a dimmer (optional): For added convenience and ambiance, you may choose to install a dimmer switch for your under cabinet lights. This will allow you to adjust the brightness level to suit different tasks or moods.
7. Enjoy your newly installed under cabinet lighting: With the installation finalized, it’s time to enjoy the enhanced ambiance and functionality of your space. Turn on the lights and appreciate the beautiful illumination they bring to your kitchen or workspace. Make any further adjustments to the lighting positioning or brightness as desired.
By following these steps to finalize the installation, you can ensure that your under cabinet string lights are securely in place and ready to be enjoyed. Taking the time to inspect, secure, trim, and organize will result in a professionally finished setup that enhances your space and illuminates your tasks.
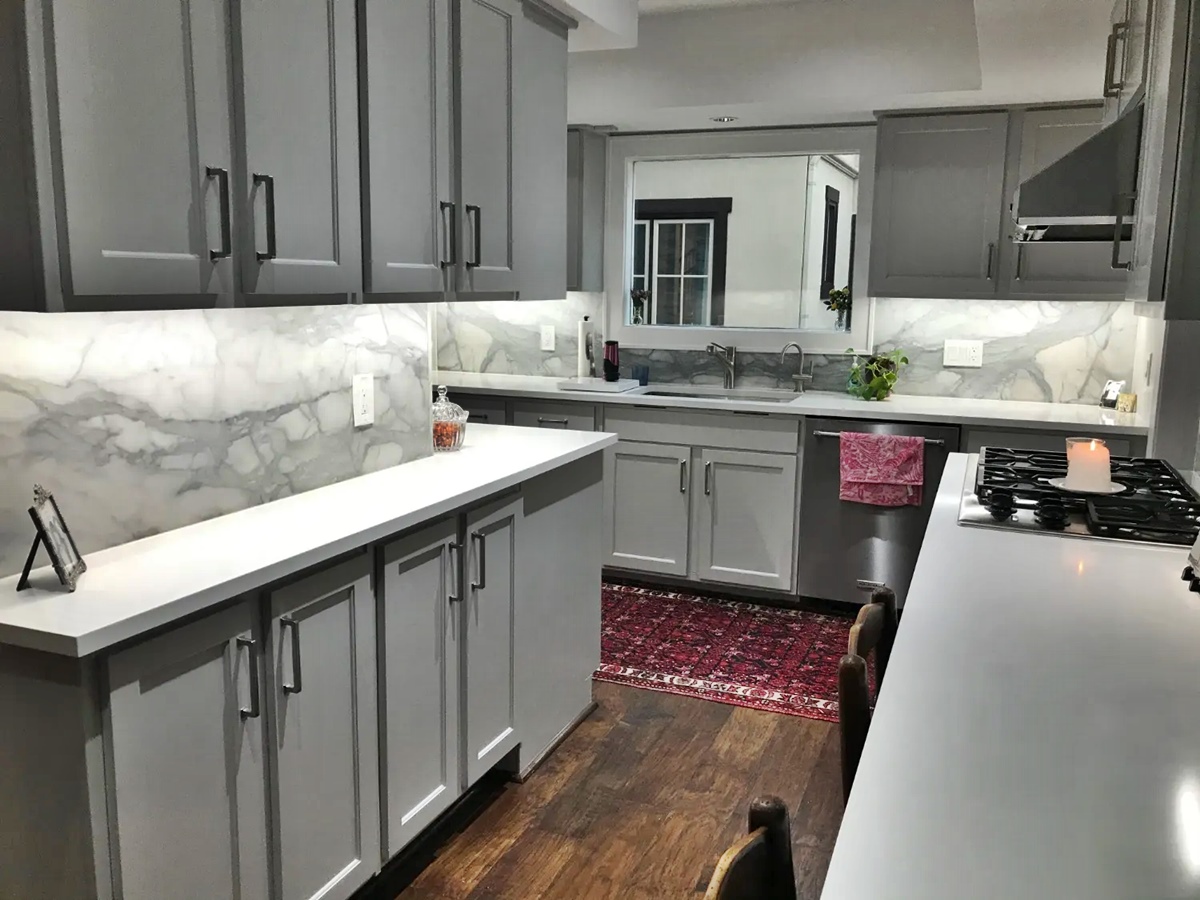
Enjoy Your New Under Cabinet Lighting!
Congratulations on successfully installing your under cabinet lighting! Now it’s time to sit back, relax, and enjoy the wonderful ambiance and functionality that your new lighting brings to your space. Here are a few things to keep in mind as you bask in the glow of your newly installed lights:
1. Experience enhanced visibility: With the addition of under cabinet lighting, you’ll enjoy improved visibility while working on your kitchen countertops or in your workspace. The targeted illumination will help you see clearly and perform tasks with greater ease and accuracy.
2. Create a welcoming atmosphere: The soft glow of the under cabinet lights can add a warm and inviting ambiance to your kitchen or workspace. Whether you’re cooking a meal, doing office work, or simply spending time in the room, the lighting will create a cozy and welcoming environment.
3. Showcase your décor: Under cabinet lighting not only provides functional illumination but also acts as a decorative element. The lights can highlight your beautiful countertops, backsplash, or kitchen décor, adding depth and dimension to the space.
4. Customize your lighting experience: If you installed a dimmer switch, take advantage of the ability to adjust the brightness level of your under cabinet lights. Customize the lighting to suit the task at hand or the mood you wish to create, allowing for versatility and flexibility.
5. Save energy with LEDs: LED strip lights are energy-efficient, consuming less electricity compared to traditional lighting options. Enjoy the benefits of long-lasting and energy-saving lighting, reducing your environmental footprint while enjoying a well-lit space.
6. Maintain and clean your lights: To ensure the longevity and optimal performance of your under cabinet lights, it’s important to regularly clean them. Use a soft, microfiber cloth to remove any dust or debris that may accumulate on the surface of the lights. Avoid using harsh cleaning agents that could damage the lights.
7. Call for professional assistance if needed: If you encounter any issues or require further assistance with your under cabinet lighting, don’t hesitate to call a professional electrician or lighting specialist. They can provide expert guidance and service to help resolve any problems or make improvements to your installation.
Now that your under cabinet lighting is installed and ready to use, take a moment to appreciate the transformation it brings to your space. Enjoy the enhanced functionality, cozy ambiance, and visual appeal that your new lights provide. Let your under cabinet lighting be a source of joy and inspiration as you tackle everyday tasks or spend time in your kitchen or workspace.