
What is a Tray Ceiling?
A tray ceiling, also known as an inverted or recessed ceiling, is a unique architectural feature that adds depth and visual interest to a room. It features a center section that is higher than the surrounding perimeter, creating a tray-like shape. This design element can elevate the look of any space, adding a touch of elegance and sophistication.
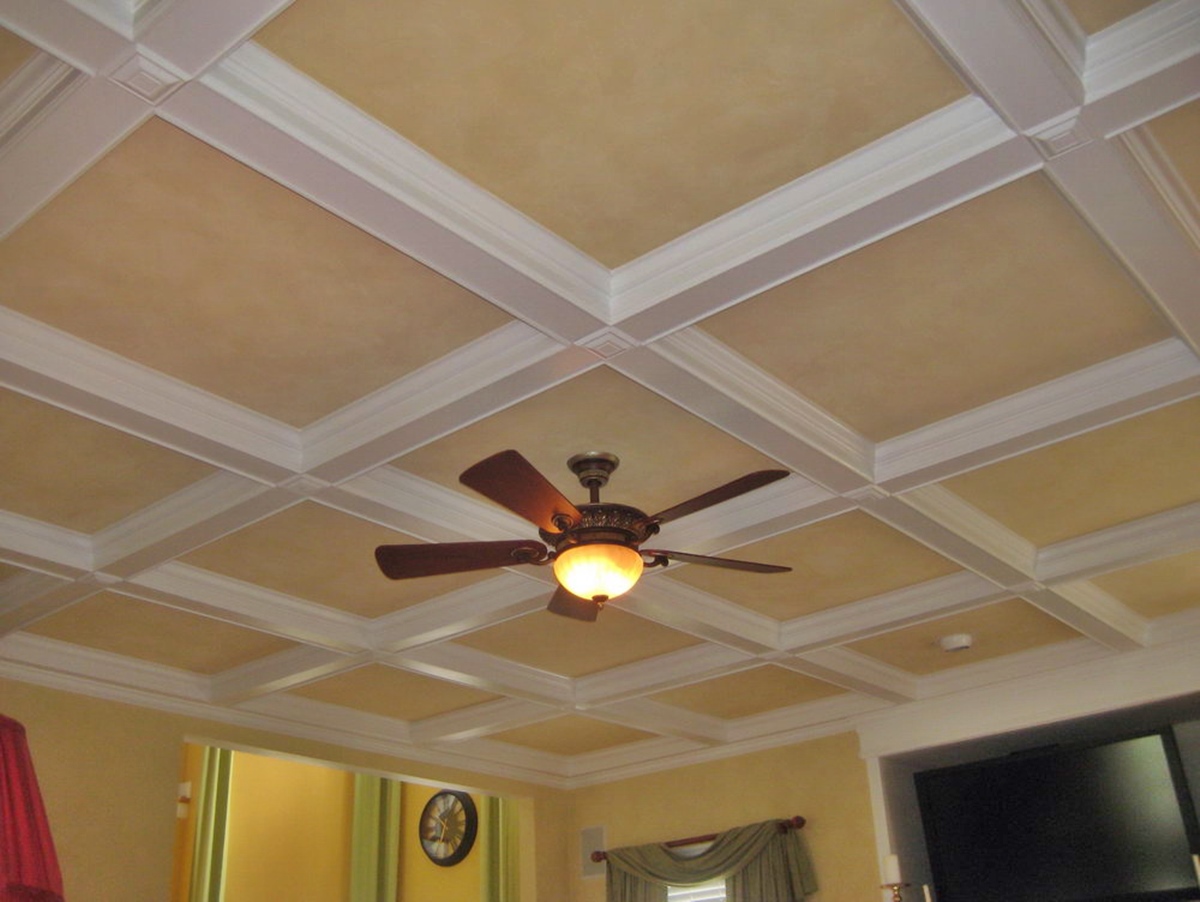
Tray ceilings are characterized by their stepped or sloping appearance, creating a sense of added height and depth. The center section of the ceiling is often painted in a different color or adorned with decorative molding to accentuate the tray effect, while the perimeter is usually painted in a complementary shade.
One of the advantages of tray ceilings is their versatility. They can be incorporated into almost any room, from bedrooms and living rooms to dining areas and entryways. Not only do they enhance the aesthetic appeal of a space, but they also provide an opportunity to introduce different lighting options. By adding recessed lights, pendant fixtures, or even a chandelier, you can create a stunning focal point that draws attention to the unique architecture of the tray ceiling.
In addition to their visual appeal, tray ceilings can also serve a practical purpose. The elevated center section allows for better air circulation and can help make a room feel more spacious. They can also be an effective way to hide structural elements such as plumbing or wiring, adding a seamless and polished look to your interior design.
Tray ceilings can be customized to suit your personal style and the overall aesthetic of your home. Whether you prefer a modern and minimalist design or a more traditional and ornate look, there are endless possibilities to explore. From simple and clean lines to intricate moldings and detailing, you can create a tray ceiling that perfectly complements the ambiance of your space.
Overall, a tray ceiling is a stunning architectural feature that can transform any room. It provides a unique and sophisticated look, enhances lighting options, and adds depth and character to your home. Whether you are renovating an existing space or building a new home, consider incorporating a tray ceiling to elevate your interior design to the next level.
Choosing the Right Location for a Tray Ceiling
Choosing the right location for a tray ceiling is crucial to ensure that it enhances the overall design and functionality of your space. Here are some key factors to consider when deciding where to install a tray ceiling:
- Room Size and Shape: Evaluate the size and shape of the room to determine if a tray ceiling will be proportionate and visually appealing. Larger rooms with high ceilings are ideal candidates for tray ceilings as they can create a grand and dramatic effect. However, smaller rooms can also benefit from tray ceilings as they can make the space feel more open and spacious.
- Room Function: Consider the function of the room when selecting the location for a tray ceiling. For instance, a tray ceiling in a bedroom can create a luxurious and tranquil atmosphere, while a tray ceiling in a dining room can add a touch of elegance and sophistication.
- Architectural Style: Take into account the architectural style of your home when choosing the location for a tray ceiling. The tray ceiling should be complementary to the overall design aesthetic and seamlessly integrate with the existing architectural elements.
- Structural Considerations: Before finalizing the location, it is essential to consult with a professional contractor or structural engineer to ensure that the chosen area can support the additional weight of the tray ceiling. They will also assess the feasibility of incorporating lighting fixtures and any necessary modifications.
- Adjacent Walls: Analyze the adjacent walls to determine how the tray ceiling will interact with them. Consider if there are any existing architectural features, such as windows or doors, that may impact the design and placement of the tray ceiling.
By carefully considering these factors, you can select the ideal location for your tray ceiling. Keep in mind that a well-placed tray ceiling can enhance the overall aesthetics and functionality of your space, creating a visually stunning and harmonious environment for you to enjoy.
Planning and Measurements
Proper planning and accurate measurements are crucial when installing a tray ceiling to ensure a smooth and successful project. Here are the key steps to consider in the planning and measurement phase:
- Design Considerations: Determine the design and shape of your tray ceiling. Popular options include rectangular, square, or even curved tray ceilings. Take into account the overall aesthetic of the room and architectural style of your home.
- Height Calculation: Measure the ceiling height to determine the desired height difference between the center section and the perimeter. This will help create the desired tray effect. Consider the room’s proportions and ceiling clearance when deciding on the height difference.
- Measuring the Room: Measure the dimensions of the room, including the length, width, and height. This will help you calculate how much framing material, drywall, and other supplies you will need for the project.
- Locating joists and utilities: Identify the location of ceiling joists and any utilities, such as wiring or plumbing, that may be running through the ceiling. This information will help you determine where to install the framing for the tray ceiling and avoid any obstructions.
- Creating a Blueprint: Create a detailed blueprint of your tray ceiling design, including the dimensions and measurements. This will serve as a guide throughout the installation process and help you stay organized.
- Acquiring Permits: Check with your local building department to determine if any permits or approvals are required for installing a tray ceiling. Adhering to local building codes is essential to ensure a safe and compliant installation.
- Consulting Professionals: If you’re unsure about any aspect of the planning or measurement process, it’s advisable to consult with a professional contractor or architect. They can provide expert guidance and ensure that your tray ceiling installation is done correctly.
Remember, accurate planning and measurements are essential to ensure a seamless and successful tray ceiling installation. Take your time during this phase to make sure all the details are properly accounted for. By doing so, you’ll be well-prepared for the next steps in the project and create a stunning tray ceiling that adds beauty and elegance to your space.
Materials and Tools Needed
Before you begin installing a tray ceiling, it’s essential to gather all the necessary materials and tools. Having everything on hand will streamline the installation process and ensure efficient progress. Here’s a list of the materials and tools you’ll likely need:
Materials:
- Lumber: Purchase high-quality lumber to create the framing for your tray ceiling. The exact amount will depend on the dimensions of your tray ceiling design.
- Drywall Sheets: Invest in enough drywall sheets to cover the entire tray ceiling area. Opt for standard-sized sheets that are easy to handle and install.
- Screws: Get a sufficient quantity of drywall screws to secure the drywall sheets to the framing. Choose screws that are specifically designed for drywall installation.
- Joint Compound: Purchase joint compound or drywall mud to fill in the seams and joints between the drywall sheets. This will create a smooth and seamless surface.
- Sanding Paper: Invest in sanding paper with different grits to sand down any rough areas and achieve a smooth finish on the drywall.
- Primer: Choose a high-quality primer to prepare the drywall surface for painting. The primer will help the paint adhere better and create a professional-looking finish.
- Paint: Select the color or colors you want for your tray ceiling and purchase enough paint to cover the entire surface. Consider using different colors for the center section and the perimeter to highlight the tray effect.
- Molding: If desired, purchase decorative moldings to enhance the overall design of your tray ceiling. This can add an extra touch of elegance and sophistication.
- Lighting Fixtures: Choose lighting fixtures that complement your tray ceiling design. Recessed lights and pendant fixtures are popular choices for tray ceilings.
Tools:
- Tape Measure: Use a tape measure to accurately measure the dimensions of the room and the tray ceiling design.
- Level: Ensure your tray ceiling is level by using a spirit level or laser level during the installation process.
- Screwdriver or Drill: Use a screwdriver or drill to secure the lumber framing and attach the drywall to the ceiling.
- Miter Saw: If you plan on installing decorative moldings, a miter saw will come in handy for making precise angled cuts.
- Sanding Block: Use a sanding block or sanding pole to smooth out any imperfections on the drywall surface.
- Paintbrushes/Rollers: Depending on your preference, use paintbrushes or paint rollers to apply the primer and paint to the tray ceiling.
Make sure to gather all the necessary materials and tools before starting your tray ceiling installation. This will save you time and effort, ensuring a more efficient and smooth process. With everything prepared, you’ll be well-equipped to create a beautiful and visually appealing tray ceiling in your space.
Removing Existing Ceiling
Before you can start installing a tray ceiling, you will need to remove the existing ceiling in the designated area. Here are the steps to follow when removing the existing ceiling:
- Prepare the workspace: Clear the room of any furniture, fixtures, or belongings that could obstruct your work area. Lay down protective coverings on the floor to catch debris and prevent damage.
- Turn off electricity: Before removing the ceiling, ensure that the power to any lighting fixtures or electrical outlets in the area is turned off to avoid any potential hazards.
- Wear safety gear: Put on safety goggles, gloves, and a dust mask to protect yourself from falling debris and dust particles.
- Locate and remove light fixtures: Carefully remove any light fixtures or ceiling fans attached to the existing ceiling. Disconnect the electrical wiring and set the fixtures aside for reinstallation later.
- Remove any trim: Using a pry bar or a crowbar, gently remove any trim or molding present along the edges of the ceiling. Take care not to damage the walls or adjacent surfaces while doing so.
- Start removing the ceiling: Begin at one corner of the room and use a hammer or a reciprocating saw to create an opening in the existing ceiling. Work your way across the ceiling, cutting or prying away the drywall or plaster panels. Take caution to avoid damaging any structural elements or electrical wiring in the process.
- Dispose of the debris: Place the removed ceiling materials into trash bags or containers. Ensure proper disposal according to local regulations, or consider recycling if possible.
- Inspect the structural condition: After removing the existing ceiling, inspect the exposed area for any signs of damage, such as water stains, cracks, or sagging. Address any structural issues before proceeding with the installation of the tray ceiling.
- Clean the workspace: Thoroughly clean the workspace, removing any dust, debris, or remnants from the removed ceiling. This will ensure a clean and smooth surface for the installation of the new tray ceiling.
Removing the existing ceiling is a crucial step in the process of installing a tray ceiling. By following these steps carefully, you can ensure a safe and efficient removal process, setting the stage for the next stages of installing your new tray ceiling.
Installing a Frame for the Tray Ceiling
Once you have removed the existing ceiling, the next step in installing a tray ceiling is to construct a frame that will serve as the foundation for the new ceiling design. Here is a step-by-step guide on how to install a frame for your tray ceiling:
- Measure and mark the perimeter: Use a tape measure and pencil to mark the desired width and shape of the tray ceiling around the room’s perimeter. This will serve as a guide for the placement of the frame.
- Identify the framing support: Locate the ceiling joists in the area where the tray ceiling will be installed. Use a stud finder or knock on the ceiling to identify the position of the joists. This is where the frame will be attached for added stability and support.
- Install the top plate: Cut lengths of lumber to match the marked perimeter, and attach them directly to the ceiling joists using screws or nails. This will serve as the top plate of the frame, providing a secure connection to the ceiling structure.
- Create the vertical supports: Measure and cut additional lengths of lumber to the desired height of the tray ceiling. Attach these vertical supports to the top plate at even intervals, ensuring they are plumb and securely fastened.
- Attach the bottom plate: Measure and cut lengths of lumber to match the width and shape of the tray ceiling’s bottom section. Attach these pieces to the lower ends of the vertical supports, forming the bottom plate of the frame.
- Add cross supports: Depending on the size and shape of your tray ceiling, you may need to install additional cross supports between the vertical supports. This will add extra stability and prevent any sagging or warping in the frame.
- Check for level and alignment: Use a level to ensure that the frame is level and aligned with your markings along the perimeter. Make any adjustments as necessary before proceeding.
- Secure the frame: Once the frame is properly aligned, secure all connections with screws, ensuring a sturdy and stable frame structure.
It is important to note that the construction of the frame may vary depending on the specific design of your tray ceiling. Additional steps or modifications may be necessary to accommodate different shapes or features. Consulting with a professional contractor or structural engineer is recommended to ensure that the frame is built to code and capable of supporting the weight of the tray ceiling.
By following these steps and creating a solid frame for your tray ceiling, you will establish a strong foundation for the rest of the installation process. A well-constructed frame will ensure a secure and visually pleasing tray ceiling that enhances the overall design of your space.
Installing the Ceiling Beams
Once the frame for the tray ceiling is in place, the next step is to install the ceiling beams. These beams will create the distinct stepped or sloping effect that gives the tray ceiling its unique and visually appealing look. Here is a step-by-step guide on how to install the ceiling beams:
- Measure and mark the beam placement: Determine the desired spacing and placement of the ceiling beams within the tray ceiling. Use a tape measure and pencil to mark the locations on both the top plate and the bottom plate of the frame.
- Prepare the beams: Measure and cut lengths of lumber to match the width of the tray ceiling’s step or slope. Ensure the beams are straight and free from any imperfections.
- Install the first beam: Begin by attaching the first beam at one end of the tray ceiling. Use screws or nails to secure the beam to the top plate and the bottom plate of the frame, ensuring that it is level and aligned with the marked position.
- Continue with additional beams: Install the remaining beams along the marked positions at equal intervals, keeping them level and aligned with the frame. Use a level to double-check the alignment of each beam before securing it.
- Attach the beams to the vertical supports: To provide additional stability, secure the beams to the vertical supports of the frame using screws or nails. This will prevent any potential movement or sagging over time.
- Consider decorative details: If desired, add decorative molding or trim to the edges of the beams to enhance the visual appeal of the tray ceiling. This can be achieved by mitering the corners and attaching the molding with adhesive or finishing nails.
- Check for alignment and stability: Once all the beams are installed, check for any discrepancies in alignment or stability. Make any necessary adjustments to ensure that the beams are straight, level, and securely fastened.
Accuracy and attention to detail are key when installing the ceiling beams for your tray ceiling. Take your time to measure and align each beam properly, ensuring a uniform and visually pleasing appearance. Remember to consult with a professional if you have any concerns or questions during the installation process.
By following these steps and installing the ceiling beams correctly, you will bring the tray ceiling design to life, adding depth and character to your space. The beams will not only enhance the aesthetic appeal but also provide structural support, ensuring the longevity and durability of your tray ceiling.
Choosing the Tray Ceiling Design
Choosing the design for your tray ceiling is an exciting step in the installation process, as it allows you to personalize the look and feel of your space. Here are some factors to consider when selecting the tray ceiling design:
- Room Style: Take into account the overall style and theme of the room. Consider whether you want a modern, traditional, or transitional design for your tray ceiling.
- Ceiling Height: Consider the height of your ceiling and how it will impact the design. Higher ceilings may allow for more elaborate and intricate tray ceiling designs, while lower ceilings may benefit from simpler and more streamlined options.
- Shape: Explore different shapes for your tray ceiling, such as rectangular, square, or curved. The shape will influence the overall aesthetic and visual impact of the tray ceiling.
- Molding and Detailing: Determine whether you want to incorporate decorative moldings or trim in your tray ceiling design. These can add depth, texture, and visual interest to the overall look.
- Lighting Options: Consider the lighting options that will be integrated into the tray ceiling. Recessed lights, pendant fixtures, or even a chandelier can enhance the ambiance and create a focal point within the tray ceiling.
- Paint or Finish: Choose the color scheme or finish for your tray ceiling. Consider using contrasting colors to highlight the tray effect, or opt for a monochromatic look that blends seamlessly with the overall room design.
- Contrast or Blend: Decide whether you want your tray ceiling to make a bold statement as a contrasting element or blend harmoniously with the rest of the room’s design elements.
- Budget and Time: Take into consideration your budget and the amount of time you have for the tray ceiling installation. More complex designs may require additional materials and labor, so it’s important to plan accordingly.
It’s also helpful to gather inspiration from design magazines, online resources, or even professional interior designers. Look for tray ceiling designs that resonate with your personal style and complement the overall aesthetic of your home.
Remember that the ultimate goal is to choose a tray ceiling design that enhances the beauty and character of your space. Whether you opt for a minimalist and sleek design or a more ornate and intricate style, your tray ceiling will surely become a stunning focal point that elevates the ambiance of your room.
Adding Lighting Fixtures
Integrating lighting fixtures into your tray ceiling design is a key step that can truly enhance its visual impact and functionality. Properly placed lights can create a stunning ambiance, highlight architectural details, and add a touch of sophistication to your space. Here’s a guide on how to add lighting fixtures to your tray ceiling:
- Plan the lighting layout: Consider the size and shape of your tray ceiling to determine the best placement for the lighting fixtures. Assess the areas where you want to create focal points or highlight specific features of the tray ceiling.
- Choose the right lighting options: Select the type of lighting fixtures that suit your design and functional needs. Recessed lights, also known as can lights, are a popular choice for tray ceilings. Pendant lights or a stylish chandelier can also add a dramatic effect.
- Calculate the number of fixtures: Determine the number of lighting fixtures needed based on the size of the tray ceiling. Consider the desired level of illumination, the wattage of the bulbs, and the spacing between each fixture.
- Consult an electrician: If you’re not experienced with electrical work, it’s best to consult a licensed electrician to ensure safe and proper installation. They will help with wiring and connecting the light fixtures to a power source.
- Install junction boxes: Junction boxes are electrical enclosures that house the wiring connections for the light fixtures. Install them at the desired locations on the ceiling beams or within the frame of the tray ceiling.
- Wire the lighting fixtures: Connect the wiring from the junction boxes to the light fixtures, following the manufacturer’s instructions. Take extra precautions to secure wiring and prevent any loose connections.
- Mount and secure the fixtures: Install the lighting fixtures according to the manufacturer’s guidelines, ensuring they are properly aligned and securely attached to the ceiling beams or frame. Confirm that they are level and centered with the design of your tray ceiling.
- Consider dimming options: To create different moods or adjust the lighting intensity, consider adding dimmer switches to control the brightness of your tray ceiling lights. This can provide flexibility and customization to suit various occasions.
- Test and adjust the lighting: After installation, test each lighting fixture to ensure they are functioning properly and emitting the desired amount of light. Make any necessary adjustments or repositioning to achieve the desired lighting effect.
Adding lighting fixtures to your tray ceiling is an opportunity to showcase the architectural beauty and design of your space. From subtle and cozy lighting to dramatic and statement-making fixtures, the right lighting choices can truly transform the ambiance and elevate the overall aesthetics of your tray ceiling.
Remember, safety should always be a priority when working with electrical components. If you’re unsure about any aspect of the installation process, it’s recommended to seek professional assistance from a qualified electrician to ensure a safe and successful outcome.
Installing Drywall on the Tray Ceiling
Once the framing and lighting fixtures are in place, the next step in installing a tray ceiling is to cover it with drywall to create a smooth and seamless surface. Here is a step-by-step guide on how to install drywall on the tray ceiling:
- Measure the tray ceiling: Measure the dimensions of the tray ceiling to determine the size of the drywall sheets needed. Take into account any cutouts required for lighting fixtures or other features.
- Cut the drywall sheets: Use a utility knife or a drywall saw to cut the drywall sheets to the appropriate size and shape. Take accurate measurements and ensure clean and straight cuts.
- Attach the drywall to the frame: Begin by applying a layer of construction adhesive along the framing or ceiling beams to provide extra adhesion for the drywall. Then, secure the drywall sheets to the frame using drywall screws, making sure they are evenly spaced and flush with the frame.
- Tape the joints: Apply drywall joint tape over the seams between the drywall sheets, pressing it firmly into place. This will help provide a smooth and seamless appearance once the drywall is finished.
- Apply joint compound: Use a trowel to apply joint compound over the taped joints, covering the tape completely. Feather the edges of the compound to create a smooth transition between the joint and the drywall surface.
- Allow the compound to dry: Give the joint compound sufficient time to dry according to the manufacturer’s instructions. This will usually take at least 24 hours, although it may take longer in humid or cold conditions.
- Sand and smooth the surface: Once the joint compound is dry, use sandpaper or a sanding block to smooth out any imperfections or roughness on the surface of the drywall. Be careful not to sand too aggressively to avoid damaging the drywall or the joint compound.
- Apply additional coats of joint compound (optional): If necessary, apply additional coats of joint compound to further smooth out the surface and achieve a seamless finish. Repeat the drying and sanding process between each coat until the desired result is achieved.
It’s important to note that installing drywall on a tray ceiling may require additional care and attention due to its unique shape and design. Take your time to ensure that the drywall is properly aligned and secured to create a polished and professional-looking result. If you’re uncertain or inexperienced in drywall installation, it may be beneficial to seek the assistance of a professional contractor to ensure a high-quality finish.
By following these steps and properly installing the drywall on your tray ceiling, you will bring your vision to life and create a seamless and visually appealing surface. The drywall serves as the foundation for the next steps, bringing you closer to the completion of your tray ceiling installation.
Sanding and Priming the Ceiling
After installing the drywall on your tray ceiling, the next important step is to sand and prime the surface to achieve a smooth and ready-to-paint finish. This process will ensure that your tray ceiling looks polished and professional. Here’s a step-by-step guide on how to sand and prime the ceiling:
- Prepare the workspace: Clear the room of any furniture or debris, and cover the flooring and surrounding areas with drop cloths or protective sheeting to catch any dust or paint splatters.
- Safety first: Wear protective goggles, a dust mask, and gloves to protect yourself from dust and particulates released during the sanding process.
- Sanding the drywall: Use a sanding block or a drywall sander to smooth the surface of the drywall. Work in a circular motion or in long, even strokes, focusing on any rough patches, seams, or imperfections. Be careful not to oversand, as this may damage the drywall or joint compound.
- Clean the surface: Use a dry cloth or a vacuum with a brush attachment to remove any sanding dust from the surface. Ensure that the tray ceiling is completely free from debris before priming.
- Applying primer: Use a high-quality primer specifically designed for drywall surfaces. Apply a thin, even coat of primer over the entire tray ceiling using a paintbrush or a roller. Pay attention to corners, edges, and joints to ensure adequate coverage.
- Allow the primer to dry: Follow the manufacturer’s instructions for the drying time of the primer. Typically, it will take a few hours for the primer to dry completely. Ensure good ventilation in the room during this process.
- Inspect the primed surface: Once the primer is dry, inspect the tray ceiling for any areas that may require additional priming or touch-ups. Address any imperfections by applying a second coat of primer as needed.
- Sand again (optional): If you notice any rough spots or surface irregularities after priming, lightly sand the primed surface with fine-grit sandpaper to achieve an even smoother finish.
- Clean the surface (again): After sanding, clean the surface once more to remove any sanding dust or debris. This will ensure a clean and debris-free surface for the final painting stage.
By carefully sanding and priming the tray ceiling, you create a smooth and well-prepared surface for the final coat of paint. This process helps to ensure that the paint adheres properly and provides an even and professional finish. Take your time during this step to achieve the best results, paying attention to detail to create a flawless and visually pleasing tray ceiling.
Remember, proper ventilation and safety precautions are important during sanding and priming. It’s also advisable to follow the manufacturer’s instructions on the specific products being used for best results. With the surface primed and ready, you’re one step closer to completing your tray ceiling installation.
Painting the Tray Ceiling
After sanding and priming the tray ceiling, it’s time to bring it to life with a fresh coat of paint. Painting is the final step in the tray ceiling installation process and will add the desired color and finish to complete the look of your space. Here’s a step-by-step guide on how to paint your tray ceiling:
- Choose the paint: Select a high-quality paint that is specifically formulated for ceilings. Consider the desired color, finish, and any specific requirements based on the type of tray ceiling you have.
- Prepare the room: Cover the floors and furniture with drop cloths or plastic sheeting to protect them from paint splatters. Use painter’s tape to mask off any areas where the ceiling meets the walls or other surfaces.
- Stir the paint: Stir the paint thoroughly with a paint stirrer or a stirring stick to ensure that the color is consistent and any settling is mixed back in.
- Cutting-in: Use a paintbrush to carefully cut-in along the edges of the tray ceiling, applying paint to the areas that cannot be reached with a roller. Take your time to create clean and precise lines.
- Rolling the paint: Use a roller with a medium nap to apply the paint to the larger, open areas of the tray ceiling. Apply the paint in smooth, even strokes, working in sections to maintain a wet edge and avoid visible roller marks.
- Multiple coats: Depending on the color and type of paint you have chosen, you might need multiple coats for full coverage. Follow the manufacturer’s instructions regarding drying times between each coat.
- Drying and touch-ups: Allow the paint to dry completely according to the manufacturer’s instructions. Inspect the tray ceiling for any areas that may require touch-ups or additional coats of paint. Address any imperfections promptly for a seamless finish.
- Remove painter’s tape: Once the paint is completely dry, carefully remove the painter’s tape from the edges. Pull the tape away at a 45-degree angle to ensure a clean line.
- Clean up: Clean your paintbrushes, roller, and any other painting tools thoroughly with water or the appropriate solvent. Remove drop cloths or plastic coverings and return the room to its original setup.
When painting a tray ceiling, take your time and approach it with care for the best result. A well-painted tray ceiling can add depth, character, and a sense of elegance to your space.
Remember to consider the overall design and aesthetic of the room when choosing the color and finish of the paint. Whether you opt for a bold and contrasting color or a subtle and complementary shade, painting your tray ceiling will provide the finishing touch that completes the look and feel of your space.
Enjoy the transformation as your tray ceiling becomes a captivating feature that enhances the overall ambiance and adds a touch of style to your room.
Adding Finishing Touches
Once the tray ceiling is painted and complete, it’s time to add the finishing touches to enhance its overall appearance and tie it into the design of your space. These final details can make a significant difference and elevate the tray ceiling to a new level. Here are some ideas on how to add those finishing touches:
- Molding and trim: Consider adding decorative molding or trim to the edges of the tray ceiling. This can create a more polished and refined look, accentuating the tray effect and adding an extra touch of elegance.
- Accent lighting: Install LED strip lights along the edges of the tray ceiling to create a soft and subtle glow. This ambient lighting can add depth and create a mesmerizing effect, especially in dimly lit environments.
- Ceiling medallion: If you have a pendant light or chandelier in the center of the tray ceiling, consider adding a ceiling medallion around it. This decorative element can serve as a focal point and enhance the overall grandeur of the space.
- Artwork or mural: Consider adding artwork or a mural directly on the tray ceiling. This unique customization can reflect your personal style and create a visually captivating focal point in the room.
- Contrasting paint or wallpaper: For an eye-catching look, consider using a contrasting paint color or wallpaper within the tray ceiling. This can create a striking visual contrast and make the tray ceiling even more prominent.
- Recessed shelves or niches: If your tray ceiling has ample depth, consider adding recessed shelves or niches. These can serve as functional or decorative elements, allowing you to display artwork, plants, or other decorative items.
- Crown molding: Install crown molding where the ceiling meets the walls to create a seamless transition between the tray ceiling and the rest of the room. This classic touch can add a touch of sophistication and elegance.
- Colored or textured ceiling paint: Experiment with different paint finishes or textures on the tray ceiling to add visual interest. This can involve using metallic paint, a textured finish, or even a faux finish for a unique and creative look.
These finishing touches allow you to personalize your tray ceiling and make it truly unique to your style and preferences. Customizing your tray ceiling will showcase your creativity and attention to detail, creating a captivating focal point and enhancing the overall atmosphere of your space.
Remember to balance the finishing touches with the rest of the room’s design to maintain harmony and cohesion. By carefully considering these subtle details, you can transform your tray ceiling into a statement piece that elevates the aesthetics and creates a stunning visual impact.