
Materials Needed
Before you embark on your candle holder decoration project, it’s important to gather all the necessary materials. Having everything ready will ensure a smooth and enjoyable crafting experience. Here are some essential materials you will need:
- Candle holders – choose the type and style that you want to decorate. Options include glass, ceramic, clay, wood, and metal.
- Paint – select acrylic paint in your preferred colors. Metallic and glitter paints are great for adding shimmer and shine.
- Brushes – have a variety of brush sizes on hand for different painting tasks. Fine-tipped brushes are useful for intricate designs.
- Markers or pens – if you prefer drawing or writing directly on the candle holder, permanent markers or paint pens are ideal.
- Adhesive – use strong glue or adhesive dots to secure any embellishments or accessories onto the candle holder.
- Ribbon or twine – add a decorative touch by incorporating ribbon or twine around the candle holder. Choose a color that complements your design.
- Decorative paper – for decoupage projects, gather patterned or tissue paper in various designs.
- Scissors – to cut out shapes, trim paper, or trim ribbon.
- Embellishments – consider using beads, gems, seashells, lace, feathers, or any other decorative elements that suit your chosen style.
- Protective spray or varnish – use a clear spray or varnish to protect and seal the finished decoration.
- Newspapers or protective covering – to protect your work area from paint splatters or glue spills.
These materials will provide you with a solid foundation to begin your candle holder decorating journey. Feel free to adapt the list based on your personal preferences and the specific techniques you plan to employ.
Choosing the Right Candle Holder
When it comes to decorating candle holders, selecting the right type of holder is essential. The choice of material and design will greatly impact the overall look and feel of your finished project. Here are some factors to consider when choosing the perfect candle holder:
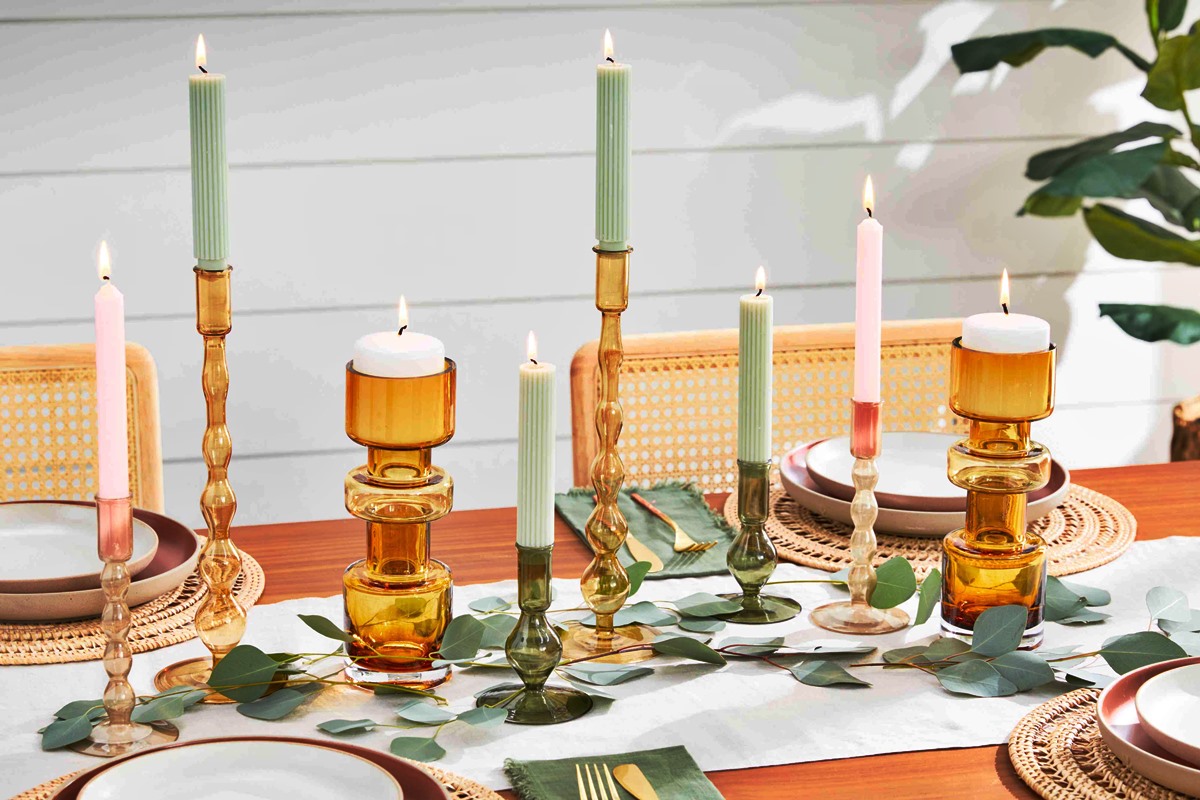
- Material: Candle holders come in a variety of materials such as glass, ceramic, clay, wood, and metal. Each material offers unique qualities and characteristics. Glass holders allow for beautiful light diffusion, while ceramic and clay provide a more rustic feel. Wood and metal can add a touch of natural or industrial elegance.
- Size and Shape: Consider the size and shape of the candle holder. Do you want a tall holder for pillar candles or a small one for tealights? Are you looking for a cylindrical shape or a more elaborate design? Think about how the size and shape will complement your chosen decorating style.
- Style: Reflect on the overall style and theme you want to achieve. Do you prefer a traditional, modern, bohemian, or vintage-inspired look? The style of the candle holder should harmonize with your overall aesthetic and the space where it will be displayed.
- Functionality: Consider the intended use of the candle holder. Will it be purely decorative, or will you also use it for lighting? Some holders come with built-in features like handles or hanging capabilities, offering versatility in how you display them.
- Budget: Keep your budget in mind when choosing a candle holder. There are options available at various price points, so you can find something that fits within your budget without compromising on style or quality.
Take your time in selecting the right candle holder. It is the foundation of your decoration project, and choosing wisely will make the entire process more enjoyable. Consider experimenting with different materials and styles to create unique and personalized designs that reflect your taste and personality.
Cleaning and Prepping the Candle Holder
To ensure the success of your candle holder decoration project, it is important to properly clean and prep the holder before you begin. This step will help remove any dirt, dust, or residue, allowing the decorations to adhere smoothly and last longer. Here’s how you can clean and prep your candle holder:
1. Gather your supplies: You will need a soft cloth, mild soap or dish detergent, warm water, and a sponge or brush for cleaning.
2. Remove any existing decorations: If the candle holder has any previous decorations or embellishments, carefully remove them. This will provide a clean surface for your new decoration.
3. Clean the surface: Fill a basin or sink with warm water and a small amount of mild soap or dish detergent. Gently dip the soft cloth or sponge into the soapy water and wring out excess moisture. Use the cloth to wipe down the entire surface of the candle holder, including the inside and outside. Pay special attention to any stubborn stains or residue. Rinse the cloth or sponge frequently and change the soapy water if needed.
4. Remove stubborn stains: For candle holders made of glass or ceramic, you can use a non-abrasive sponge or brush to scrub away any stubborn stains. Be sure to use gentle, circular motions to avoid scratching the surface. If the holder is made of wood or metal, simply continue wiping with the soapy cloth to remove any stains.
5. Dry thoroughly: After cleaning, rinse the candle holder with clean water to remove any soap residue. Use a soft, dry towel to dry the holder completely. Ensure that there is no moisture left, as it can affect the adhesion of the decorations.
6. Check for imperfections: Take a close look at the cleaned candle holder to check for any imperfections or rough edges. If you find any, use a fine-grit sandpaper to gently smooth them out. This step will ensure a seamless and professional-looking finished product.
By following these steps, you will have a clean and perfectly prepped candle holder ready for decoration. Taking the time to clean and prep your holder will result in a more professional finish and allow your creative ideas to shine through.
Painting and Decorating Glass Candle Holders
Glass candle holders provide a beautiful canvas for your creativity. With a few simple techniques and materials, you can transform a plain glass holder into a stunning decorative centerpiece. Here are some tips for painting and decorating glass candle holders:
1. Choose the right paint: Select acrylic paint specifically designed for glass surfaces. These paints are available in a wide range of colors and finishes, including matte, glossy, metallic, and even translucent options.
2. Clean the glass: Before painting, make sure the glass candle holder is clean and dry. Use rubbing alcohol to remove any traces of oil, dirt, or fingerprints. This step will ensure proper adhesion and a smooth finish.
3. Paint inside or outside: Decide whether you want to paint the inside or outside of the glass holder. Painting the inside will create a more durable finish, as the paint is protected from heat and external elements. Painting the outside allows for more intricate designs and details.
4. Apply multiple coats: For a vibrant and even color, apply multiple thin coats of paint. Allow each coat to dry completely before applying the next one. Thick layers of paint can lead to uneven coverage and longer drying times.
5. Use different techniques: Get creative with your painting techniques. Experiment with brushstrokes, sponge dabbing, or even creating patterns with stencils. You can also try blending different colors together for a stunning ombre effect.
6. Add details and embellishments: Once the base coat is dry, you can add additional details and embellishments to your glass candle holder. Use a smaller brush or paint pen to draw intricate designs or add patterns. Embellishments like rhinestones, beads, or ribbons can also be secured onto the holder with adhesive.
7. Consider glass etching: If you want a unique and elegant look, consider etching the glass. You can purchase glass etching cream and stencil designs to create a frosted or textured effect on the glass surface. Follow the instructions provided with the etching cream carefully.
8. Cure and protect the paint: After completing your design, allow the paint to cure for the recommended time. Some paints may require baking or air drying for a specific duration. Once cured, you can protect the paint by spraying a clear sealant or varnish over the glass holder.
With these tips in mind, you can unleash your creativity and transform a simple glass candle holder into a personalized work of art. Whether you prefer a bold and colorful design or an elegant and understated look, painting and decorating glass holders will add a touch of charm and uniqueness to your space.
Decorating Clay or Ceramic Candle Holders
Clay or ceramic candle holders offer a versatile and tactile surface for your creative endeavors. With a variety of decorative techniques, you can add texture, color, and personal flair to these holders. Here are some ideas for decorating clay or ceramic candle holders:
1. Paint and glaze: Use acrylic paints or ceramic glazes to add color and patterns to the surface of the holder. Ceramic glazes provide a glossy finish and are heat-resistant, making them ideal for candle holders. Apply the paint or glaze using brushes or sponge dabbing techniques for different effects.
2. Hand-painted designs: Get creative with hand-painted designs on the clay or ceramic surface. You can use fine-tip brushes or paint pens to draw intricate patterns, flowers, geometric shapes, or even personalized messages or names. Allow the paint to dry completely before moving on to the next step.
3. Textured surfaces: Enhance the visual appeal of your candle holder by adding textures. Use tools like stamps, textured rollers, or even everyday objects like lace or leaf imprints to create interesting designs on the clay or ceramic surface. Experiment with different techniques and let your imagination guide you.
4. Embossed details: Add a touch of elegance and dimension to your clay or ceramic holder by incorporating embossed details. Use embossing powder or embossing pens to create raised designs, patterns, or metallic accents. Heat the powder with a heat gun to set the embossing and achieve a textured effect.
5. Decals and transfers: Apply ceramic decals or transfers to your candle holder for a professional and intricate look. These pre-printed designs can be applied to the surface and then fired in the kiln to bond with the clay or ceramic. Choose from a wide range of patterns, images, or motifs to suit your desired aesthetic.
6. Mosaic or tile decoration: Create a mosaic effect by attaching small ceramic tiles or pieces of colored clay to the surface of the holder. Arrange the tiles in a pattern or create a random mosaic for a unique and eye-catching design. Secure the tiles with a strong adhesive and allow it to dry completely before use.
7. Glitter and metallic accents: Add a touch of sparkle with glitter or metallic accents. You can use glitter glue or metallic paint pens to create shiny details or highlights on your clay or ceramic candle holder. Be sure to seal the glitter or metallic accents with a clear sealant to prevent any shedding or fading.
Regardless of the technique you choose, clay or ceramic candle holders provide a wonderful opportunity to let your creativity shine. With these decorating ideas, you can transform a simple holder into a unique and visually appealing centerpiece that adds warmth and beauty to any space.
Decorating Wooden Candle Holders
Wooden candle holders offer a natural and rustic aesthetic that can be enhanced with various decorating techniques. Whether you have a plain wooden holder or want to revamp an existing one, there are several ways to add charm and character to these holders. Here are some ideas for decorating wooden candle holders:
1. Stain or paint: Enhance the natural beauty of the wood by staining or painting the holder. Choose a stain color that complements your décor or opt for a distressed look by applying multiple layers of different-colored stains. Alternatively, paint the holder with acrylic paint to match your desired color scheme.
2. Wood burning: Create intricate patterns and designs on the wooden holder with wood burning tools. Use different tips to achieve varying line thicknesses and shading effects. Wood burning adds a unique and personalized touch to the holder, making it a true work of art.
3. Decoupage: Decorate your wooden candle holder with decoupage, a technique that involves adhering decorative paper or fabric to the surface using a specialized glue or decoupage medium. Cut out desired patterns or images and carefully apply them to the holder. Once dried, seal the decoupage with a clear varnish for protection.
4. Wood carving: If you’re skilled in wood carving, consider carving intricate motifs or designs onto the wooden holder. This technique allows for beautifully detailed and textured decorations. Be sure to use appropriate carving tools and take your time to achieve the desired results.
5. Ribbon or twine: Add a touch of elegance by wrapping ribbon or twine around the wooden candle holder. Choose a ribbon that complements your décor and tie it in a bow or create an intricate design by winding twine around the holder. This simple yet effective technique can instantly transform the look of the holder.
6. Natural elements: Incorporate natural elements like twigs, bark, or dried flowers into the decoration of your wooden candle holder. Use strong glue to securely attach these elements to the holder, creating a unique and organic look. Ensure that any flammable materials are kept away from the candle flame.
7. Metallic accents: Add a touch of glamour by incorporating metallic accents onto the wooden holder. Use metallic paint or leafing to create shiny effects or add a metallic band or design around the holder. This can elevate the rustic charm of the wood and bring visual interest to the holder.
With these creative ideas, you can transform a simple wooden candle holder into a captivating centerpiece. Whether you prefer a rustic, bohemian, or modern look, decorating wooden holders offers endless possibilities to showcase your personal style and enhance the ambiance of any space.
Decorating Metal Candle Holders
Metal candle holders provide a sleek and modern aesthetic that can be enhanced with various decorating techniques. Whether you have a plain metal holder or want to revamp an existing one, there are several ways to add personality and style to these holders. Here are some ideas for decorating metal candle holders:
1. Spray paint: Transform the look of your metal candle holder by giving it a fresh coat of spray paint. Choose a color that complements your décor or opt for metallic paint for a sleek and modern finish. Ensure that the paint is suitable for metal surfaces and follow the instructions carefully for the best results.
2. Embossing: Add dimension and texture to your metal candle holder by embossing it with decorative designs. Use embossing tools and stencils to create patterns or motifs on the metal surface. The raised designs can be left as is for a subtle effect or highlighted with metallic or patina finishes.
3. Etching: Create an elegant and intricate look by etching designs on the metal surface of the candle holder. You can use etching cream and stencils to achieve beautiful frosted or textured effects. Follow the instructions provided with the etching cream carefully and wear protective gloves throughout the process.
4. Decoupage: Decorate your metal candle holder with decoupage using decorative paper or fabric. Cut out desired patterns or images and adhere them to the surface using decoupage glue or medium. Once dried, seal the decoupage with a clear varnish for protection. This technique allows for endless design possibilities and can add a unique touch to your metal holder.
5. Beading or wire wrapping: Add a touch of elegance and intricacy by incorporating beads or wire wrapping into your metal candle holder design. Use jewelry wire to wrap beads around the holder or to create decorative patterns. This technique adds a beautiful accent and can create a luxurious and eye-catching display.
6. Metal stamping: Personalize your metal candle holder by stamping it with letters, numbers, or small designs. Use metal stamps and a hammer to imprint your desired pattern onto the surface of the holder. This technique allows for customization and can create a unique and meaningful piece.
7. Metallic accents: Highlight the beauty of the metal candle holder by adding metallic accents. Use metallic paints or leafing to create shiny effects on the surface. You can also incorporate metallic elements like wire, beads, or charms to create an elegant and glamorous look.
With these decorating ideas, you can transform a plain metal candle holder into a stunning decorative piece. Let your creativity shine and experiment with different techniques to personalize your metal holder and create a stylish centerpiece that complements your décor.
Decorating with Decoupage
Decoupage is a popular technique that allows you to decorate various surfaces with decorative paper or fabric. It’s a versatile and accessible method that can be used to transform plain candle holders into unique and visually appealing pieces. Here’s how you can create beautiful designs using decoupage:
1. Choose your materials: Select the decorative papers or fabrics you want to use for your decoupage project. You can choose from a wide range of options, such as patterned paper, tissue paper, napkins, or even fabric scraps. Consider the overall design and theme you want to achieve.
2. Prepare the surface: Clean and prepare the surface of the candle holder, ensuring it is dry and free from any dust or dirt. If needed, you can lightly sand the surface for better adhesion of the decoupage medium.
3. Cut or tear the pieces: Cut or tear the selected paper or fabric into smaller pieces or shapes. Experiment with different sizes and shapes to create a varied and interesting design. You can use scissors or tear the paper by hand to achieve a more rustic and textured effect.
4. Apply the decoupage medium: Apply a layer of decoupage medium, such as Mod Podge or white glue mixed with water, onto the back of the paper or fabric piece. Place it on the surface of the candle holder and smooth it out using a brush or your fingers. Continue applying the pieces in your desired arrangement, overlapping them slightly or leaving gaps for a collage effect.
5. Seal and protect: Once you have finished applying the paper or fabric pieces, allow the decoupage medium to dry completely. Once dry, apply a layer of the medium over the entire surface of the candle holder. This will seal the decoupage, protect it from wear, and give it a polished finish. Repeat this step for a few more layers, allowing each layer to dry before applying the next one.
6. Optional embellishments: If desired, you can add extra embellishments to enhance your decoupage design. Consider using ribbons, trims, beads, or small charms to add a three-dimensional element to the holder. Secure these embellishments with additional layers of decoupage medium or strong adhesive.
7. Finishing touches: Once the decoupage medium and any embellishments are fully dried and adhered, inspect the candle holder for any rough edges or excess paper. Use sandpaper or a nail file to gently smooth out any imperfections. Apply a final layer of the decoupage medium to seal and protect the entire surface.
With the decoupage technique, you can unleash your creativity and turn a plain candle holder into a one-of-a-kind decorative piece. Whether you opt for a delicate and intricate design or a bold and vibrant collage, decoupage offers endless possibilities to showcase your personal style and create beautiful home decor.
Adding Embellishments and Accessories
Once you have decorated your candle holders with paint, decoupage, or other techniques, you can take your designs to the next level by adding embellishments and accessories. These small details can enhance the overall look and create a personalized touch. Here are some ideas for adding embellishments and accessories to your candle holders:
1. Ribbons and trims: Attach ribbons or trims around the candle holders to add a decorative and stylish element. You can tie bows or create intricate designs by wrapping the ribbon or trim around the holder. Choose colors and patterns that complement your overall design aesthetic.
2. Beads and charms: Incorporate beads or charms onto your candle holders for a touch of elegance and sophistication. You can string beads onto wire or thread and wrap them around the holder, or use jewelry findings to attach charms to the surface. Consider matching the bead or charm colors with your color scheme or theme.
3. Lace or fabric embellishments: Add a delicate and romantic touch by attaching lace or fabric embellishments to your candle holders. You can glue lace trim around the top or bottom of the holder, or cut out fabric pieces and attach them with adhesive or decoupage medium. Experiment with different textures and patterns to create unique designs.
4. Seashells and natural elements: Give your candle holders a coastal or nature-inspired look by incorporating seashells, dried flowers, or other natural elements. Arrange seashells around the base of the holder or attach them to the surface using strong adhesive. For a bohemian feel, consider adding feathers or small branches.
5. Gems and rhinestones: Create a glamorous and eye-catching effect by adding gems or rhinestones to your candle holders. Use adhesive to secure them in patterns or create a sparkling border. The gems can be color-coordinated with your overall design or include a mix of various hues for a vibrant look.
6. Personalized touches: Make your candle holders extra special by adding personalized touches. Consider attaching small photo frames or tags with names or initials. You can also use letter stickers or stencils to spell out meaningful words or quotes on the holder.
7. Hanging or decorative accessories: If your candle holders have handles or hanging capabilities, consider attaching hanging charms or decorative accessories. These can include small bells, tassels, or tiny decorative ornaments that add movement and visual interest.
These embellishments and accessories give your candle holders a unique and personalized touch. You can mix and match different ideas or combine multiple embellishments for a more eclectic look. Let your creativity shine and have fun experimenting with different materials and designs to create candle holders that truly reflect your style and personality.
Tips for Arranging and Displaying Candle Holders
Arranging and displaying candle holders is an art that can significantly enhance the ambiance and aesthetics of any space. Here are some helpful tips to consider when arranging and displaying your candle holders:
1. Grouping: Create visual interest by grouping candle holders together. Arrange them in clusters on a tabletop or mantel, varying the heights and sizes for an appealing composition. Grouping candle holders also adds depth and dimension to your display.
2. Symmetry and balance: For a more formal and balanced look, consider arranging candle holders symmetrically. Place an equal number of candle holders on each side of a central focal point, such as a larger centerpiece or artwork.
3. Varying heights: Play with different heights to add visual drama and interest to your display. Use candle holders of varying heights to create a dynamic arrangement. This creates a sense of depth and makes the display more eye-catching.
4. Mixing styles: Experiment with combining different styles of candle holders to create a unique and eclectic look. Mixing materials, shapes, and designs can add a contemporary and artistic touch to your display.
5. Consider the candle size: When arranging and displaying candle holders, consider the size of the candles you plan to use. Ensure that the candle holder is the appropriate size to securely hold the candles without any risk of tipping or melting onto other surfaces.
6. Consider the room and occasion: Think about the overall theme and purpose of the room or the event you are decorating for. Choose candle holders that complement the style and ambiance of the space. For example, opt for elegant and sophisticated candle holders for formal settings, and rustic or bohemian candle holders for more casual environments.
7. Lighting and placement: Consider the lighting factors when positioning your candle holders. Place them where they can create a warm and inviting atmosphere. Think about natural light sources, such as windows, and place your candle holders strategically to enhance the natural light and create a cozy glow.
8. Incorporate other decor elements: Combine your candle holders with other decorative elements to create a cohesive and visually stimulating display. Consider adding flowers, greenery, mirrors, or other decor items that complement the candle holders and enhance the overall look.
9. Safety first: Always prioritize safety when arranging and displaying candle holders. Ensure that the flame is a safe distance from any flammable materials and that candle holders are placed on stable surfaces to prevent tipping or accidents.
By following these tips, you can create beautiful and captivating displays with your candle holders. Let your creativity guide you as you arrange them to set the mood and style of your space and enjoy the inviting glow they bring to your home.
Safety Precautions for Using Decorated Candle Holders
While decorated candle holders can enhance the beauty and ambiance of any space, it is important to prioritize safety to prevent accidents or damage. Here are some essential safety precautions to consider when using decorated candle holders:
1. Choose appropriate candle sizes: Ensure that the size of the candle matches the size and design of the candle holder. Avoid using candles that are too large or too small, as they may pose a fire hazard or result in instability.
2. Use flameless candles: Consider using flameless LED candles instead of traditional wax candles. Flameless candles provide a safe alternative, especially if you have decorated the candle holder with flammable materials. They still create a warm and realistic ambiance without the risk of an open flame.
3. Monitor burning candles: Never leave a burning candle unattended. Always keep an eye on the flame to prevent accidents or fires. Make sure to extinguish candles before leaving the room or going to bed.
4. Keep candles away from flammable materials: Ensure that your decorated candle holder is placed on a stable surface away from any flammable materials such as curtains, drapes, paper, or fabrics. Keep a safe distance between candles and other decor items to avoid accidental contact.
5. Ensure proper ventilation: Make sure that the area surrounding the decorated candle holder is well-ventilated to prevent the buildup of smoke or soot. Avoid placing candles near air vents or drafts that can cause uneven burning or flickering.
6. Trim candle wicks: Before lighting candles, trim the wicks to about ¼ inch in length. This helps to prevent excessive flickering, uneven burning, and the creation of soot.
7. Use appropriate candle holders: Ensure that the decorated candle holder is stable and can safely hold the weight of the candle. If using a homemade or altered candle holder, make sure it is sturdy, heat-resistant, and appropriate for the type of candle being used.
8. Protect surfaces: Place the decorated candle holder on a heat-resistant surface to protect the underlying surface from heat damage. Use a heat-resistant coaster or a designated candle holder plate to catch any dripping wax.
9. Educate household members: If you have children or pets in the household, educate them about the potential dangers of lit candles and the importance of not touching or playing with them. Keep candles out of reach of children and pets.
10. Properly extinguish candles: Extinguish candles by gently blowing them out or using a candle snuffer. Avoid using water to extinguish candles, as this can cause hot wax to splatter or crack the holder. Double-check that the candle is completely extinguished and cooled before leaving the area.
By following these safety precautions, you can enjoy the beauty and ambiance of decorated candle holders while minimizing the risk of accidents or fires. Prioritizing safety ensures that your candle decoration projects are not only visually appealing but also safe for you, your family, and your home.
Storing and Caring for Decorated Candle Holders
Proper storage and care of your decorated candle holders will help maintain their beauty and ensure their longevity. Here are some guidelines to follow when storing and caring for your decorated candle holders:
1. Clean gently: When cleaning your decorated candle holders, use a soft cloth or sponge along with mild soap or detergent. Avoid using harsh scrub brushes or abrasive materials that could damage the decorations or the holder itself.
2. Remove wax residue: After burning candles, allow the wax to cool and harden. To remove any residue, gently scrape it off with a plastic scraper or your fingernail. Avoid using sharp objects that could scratch the surface of the holder.
3. Avoid exposure to direct sunlight: Prolonged exposure to direct sunlight can cause fading or discoloration of your decorated candle holders. Store them in a cool, dry place away from windows or other sources of intense sunlight.
4. Properly pack for storage: If you need to store your candle holders for an extended period, pack them carefully to prevent damage. Wrap each holder individually with tissue paper or bubble wrap to protect the decorations. Place them in a sturdy box or container, ensuring they are secure and won’t shift during storage.
5. Consider temperature and humidity: Extreme temperature fluctuations or high humidity can affect the integrity of the decorations on your candle holders. Avoid storing them in environments that are excessively hot, cold, or humid, as this can cause adhesives to weaken or decorations to deteriorate.
6. Handle with care: When handling your decorated candle holders, be gentle to avoid accidentally knocking or dropping them. The decorations may be delicate, and rough handling can cause them to detach or break.
7. Regularly dust: Keep your decorated candle holders looking their best by regularly dusting them with a soft, lint-free cloth. This will help remove any dust or debris that may accumulate on the surfaces and decorations.
8. Check for damage: Occasionally inspect your decorated candle holders for any signs of damage or wear. Look for loose decorations, cracks, or chips. Promptly address any issues to prevent further damage or potential safety hazards.
9. Reapply protective coating: If your candle holders have a protective sealant or varnish, monitor it over time. If it starts to wear off or show signs of damage, consider reapplying a fresh coat to preserve and protect the decorations.
10. Avoid harsh chemicals: When cleaning your decorated candle holders, avoid using harsh chemicals or solvents that could damage the decorations or the holder’s surface. Stick to mild, gentle cleaning solutions to keep them looking their best.
By following these guidelines, you can ensure that your decorated candle holders remain beautiful and well-maintained for years to come. Proper care and storage will help preserve their appearance and allow you to enjoy them as part of your home decor for many seasons.