
Choosing the Right Bread
When it comes to cutting a bread bowl, selecting the right type of bread is essential. The bread should have a firm crust and a soft, airy interior to ensure that it holds its shape while still being easy to scoop out and enjoy. Here are a few options to consider:
Sourdough Bread
Sourdough bread is one of the most popular choices for bread bowls. Its sturdy crust and tangy flavor make it a perfect vessel for holding soups, stews, or dips. Look for a sourdough loaf that has a dense structure and an attractive brown crust, as this will ensure a satisfying bread bowl experience.
French Bread
French bread, with its crusty exterior and soft, fluffy interior, is another excellent choice. It has a mild flavor that complements a wide range of fillings, and its elongated shape allows for generous portions. Look for a French bread loaf that is slightly larger in size, ensuring that it can hold a sufficient amount of your desired filling.
Whole Wheat Bread
For a healthier alternative, consider using a whole wheat bread for your bread bowl. Whole wheat bread offers a nutty flavor and a more substantial texture while still maintaining its integrity when hollowed out. Look for a loaf that is made with cracked grains or seeds for added texture and flavor.
Rye Bread
If you’re looking to add a unique twist to your bread bowl, rye bread is a fantastic option. Rye bread has a distinct taste that pairs well with heartier fillings and adds depth to your dish. Look for a loaf with a medium density that will hold up well when hollowed out.
When choosing your bread, ensure that it is fresh and free from any mold or staleness. Avoid loaves that are overly dense or have a tough, chewy texture, as they may not create a pleasant bread bowl experience. Remember, the bread is not only a vessel but also an integral part of the overall taste and enjoyment of your dish, so choose wisely.
Preparing the Bread
Before you start cutting your bread bowl, it’s important to properly prepare the bread. This will ensure that it maintains its shape and integrity throughout the process. Follow these steps to prepare your bread:
Allow the Bread to Cool
If you’ve just purchased or baked your bread, let it cool completely before attempting to work with it. Cutting into hot or warm bread can cause it to become squished or lose its shape. Patience is key when it comes to preparing your bread bowl.
Trim the Top
Using a serrated knife, carefully cut off the top part of the bread. This will create a lid for your bread bowl. Make sure to cut evenly and follow the natural shape of the loaf. Set the top aside as you will need it later for serving.
Scoop Out the Center
With a spoon or your hands, gently remove the soft, doughy center of the bread, making sure to leave a sturdy crust all around. Keep the extracted bread as it can be used for dipping or making breadcrumbs for future recipes.
Create a Slightly Thicker Base
To ensure that your bread bowl can hold your desired filling without collapsing, carefully remove some of the bread from the base to create a slightly thicker layer. This added stability will prevent the bread bowl from getting too soggy or leaking when filled with liquid-based dishes.
Preparing the bread properly is crucial to creating a durable bread bowl that will hold your chosen filling without crumbling or losing its shape. Taking the time to cool the bread, trim the top, scoop out the center, and create a thicker base will make the cutting process easier and ensure a more enjoyable dining experience.
Creating a Guide
Creating a guide on the bread will help you maintain consistency and precision while cutting. It will serve as a visual aid and make the process easier. Follow these steps to create your guide:
Mark the Top Edge
Using a ruler or a straight edge, measure and mark the desired height from the top edge of the bread. This will determine how much of the bowl will be left after cutting. Make light, shallow markings to avoid damaging the bread’s surface.
Divide into Segments
To ensure even portions, divide the circumference of the bread into several segments. The number of segments will depend on the size and shape of your bread bowl. For example, you can divide it into four, six, or eight equal parts.
Mark the Cutting Lines
Starting from the top mark, connect each segment line to the bottom of the bread bowl, creating cutting lines. Again, use a ruler or straight edge to keep the lines straight and consistent. These lines will act as your guide when cutting.
Be Mindful of Depth
While marking the lines, consider the desired depth of your bread bowl. Take into account the size of your chosen filling and ensure that you create a sufficient space to hold it. However, be careful not to cut too deep, as it can weaken the structure of the bread bowl.
Creating a guide will go a long way in maintaining uniformity and ensuring that your bread bowl turns out visually appealing. Take your time to create accurate measurements and cutting lines to achieve the desired outcome in the next steps.
Cutting the Top
Now that you have prepared the bread and created a guide, it’s time to start cutting. The first step is to cut the top of the bread to create a lid that can be easily removed and placed back on. Follow these steps to cut the top:
Follow the Marked Line
Using a serrated knife, gently trace along the marked line that you made on the top edge of the bread. Apply even pressure and use a gentle sawing motion to ensure a clean and even cut. Take your time to maintain the shape and integrity of the bread.
Angle the Knife
To create a lid that fits snugly on the bread bowl, angle the knife slightly inward while cutting. This will result in a slightly smaller top piece that fits neatly once placed back on top. Be careful not to cut too deeply as you want to avoid piercing the bottom crust.
Remove the Top
Once you have cut all the way around the bread, gently lift and remove the top piece. Set it aside for later use, as it will be used to cover the bread bowl when serving. Take caution not to break or crumble the top, as it should remain intact for presentation purposes.
Cutting the top is an important step in creating a bread bowl. By following the marked line and angling the knife correctly, you’ll end up with a perfectly shaped lid that can be easily removed and replaced. Take your time and be gentle to maintain the integrity of your bread bowl.
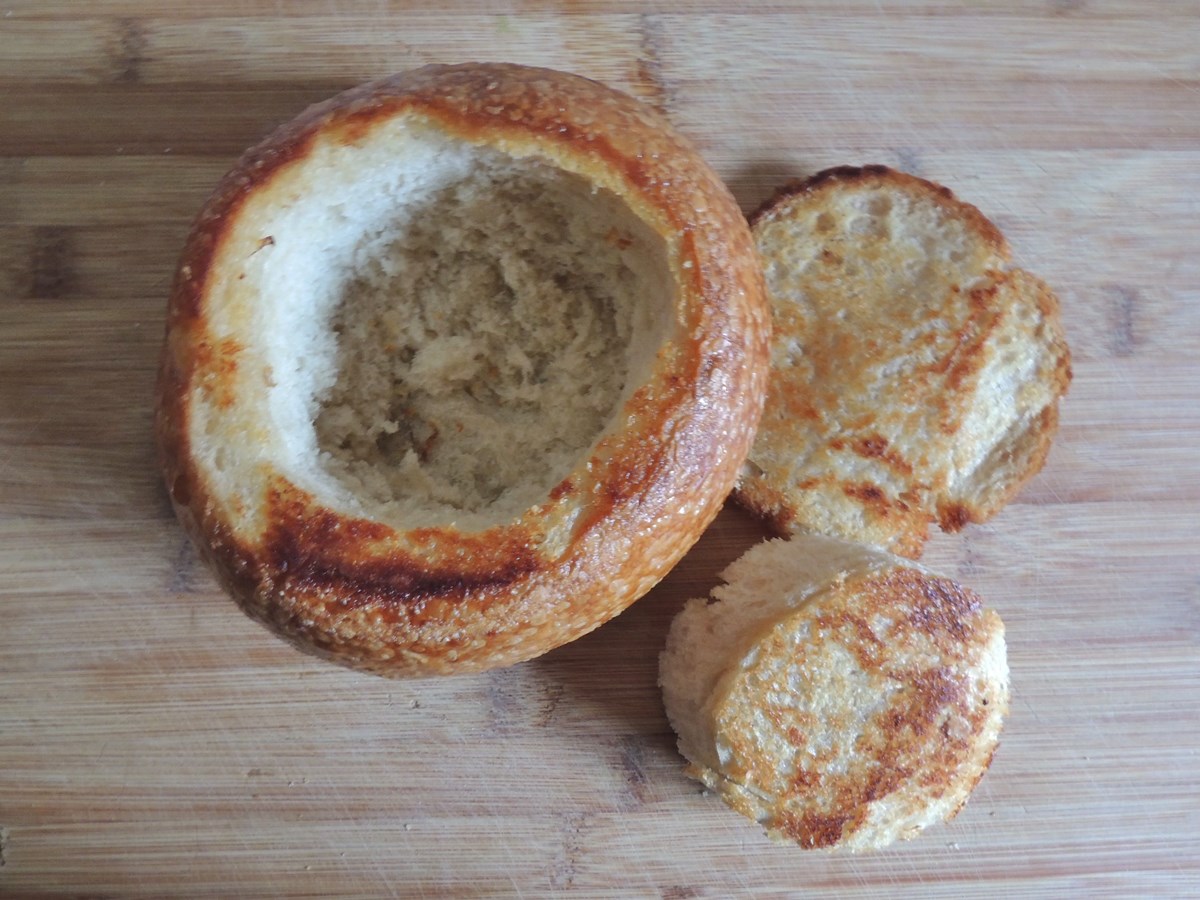
Removing the Center
With the top cut and removed, it’s time to tackle the next step of creating a bread bowl – removing the center. This step is crucial as it will create the hollow space needed to hold your desired fillings. Follow these steps to remove the center of the bread:
Scoop with a Spoon
Using a spoon, gently start scooping out the soft, doughy center of the bread. Start from the center and work your way towards the edges, being careful not to dig too deep or pierce the bottom crust. Maintain even pressure and scoop out the bread in small sections to ensure control and accuracy.
Save the Center Bread
As you remove the center, collect the extracted bread pieces and save them for later use. These pieces can be used for making breadcrumbs, croutons, or as an accompaniment for soups or dips. Waste not, want not!
Leave a Sturdy Crust
Ensure that you leave a sturdy crust all around the bread bowl. This will help maintain the structural integrity and prevent the bread from becoming too soft or floppy when filled. Take care not to remove too much bread, as it can weaken the bowl and make it prone to collapsing.
Avoid Over-Scooping
Be mindful not to hollow out the bread bowl too much, as it can cause the fillings to leak through or make the bowl too fragile. Aim for a thickness of approximately half an inch (1.3 cm) for a balance between holding capacity and structural stability.
Removing the center of the bread is a delicate process. Take your time, exercise patience, and be mindful of the crust’s thickness and the depth of the hollowed center. With proper care and precision, you’ll achieve a perfectly hollowed bread bowl that is ready to be filled and enjoyed.
Slicing the Inside Bread
After removing the center of the bread, it’s time to slice the inside bread into smaller pieces. These slices will be used for dipping, filling, or enjoying alongside the main dish. Follow these steps to slice the inside bread:
Cut into Bite-Sized Cubes
Using a serrated knife, slice the inside bread into bite-sized cubes or chunks. Aim for consistent sizes to ensure even cooking and dipping. You can slice them directly from the hollowed-out center or use the extracted bread pieces from earlier.
Crust or No Crust
Decide whether you want to keep the crust on the sliced bread or remove it. The choice is purely subjective and depends on personal preference. Some prefer the texture and added flavor of the crust, while others prefer a softer and more uniform texture without the crust.
Stack and Cut Strips
If you prefer longer and thinner slices, stack the cubes together and cut them into strips. This method works particularly well for sandwiches or as an accompaniment for certain dishes.
Arrange for Presentation
Once sliced, arrange the inside bread pieces on a serving platter or in a separate bowl, keeping in mind the overall presentation. You can garnish them with herbs or sprinkle some salt and pepper to add an extra touch of flavor.
Slicing the inside bread not only adds versatility to your bread bowl but also provides additional options for enjoying the delicious bread itself. Whether you prefer cubes, strips, or any other shape, be sure to slice them uniformly for a visually appealing and enjoyable dining experience.
Serving and Enjoying
Now that your bread bowl is prepared, it’s time to fill it with your desired soup, stew, or dip and serve it to your eager guests. Here are some tips for serving and enjoying your bread bowl:
Fill with Delicious Fillings
Carefully ladle your chosen soup, stew, or dip into the hollowed-out bread bowl. Make sure to fill it to the brim for a generous serving. Remember to choose fillings that complement the flavor and texture of the bread.
Top with Garnishes
Add a final touch to your bread bowl by garnishing it with toppings or herbs that enhance the flavors. Sprinkle some grated cheese, chopped herbs, or a drizzle of olive oil for an extra burst of taste and visual appeal.
Serve with Bread Slices
Don’t forget to place the sliced bread you prepared earlier on the table alongside the filled bread bowl. These slices can be used for dipping into the filling, or as a side accompaniment to complete the meal.
Share and Enjoy
Place the filled bread bowl and the accompanying bread slices in the center of the table. Encourage your guests to help themselves to the delicious combination of flavors and textures. Sharing the bread bowl creates a communal and interactive dining experience.
Enjoy the Edible Bowl
Once you and your guests have enjoyed the fillings, don’t forget to savor the bread bowl itself. Tear off a piece of the crust or scoop out the tender interior for a delightful combination of tastes and textures.
Serving and enjoying a bread bowl is not only about the delicious flavors but also about the shared experience and unique presentation. Whether it’s a cozy gathering with loved ones or a special occasion, the bread bowl adds a touch of warmth and creativity to any meal.