
What You’ll Need
When faced with the unpleasant task of cleaning up vomit from your rug, having the right supplies on hand can make the process much easier and more effective. Here are the essential items you’ll need:
- A pair of disposable gloves: Protect your hands from coming into direct contact with the vomit.
- Paper towels or old rags: These will be used to initially remove any solid matter.
- A plastic scraper or spatula: Gently scrape off any remaining solid matter without damaging the rug.
- Dish soap or carpet cleaner: These cleaning agents will help break down stains and sanitize the affected area.
- A clean cloth or sponge: Use this to blot and apply the cleaning solution to the rug.
- White vinegar: A natural disinfectant that can be used as an alternative to dish soap or carpet cleaner.
- Baking soda: Great for eliminating odor and drying up any residual moisture.
- A bucket of warm water: This will be used for rinsing the rug after cleaning.
- A wet/dry vacuum or clean towels: These will be used to extract any excess moisture from the rug.
Having these items readily available before you start the cleaning process will save you time and make tackling the mess much more seamless.
Step 1: Remove Solid Matter
The first step in cleaning vomit out of a rug is to remove any solid matter. It’s essential to do this carefully to avoid spreading the mess or pushing it deeper into the fibers of the rug.
To remove solid matter, start by putting on a pair of disposable gloves to protect your hands. Next, take a few paper towels or old rags and gently pick up as much of the vomit as possible. Be careful not to press too hard, as this can cause the vomit to spread or embed itself further into the rug.
If there are any larger chunks that are difficult to remove with the paper towels, you can use a plastic scraper or spatula. Again, be gentle to avoid damaging the rug. Use the scraper to carefully lift off the solid matter, working from the outer edges towards the center of the vomit stain.
Once you have removed as much of the solid matter as possible, dispose of it in a plastic bag. Seal the bag tightly and discard it properly. Do not flush solid waste down the toilet, as it can cause plumbing issues.
Remember to work quickly during this step to prevent the vomit from drying and becoming more difficult to remove. Time is of the essence when it comes to cleaning up messes like these.
Step 2: Blot the Area
After removing the solid matter, the next step is to blot the area to absorb any remaining liquid and prevent it from seeping deeper into the rug.
Take a fresh set of paper towels or clean rags and gently press them onto the vomit stain. Avoid rubbing or scrubbing, as this can spread the stain or push it further into the rug fibers.
Apply firm but gentle pressure to the paper towels or rags and leave them in place for a few seconds. This allows the absorbent material to soak up as much liquid as possible. If the paper towels or rags become soaked, replace them with fresh ones to continue blotting.
Continue blotting until no more liquid is being absorbed. Be patient during this step and avoid the temptation to rush through it. Taking the time to thoroughly blot the area will help ensure that you remove as much of the vomit as possible.
If the vomit stain has already dried before you had a chance to clean it, you can slightly dampen the area with a clean, damp cloth before blotting. This can help rehydrate the stain and make it easier to remove.
Remember, the goal of blotting is to lift the liquid without spreading the stain or damaging the rug. So take your time and be gentle with the blotting process.
Step 3: Create a Cleaning Solution
Once you have blotted the vomit stain and removed as much liquid as possible, it’s time to create a cleaning solution to tackle the remaining residue.
There are a few options for cleaning solutions that you can use, depending on the materials of your rug and personal preference. Here are a couple of effective options:
- Dish soap solution: Mix a small amount of mild dish soap with warm water in a bucket or bowl. Make sure to use a dish soap that does not contain bleach or lanolin, as these can potentially damage your rug.
- Carpet cleaner solution: If you have a specific carpet cleaner product, follow the instructions on the label to create a diluted cleaning solution. Some carpet cleaners come in a spray bottle format, which can be convenient for applying directly to the stain.
For a natural alternative, you can also create a cleaning solution using white vinegar and water. Mix equal parts of white vinegar and warm water in a spray bottle or container.
Regardless of the cleaning solution you choose, ensure it is thoroughly mixed before applying it to the vomit stain.
Remember, it’s always a good idea to test the cleaning solution on a small, inconspicuous area of the rug before applying it to the stained area. This will help you determine whether the solution is safe to use and won’t cause any discoloration or damage to the rug.
Once you have your cleaning solution ready, you’re now prepared to move on to the next step of the cleaning process.
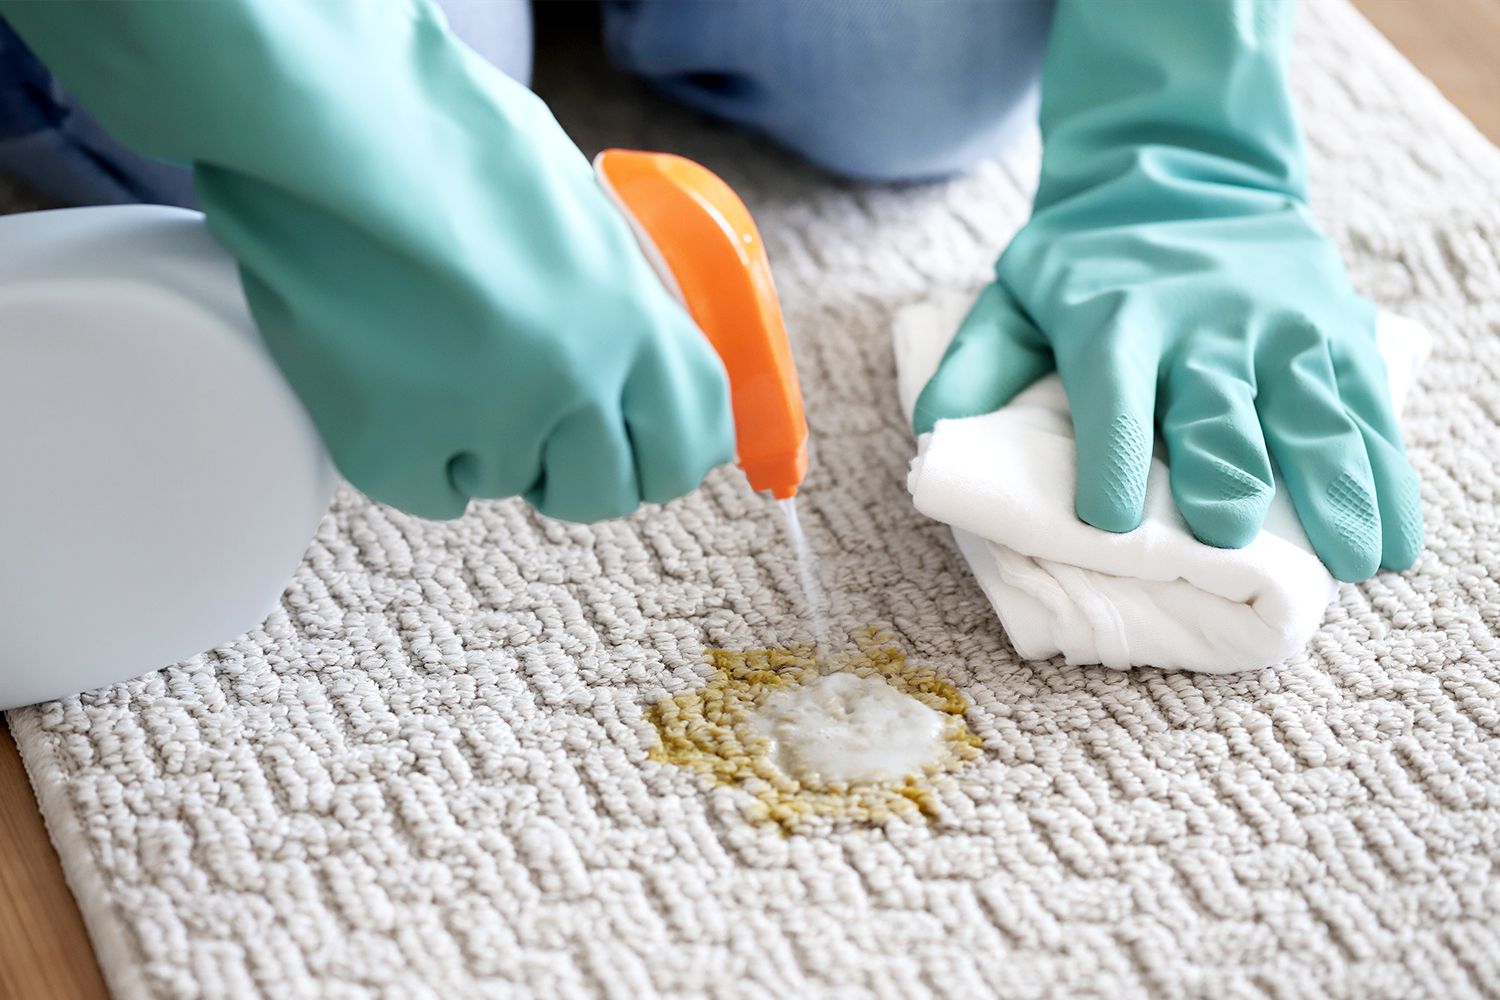
Step 4: Apply the Cleaning Solution
With your cleaning solution in hand, it’s time to apply it to the vomit stain on your rug. Follow these steps to effectively clean and remove the stain:
- Pour a small amount of the cleaning solution directly onto the vomit stain. Be careful not to saturate the rug too much, as excessive moisture can lead to mold or mildew growth.
- Using a clean cloth or sponge, gently work the cleaning solution into the stained area. Use light, circular motions to help loosen the stain and lift it from the rug fibers.
- Avoid rubbing or scrubbing vigorously, as this can damage the rug or spread the stain further.
- Continue applying the cleaning solution and gently blotting the area until the stain starts to fade.
- If you’re using a carpet cleaner product, follow the instructions on the packaging for the recommended amount to use and the dwell time needed.
- If you’re using the white vinegar and water solution, you can spray it onto the stain and let it sit for a few minutes before blotting.
Remember, different rugs and stains may require varying amounts of cleaning solution and effort. Adjust your approach accordingly, and be patient. It may take a few rounds of cleaning to completely eliminate the stain.
Once you have thoroughly worked the cleaning solution into the stain, proceed to the next step to remove any residues and ensure the rug is properly rinsed.
Step 5: Blot the Area Again
After applying the cleaning solution and working it into the vomit stain, it’s important to blot the area again to remove any remaining liquid and cleaning residue.
Take a fresh set of paper towels or clean cloth and gently blot the treated area. This step helps to absorb any excess moisture and residue from the cleaning solution.
Be sure to blot rather than scrub or rub the area. Blotting allows the paper towels or cloth to soak up the liquid without spreading the stain or pushing it further into the rug.
Continue blotting until no more moisture is being absorbed from the rug. You may need to replace the paper towels or cloth several times during this process.
If the vomit stain is particularly stubborn, you may need to repeat steps 4 and 5 again until the stain is fully removed.
Remember to be patient during this step. It’s better to take your time and thoroughly remove the liquid rather than rush and risk leaving behind residue or moisture that can lead to odors or discoloration.
Once you have completed this step, it’s time to proceed to the next step and rinse the rug to ensure all traces of the cleaning solution are removed.
Step 6: Rinse with Water
After blotting the area to remove excess moisture and cleaning residue, it’s crucial to rinse the rug to ensure all traces of the cleaning solution are removed thoroughly.
Fill a bucket or container with clean, warm water. You can also use a spray bottle to apply the water if you prefer.
Take a clean cloth or sponge and dampen it in the water. Gently blot the area where the vomit stain was treated. This process helps to dilute and rinse away any remaining cleaning solution from the rug.
Continue blotting with the damp cloth or sponge, frequently rinsing it in the water to ensure you are using clean water each time. You may need to repeat this step a few times to ensure all traces of the cleaning solution are thoroughly rinsed out.
It’s important to remove the cleaning solution completely as any residue left on the rug can attract dirt and cause the area to become dirty again quickly.
Once you are satisfied that the cleaning solution has been rinsed out, proceed to the next step to remove excess moisture from the rug.
Note: Avoid using excessive water during the rinsing process, as this can oversaturate the rug and prolong the drying time. Use only enough water to rinse out the cleaning solution.
Step 7: Extract the Excess Moisture
After rinsing the rug with water, it’s important to remove any excess moisture to aid in the drying process. Standing water can lead to mold or mildew growth if not properly addressed.
The most effective way to extract excess moisture is by using a wet/dry vacuum. Run the suction nozzle of the vacuum over the treated area, making sure to cover the entire affected section of the rug.
Move the vacuum slowly to allow it to effectively extract the moisture. Be thorough and go over the area multiple times if needed to ensure you remove as much moisture as possible.
If you don’t have a wet/dry vacuum, you can place clean towels on top of the treated area. Press down firmly to absorb the moisture. Repeat this process with dry towels until you no longer see any moisture transferring onto the towels.
It’s important to remember not to excessively scrub or rub the area with the towels, as this can damage the rug fibers. Instead, apply gentle pressure and allow the towels to soak up the moisture.
Continue the extraction process until the rug feels damp but not soaking wet. Removing as much moisture as possible will help speed up the drying time and prevent any potential damage to the rug.
Once you have successfully extracted the excess moisture, it’s time to allow the rug to dry completely before moving on to the next step.
Step 8: Allow the Rug to Dry
After extracting the excess moisture from the rug, it’s crucial to allow it to dry completely. Proper drying helps prevent mold, mildew, and unpleasant odors from developing.
Lay the rug flat in a well-ventilated area, away from direct sunlight. It’s important to avoid exposing the rug to direct heat sources, as this can damage the fibers.
If possible, elevate one end of the rug slightly with the help of books or blocks. This promotes air circulation and aids in the drying process.
Depending on the rug’s thickness, material, and the amount of moisture present, drying time can vary. On average, it may take a few hours to a couple of days for the rug to dry completely.
During the drying process, it’s important to keep children, pets, and foot traffic away from the rug to avoid recontamination or accidental spills.
Check the rug periodically to assess its dryness. Run your hand across the fibers to ensure they feel dry to the touch. If any dampness remains, allow the rug more time to air dry.
Patience is key during this step; rushing to use or put the rug back in place before it’s completely dry can result in unpleasant consequences.
Once the rug is thoroughly dry, you can proceed to the final step – vacuuming the rug to remove any remaining debris and restore its texture.
Step 9: Vacuum the Rug
Once the rug has dried completely, the final step is to vacuum it to remove any remaining debris and restore its texture.
Start by checking the vacuum cleaner’s bag or canister and emptying it if necessary. A clean bag or canister ensures optimal suction and prevents debris from being dispersed back onto the rug.
Attach an appropriate attachment or nozzle to the vacuum cleaner depending on the type of rug you have. For delicate rugs, consider using a brush attachment or a soft bristle brush to avoid causing any damage.
Begin vacuuming the rug, using slow and steady strokes in different directions. This helps to loosen and lift any dirt, dust, or debris that may have accumulated during the cleaning process.
Pay special attention to the area that was affected by the vomit stain, as it may require a bit more thorough vacuuming to ensure all residue and particles are removed.
If you notice any lingering odors, you can sprinkle baking soda over the rug and let it sit for a few hours before vacuuming it up. Baking soda is known for its odor-absorbing properties and can help freshen up the rug.
Make sure to vacuum the entire surface of the rug, including the edges and corners, to ensure a thorough cleaning.
Once you have finished vacuuming, take a step back and admire your clean and fresh-smelling rug. It’s ready to be enjoyed once again!
Remember to regularly vacuum your rug as part of your routine cleaning to maintain its cleanliness and prolong its lifespan.
Tips for Deep Cleaning Rugs
Deep cleaning your rugs is an essential part of maintaining their appearance and longevity. Here are some helpful tips to ensure a thorough and effective deep clean:
- Regular maintenance: Vacuum your rugs regularly to prevent dirt and debris from settling deep into the fibers. This will make the deep cleaning process easier and more effective in the long run.
- Follow manufacturer’s instructions: Check the care instructions provided by the rug manufacturer to ensure you are using the appropriate cleaning methods and products. Different rugs may have specific cleaning requirements based on their material and construction.
- Spot test: Before using any cleaning solution or product on your rug, perform a spot test in a small, inconspicuous area to check for any adverse reactions or color fading.
- Work in sections: When deep cleaning large rugs, divide them into manageable sections to ensure thorough cleaning and more efficient results.
- Use a carpet cleaner: Consider using a carpet cleaner machine for deep cleaning larger rugs. These machines provide a more powerful and thorough cleaning, and some even have built-in brushes for agitating the fibers.
- Dry the rug properly: After deep cleaning, make sure to dry the rug thoroughly to prevent mold and mildew growth. Use fans or open windows to increase airflow and aid in the drying process.
- Professional cleaning: For heavily soiled rugs or if you’re unsure about deep cleaning them yourself, consider hiring a professional rug cleaning service. They have the expertise and specialized equipment to deep clean and rejuvenate your rugs.
- Protect your rug: Place doormats at entrances and ask guests to remove their shoes. This helps minimize dirt and debris being tracked onto the rug, reducing the frequency of deep cleaning needed.
- Treat stains promptly: Address any spills or stains on your rug immediately. Blot up liquid spills and attend to solid stains quickly to prevent them from setting and becoming more difficult to remove.
By following these tips, you can ensure that your rugs stay clean, fresh, and beautiful for years to come.
Using Natural Cleaning Solutions
If you prefer to use natural cleaning solutions or want to avoid using harsh chemicals, there are several effective options available for deep cleaning your rugs. Here are some natural cleaning solutions you can try:
- White vinegar: Mix equal parts of white vinegar and water in a spray bottle or bucket. This solution is great for removing stains, killing bacteria, and neutralizing odors. Test it in an inconspicuous area first to ensure it doesn’t cause discoloration.
- Baking soda: Sprinkle baking soda liberally over the rug and let it sit for a few hours. It not only helps to absorb odors but also acts as a gentle abrasive that can lift dirt and stains. Vacuum up the baking soda thoroughly to remove it from the rug.
- Lemon juice: Lemon juice is a natural bleaching agent and can help remove stubborn stains. Mix lemon juice with water and apply it directly to the stain. Allow it to sit for a few minutes, then blot the area with a clean cloth.
- Hydrogen peroxide: Hydrogen peroxide can be effective in removing tough stains on lighter-colored rugs. Mix it with water in a spray bottle and apply it to the stained area. Allow it to sit for a few minutes before blotting it with a clean cloth.
- Cornstarch: For oily stains, sprinkle cornstarch over the affected area and let it sit for several hours. The cornstarch will help absorb the oil. Vacuum up the cornstarch and then clean the area with a mild detergent or natural cleaning solution.
When using natural cleaning solutions, it’s still important to spot test in an inconspicuous area to ensure they don’t cause any damage or discoloration to the rug.
Remember to use proper cleaning techniques, such as blotting rather than scrubbing, to prevent spreading the stain or damaging the rug fibers.
Using natural cleaning solutions not only helps to keep your rugs clean but also provides a safer environment for your family and pets.
By employing these natural alternatives, you can effectively deep clean your rugs while minimizing your exposure to harsh chemicals.