
Vacuum the Rug
Keeping your kitchen rug clean is essential for maintaining a healthy and hygienic environment. Regular vacuuming is the first step in keeping your rug free from dirt, dust, and debris.
To begin, ensure that your vacuum cleaner is suitable for cleaning rugs or carpets. Adjust the height of the vacuum to the appropriate level to avoid damaging the rug fibers. If your rug is small and lightweight, consider using a handheld vacuum cleaner for easier maneuverability.
Start by removing any loose dirt or debris from the rug’s surface. Use a crevice tool or a brush attachment to reach into the corners and edges. Work your way across the entire rug, covering both high-traffic areas and less frequently used spots.
To achieve optimal results, vacuum in multiple directions. This will help to loosen any embedded dirt and ensure that all areas of the rug are thoroughly cleaned. Pay extra attention to areas near the entrance of your kitchen, as these tend to accumulate more dirt and crumbs.
If your rug has a thick or shaggy pile, you may need to use the brush attachment to gently agitate the fibers and remove any trapped debris. Take care not to apply too much pressure, as this can damage the rug’s texture. Instead, use a light and gentle touch.
For rugs with long or matted fibers, the upright vacuum cleaner’s beater brush attachment can be effective in lifting dirt and restoring the rug’s appearance. Again, be cautious not to press the brush too hard against the rug.
Regular vacuuming, at least once a week, will help to keep your kitchen rug clean and prolong its lifespan. If you have pets or experience heavy foot traffic in your kitchen, you may need to vacuum more frequently.
Remember to empty the vacuum’s dust container or replace the bag regularly to maintain optimal suction power. A clogged vacuum can be less effective in removing dirt from your rug.
By vacuuming your kitchen rug regularly, you can eliminate surface dirt and prevent it from being ground into the fibers. This will not only keep your rug clean and fresh but also contribute to a healthier and more inviting kitchen space.
Shake the Rug
Shaking your kitchen rug is a simple yet effective way to remove loose dirt, dust, and debris that may be trapped in its fibers. This step is particularly useful for rugs that are too large or heavy to be easily vacuumed.
To shake your rug, start by taking it outside or to a well-ventilated area such as your patio or balcony. Find a suitable surface to shake the rug on, such as a clothesline, railing, or any sturdy object that can support its weight.
Hold one corner of the rug firmly and lift it off the ground. Give it a gentle shake, allowing the loose particles to dislodge and fall to the ground. Repeat this process for each corner and, if necessary, for the center of the rug.
While shaking the rug, be mindful of your surroundings. Ensure that there are no delicate items or breakables nearby that could be accidentally damaged. Additionally, try to choose a time when there is minimal wind, as strong gusts could cause the rug to whip around uncontrollably.
For rugs with stubborn dirt or debris, you can enhance the shaking process by hitting the rug with a soft object, such as a broom handle or a tennis racket. Lightly tap the rug to dislodge any trapped particles, but avoid hitting it too aggressively, as this can cause damage to the fibers.
It is also important to shake your rug on a regular basis, especially if it is placed in a high-traffic area. Weekly or monthly shaking can help prevent dirt from building up and extend the rug’s longevity.
Once you have finished shaking the rug, take a few moments to examine it for any remaining dirt or stains. If you spot any specific areas that require attention, you can move on to the next step in the cleaning process.
By regularly shaking your kitchen rug, you remove loose dirt and debris that may have accumulated over time. This simple yet effective technique helps to maintain the cleanliness and appearance of your rug, ensuring that it remains a welcoming addition to your kitchen decor.
Spot Clean Stains
Spills and stains on your kitchen rug are inevitable, especially in a busy cooking area. Spot cleaning is an essential step in maintaining the rug’s cleanliness and ensuring that stains don’t become permanent.
Before you begin spot cleaning, it’s important to identify the type of stain you’re dealing with. Different stains require different cleaning methods, and using the wrong approach can potentially worsen the situation.
For food and beverage stains, start by gently blotting the affected area with a clean cloth or paper towel. Avoid rubbing the stain, as this can cause it to spread and penetrate deeper into the rug fibers.
Next, prepare a cleaning solution by mixing a small amount of dish soap with warm water. Test the solution on a small, inconspicuous area of the rug to ensure that it doesn’t cause any discoloration or damage. If the rug’s color remains unaffected, proceed with the cleaning.
Dip a clean cloth or sponge into the soapy solution and gently dab the stained area. Work from the outer edges of the stain towards the center to prevent spreading. Continue blotting until the stain starts to lift, but be patient as this may take several attempts.
If the stain persists, you can try using a specialized carpet stain remover. Follow the product’s instructions carefully and test it on a small area of the rug first to avoid any unwanted side effects.
For oil or grease stains, sprinkle a small amount of baking soda or cornstarch over the affected area. Leave it to absorb the grease for a few minutes, then vacuum it up. Repeat this process as needed until the stain has disappeared.
In the case of liquid spills, such as sauces or oils, it’s crucial to act quickly. Blot up the excess liquid with a towel or paper towel, being careful not to rub it into the rug. Then, use a clean cloth dipped in a mixture of mild dish soap and water to gently clean the spot.
Remember to always blot and never scrub, as vigorous scrubbing can damage the rug fibers and make the stain more difficult to remove.
If you’re uncertain about how to treat a specific stain, or if the stain is persistent, it may be best to seek professional help from a rug cleaner. Professional cleaners have the expertise and equipment to effectively remove tough stains without causing harm to the rug.
By promptly and properly spot cleaning stains on your kitchen rug, you can prevent them from setting and maintain its overall cleanliness and appearance.
Pre-Treat Stains
Pre-treating stains on your kitchen rug is an effective method to increase the chances of successful stain removal during the cleaning process. By taking immediate action and using appropriate pre-treatment techniques, you can prevent stains from setting and ensure a cleaner rug.
Before pre-treating a stain, it’s crucial to identify the type of stain and assess the rug’s compatibility with the treatment method. Different stains require different approaches, and using the wrong method can potentially damage the rug’s fibers or color.
If you’re dealing with a liquid-based stain, such as coffee or juice, start by blotting up as much of the liquid as possible using a clean cloth or paper towel. Avoid rubbing, as this can spread the stain or embed it deeper into the rug.
Next, create a pre-treatment solution by mixing equal parts of white vinegar and water. Vinegar acts as a natural stain remover and deodorizer. Test the solution on a small inconspicuous area of the rug to make sure it doesn’t cause any discoloration or damage.
Dip a clean cloth or sponge into the vinegar solution and gently dab the stained area. Work from the outer edges of the stain towards the center, applying light pressure. Allow the solution to sit on the stain for a few minutes to loosen the dirt or pigment.
For solid or dried stains, such as grease or food residue, use a blunt knife or spoon to carefully scrape off any excess. Be cautious not to damage the rug fibers in the process.
After pre-treating the stain, proceed with the appropriate cleaning method based on the type of rug and stain. This could involve using a carpet cleaner, spot cleaning with a mild detergent solution, or seeking professional assistance.
Keep in mind that pre-treatment is most effective when done as soon as possible after the stain occurs. The longer a stain sits, the more difficult it becomes to remove. So, act promptly to increase the likelihood of successful stain removal.
It’s important to note that not all stains may be successfully removed through pre-treatment alone. Some stains, especially those that have set or are deeply embedded, may require additional cleaning or professional help for a thorough removal.
By pre-treating stains on your kitchen rug, you can improve the chances of successfully cleaning and removing the stain. Acting quickly and using the right pre-treatment method can minimize the impact of the stain on your rug’s appearance and longevity.
Use a Carpet Cleaner
When regular spot cleaning is not enough to remove stubborn stains or deeply embedded dirt from your kitchen rug, using a carpet cleaner can provide a more thorough and effective cleaning solution. Carpet cleaners are specifically designed to deep clean rugs and carpets, extracting dirt and grime from the fibers.
Before using a carpet cleaner, it’s important to read the manufacturer’s instructions and ensure that your rug is suitable for machine cleaning. Some rugs may require professional cleaning or have specific care instructions that should be followed.
Start by preparing the carpet cleaner according to the instructions provided. This usually involves filling the tank with a mixture of water and the appropriate cleaning solution. Some carpet cleaners may have separate compartments for water and solution, while others may require pre-mixing.
Once the carpet cleaner is ready, begin by vacuuming the rug to remove loose dirt and debris. This step helps to ensure that the cleaner can focus on deep cleaning rather than just surface dirt.
Next, slowly move the carpet cleaner over the rug, making overlapping passes to ensure that the entire rug is thoroughly cleaned. Follow the specific instructions for your carpet cleaner, as different models may have different settings and techniques.
Pay close attention to high-traffic areas, where dirt and stains are more likely to be concentrated. Take your time, allowing the cleaner to agitate the rug fibers and extract dirt effectively. Be cautious not to over-saturate the rug, as excessive moisture can lead to mildew or damage the backing.
After the initial cleaning pass, it’s essential to rinse the rug using clean water. This step helps to remove any remaining cleaning solution residue and ensures a fresh and residue-free rug. Follow the carpet cleaner’s instructions on how to perform the rinsing process.
Once the cleaning and rinsing are complete, it’s important to allow the rug to dry thoroughly. Air circulation and proper ventilation are crucial in preventing mold or mildew growth. Place the rug in a well-ventilated area or use fans to speed up the drying process.
It’s important to note that not all rugs can be machine-cleaned. Delicate or antique rugs may require professional cleaning or alternative methods. Be sure to check the care instructions provided by the rug manufacturer to prevent any damage.
By using a carpet cleaner, you can achieve a deep and thorough cleaning for your kitchen rug. Regular maintenance with a carpet cleaner helps to remove accumulated dirt and maintain the rug’s cleanliness and appearance over time.
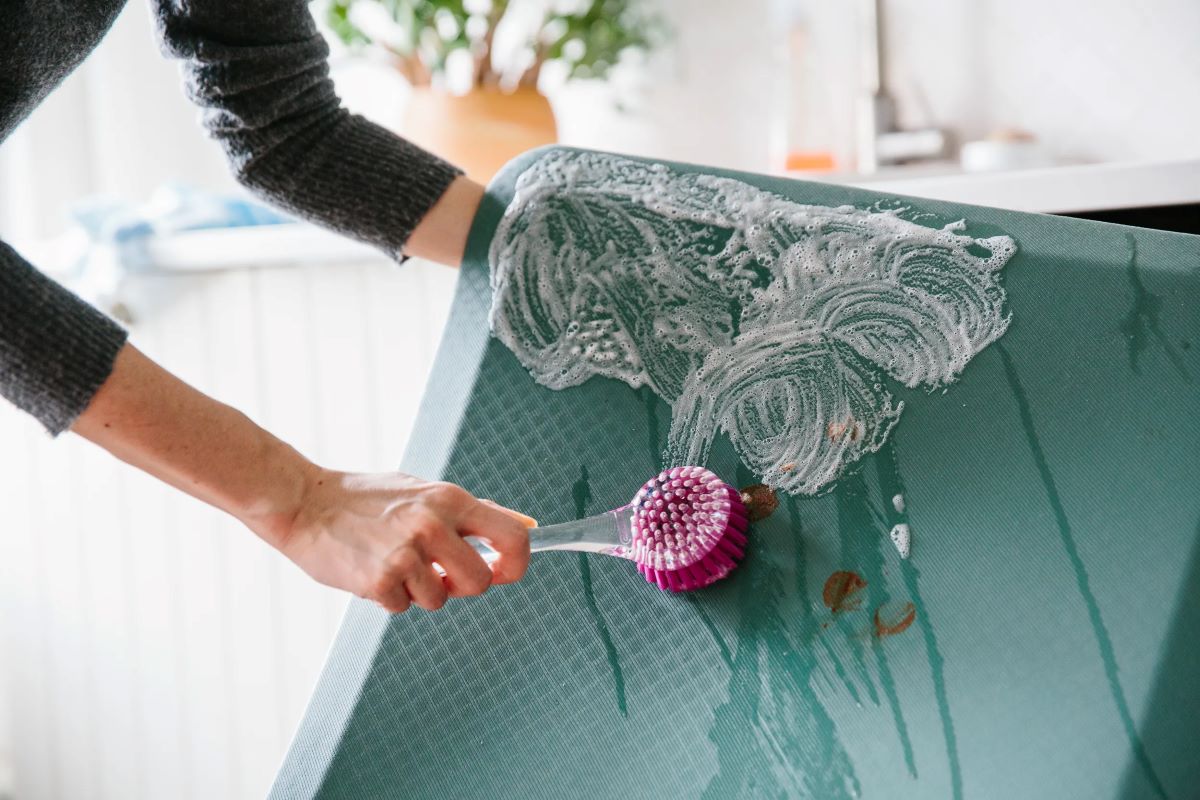
Scrub the Rug
For deep cleaning your kitchen rug and tackling stubborn stains and dirt, scrubbing the rug is an effective method to restore its cleanliness and freshness. Scrubbing helps to agitate the fibers and loosen embedded dirt, leaving your rug looking revitalized.
Before you start scrubbing, it’s essential to gather the necessary tools. You will need a soft-bristle brush or sponge, warm water, and a mild detergent or rug cleaning solution specifically formulated for your rug type. Avoid using harsh chemicals or abrasive brushes, as they can damage the rug fibers.
Begin by vacuuming the rug to remove any loose dirt and debris. This step ensures that the scrubbing process focuses on the deep cleaning rather than surface dirt.
Next, mix the cleaning solution with warm water according to the manufacturer’s instructions. Test the solution on a small, inconspicuous area of the rug to ensure that it doesn’t cause any discoloration or damage.
Dip the soft-bristle brush or sponge into the cleaning solution and gently scrub the rug in a circular motion. Start from one end of the rug and work your way across, covering both high-traffic areas and less frequently used spots.
Pay extra attention to any visible stains or heavily soiled areas. Apply a bit more pressure on those areas to help remove the dirt or stain. However, be careful not to scrub too vigorously, as it can cause damage to the rug’s fibers.
If you encounter stubborn stains, you can pre-treat them with a stain remover or a solution of vinegar and water before scrubbing. Allow the pre-treatment to sit on the stain for a few minutes to break down the dirt or pigment. Then, proceed with the scrubbing process.
Remember to rinse the brush or sponge regularly in clean water to avoid transferring dirt or residue back onto the rug. This step ensures that the cleaning process remains effective and prevents any cross-contamination.
After thoroughly scrubbing the rug, rinse it with clean water to remove any excess detergent or cleaning solution. Use a clean sponge or cloth to blot away the rinse water, ensuring that it’s free from soap residue.
Once the rug is clean and rinsed, allow it to air dry completely. Hang it over a drying rack or lay it flat in a well-ventilated area. Avoid exposing it to direct sunlight, as this can cause fading or discoloration.
By scrubbing your kitchen rug, you can effectively remove dirt, stains, and grime, restoring its freshness and beauty. Regular scrubbing, combined with proper care and maintenance, will help to prolong the life of your rug and maintain its cleanliness.
Remove Excess Moisture
After cleaning your kitchen rug, it’s crucial to ensure that you remove excess moisture to prevent mold or mildew from developing. Properly drying the rug is an essential step in maintaining its cleanliness and prolonging its lifespan.
Start by using a clean, absorbent towel or several layers of paper towels to blot the rug gently. Press down firmly, absorbing as much moisture as possible. Avoid rubbing or scrubbing, as this can damage the rug fibers or cause the moisture to spread.
If the rug is too large to handle, you can place it on a clean, dry surface and use a squeegee to push the excess water out. Begin at one end of the rug and work your way across, applying even pressure as you go. Continue this process until you’ve removed as much moisture as possible.
If necessary, you can repeat the blotting or squeegee method with fresh towels until the rug feels damp rather than wet. This step is crucial for preventing any water damage, as wet rugs can become a breeding ground for bacteria and mold.
Next, ensure proper air circulation in the drying area. Open windows or use fans to help speed up the drying process. If the weather permits, you can even hang the rug outdoors in a shaded area to benefit from natural airflow and sunlight.
Avoid using artificial heat sources, such as heaters or hairdryers, as they can potentially damage the rug fibers or cause them to shrink. The natural drying process is the safest and most effective method for removing moisture from your rug.
Periodically check the rug’s drying progress. Feel the rug to determine if it’s still damp or if it has fully dried. This step helps to prevent any lingering moisture from causing unpleasant odors or the growth of mold or mildew.
Remember that the drying time can vary depending on factors such as the rug’s thickness, material, and environmental conditions. Be patient and allow sufficient time for the rug to dry completely before returning it to its designated area.
If you notice any lingering moisture or a persistent damp smell, consider using a dehumidifier in the drying area to remove excess humidity. This can help prevent any potential moisture-related issues.
By removing excess moisture from your kitchen rug, you ensure that it stays clean, fresh, and free from potential damage. Proper drying is a crucial step in the overall cleaning process, and it plays a significant role in maintaining the rug’s longevity and appearance.
Air Dry the Rug
After removing excess moisture from your kitchen rug, it’s important to allow it to air dry completely. Air drying is a natural and effective method that helps prevent damage to the rug fibers and ensures that it retains its shape and quality.
Begin by finding a suitable location for drying the rug. Ideally, choose a well-ventilated area with good air circulation. Avoid placing the rug in direct sunlight, as this can cause fading or discoloration.
If possible, hang the rug outdoors on a clothesline or sturdy drying rack. Make sure to evenly distribute the weight of the rug to avoid stretching or distortion. If outdoor drying is not feasible, you can lay the rug flat on a clean, dry surface indoors.
Ensure that the rug is positioned so that it doesn’t come into contact with any damp surfaces or objects. This helps to prevent any potential moisture absorption and promotes thorough drying.
Leave the rug undisturbed during the drying process. Depending on factors such as the rug’s thickness, material, and surrounding humidity, it may take anywhere from a few hours to a couple of days for the rug to dry completely.
To speed up the drying process, you can use fans or open windows to increase airflow in the drying area. However, avoid using artificial heat sources, such as heaters or hairdryers, as they can damage the rug fibers or cause them to shrink.
Periodically check the rug to assess its drying progress. Gently touch the rug to determine if it feels dry and no longer cold to the touch. If you notice any areas that are still damp, continue the drying process until the entire rug is completely dry.
Once the rug has dried thoroughly, gently feel the fibers to ensure that there is no residual moisture. This step is essential to prevent any mold or mildew growth and to avoid any potential odors.
Before returning the rug to its designated area, inspect it for any remaining dirt or stains. If necessary, you can use a soft brush or vacuum cleaner to remove any loose particles that may have accumulated during the drying process.
By allowing your kitchen rug to air dry, you ensure that it retains its quality and appearance. This natural drying method helps prevent damage and promotes a clean and fresh rug, ready to enhance your kitchen aesthetic once again.
Brush the Rug
Brushing your kitchen rug is an essential step in maintaining its appearance, prolonging its lifespan, and keeping the fibers in good condition. Regular brushing helps to remove dirt, debris, and pet hair, revitalizing the rug’s texture and keeping it looking fresh.
Start by selecting a suitable brush for your rug. Opt for a soft-bristle brush or a vacuum cleaner attachment specifically designed for rugs and carpets. Avoid using a brush with hard bristles, as it can damage the rug fibers.
Before you begin brushing, make sure that the rug is clean and dry. This helps to prevent any particles from being pushed into the rug or causing friction during the brushing process.
Stand at one end of the rug and work your way across, brushing in the direction of the rug’s fibers. Use long, gentle strokes, applying minimal pressure to avoid damaging the rug. If you notice any resistance or tangles, brush more delicately to prevent pulling or tangling the fibers.
If your rug has a high pile or shaggy texture, use a brush with longer bristles to reach into the depths of the fibers and lift any embedded dirt or debris. For rugs with a shorter pile, a brush with shorter bristles works well to remove surface dirt.
Focus on areas that experience high foot traffic or those prone to accumulating dirt, such as entranceways or under kitchen tables. These areas may require extra attention and more thorough brushing.
In addition to removing dirt, brushing the rug also helps to revitalize the fibers and restore their natural sheen. It can also help to fluff up the rug and maintain its overall appearance.
Brushing your rug regularly, at least once a week, prevents dirt from becoming embedded and prolongs the time between deep cleanings. It’s a quick and simple task that contributes to the overall cleanliness and longevity of your kitchen rug.
After brushing, take a moment to inspect the rug for any lingering dirt or stains that may require spot cleaning. By addressing any issues promptly, you can maintain the rug’s cleanliness and prevent stains from setting.
Remember to brush the rug gently and with care, especially for older or more delicate rugs. Avoid excessive force or aggressive brushing, as this can lead to fiber damage or fraying.
By regularly brushing your kitchen rug, you keep it looking fresh and free from dirt buildup. This simple maintenance routine ensures that your rug remains a delightful addition to your kitchen decor for years to come.
Repeat if Needed
While following the proper steps for cleaning and maintaining your kitchen rug, it’s important to remember that sometimes one round of cleaning may not be sufficient to achieve desired results. In such cases, repeating the cleaning process can help tackle stubborn stains or deeply embedded dirt.
If, after the initial cleaning, you find that certain areas of the rug still appear stained or dirty, don’t hesitate to repeat the cleaning steps. This is especially true for high-traffic areas or spots that have endured heavy use or spills.
Start by reassessing the specific areas that require further attention. Identifying the nature of the stain and the type of dirt can help determine the most effective cleaning method. For example, using a different cleaning solution or applying a longer soaking time might be necessary.
Resume the cleaning process by spot cleaning or applying the appropriate cleaning solution to the targeted areas. Use gentle scrubbing or blotting techniques to remove stubborn stains or dirt embedded deep within the rug fibers.
Pay attention to any changes in the appearance of the stain or level of cleanliness as you repeat the cleaning process. It’s important to be patient and persistent, as some stains or dirt may require multiple attempts to fully remove.
However, be cautious not to excessively scrub or apply too much pressure, as this can damage the rug fibers or alter its texture. Adhere to the recommended guidelines for cleaning and maintain a gentle touch throughout the process.
After completing the additional cleaning, thoroughly rinse and dry the rug as instructed in the earlier sections. This step helps to remove any residual cleaning agents and ensures that the rug is fresh and ready for use.
Remember that some stains can be particularly stubborn or may be permanent due to the nature of the material or dye used in the rug. In such cases, seeking professional assistance from a rug cleaner may be the best solution to achieve optimal results.
By being diligent and willing to repeat the cleaning process when necessary, you can effectively tackle tough stains or lingering dirt on your kitchen rug. Persistence and proper maintenance techniques will ensure the rug remains in excellent condition and enhances the overall cleanliness of your kitchen space.