
Types of Water Filters in GE Fridges
When it comes to ensuring the quality and purity of the water you consume, having a reliable water filter in your GE fridge is crucial. GE offers a variety of water filters that cater to different needs and preferences. Understanding the types of filters available will help you make an informed decision when selecting the right one for your fridge.
1. Inline Water Filter: This type of filter is installed in the water supply line that connects to your fridge. It effectively removes impurities and contaminants from the water before it reaches the refrigerator’s dispenser or ice maker. Inline filters generally have a long lifespan and can efficiently remove chlorine, sediment, rust, and other common contaminants.
2. Internal Water Filter: This type of filter is placed inside the refrigerator, typically at the top or rear. It works by purifying the water as it flows through the fridge’s internal plumbing system. Internal filters are usually smaller in size and require replacement every six months. They are effective in removing various impurities, including chlorine taste and odor, cysts, lead, and mercury.
3. SmartWater Filter: SmartWater filters are designed with advanced technology to deliver superior water filtration. These filters are equipped with a smart chip that monitors and tracks usage, indicating the optimal time for replacement. They offer enhanced filtration for lead, pharmaceuticals, chlorine-resistant cysts, and other impurities.
4. Reverse Osmosis Filter: While not specific to GE fridges, reverse osmosis (RO) filters are a popular choice for those seeking the highest level of water purification. RO systems use a semi-permeable membrane to remove even the tiniest contaminants, including heavy metals, dissolved solids, and bacteria. If you have an RO system installed in your home, you can connect it to your refrigerator to enjoy clean, purified water.
Choosing the right type of water filter for your GE fridge depends on your specific needs and the quality of your water supply. Consider factors such as filter lifespan, filtration capabilities, and ease of installation when making your decision. It’s important to remember to always follow the manufacturer’s instructions when replacing or installing a water filter to maintain the optimal performance of your refrigerator’s water system.
How to Determine When to Change the Water Filter
Regularly replacing the water filter in your GE fridge is essential to ensure clean and healthy drinking water. While the frequency of filter changes may vary depending on your usage and water quality, there are a few indicators that can help you determine when it’s time for a replacement.
1. Manufacturer’s Recommendations: The first step is to consult the manufacturer’s guidelines for your specific fridge model. GE typically recommends replacing the water filter every six months. However, certain factors such as the level of water contamination in your area, the frequency of filter usage, and the quality of your water supply can impact the lifespan of the filter.
2. Water Taste and Odor: If you notice a change in the taste or odor of your water, it could be an indication that the filter is no longer effectively removing impurities. An unpleasant taste or odor may suggest that the filter is saturated and needs replacement.
3. Slow Water Flow: Another common sign that your water filter is due for a change is a noticeable decrease in water flow from the dispenser or the icemaker. A clogged or worn-out filter can restrict water flow, affecting the performance of your fridge’s water system. If you experience a significantly slower flow, it’s likely time to replace the filter.
4. Filter Indicator Light: Many GE fridges are equipped with a helpful filter indicator light that alerts you when it’s time to replace the filter. This light usually turns on after six months of filter usage or when the filter’s capacity is nearly depleted. Refer to your fridge’s user manual to understand the specific meaning and location of the indicator light.
5. Water Quality Test: If you want to be more thorough in assessing the effectiveness of your water filter, you can consider conducting a water quality test. These tests, available as DIY kits or through professional services, can measure the levels of certain contaminants in your water. Comparing the test results with the recommended limits will give you a clearer idea of when to replace your filter.
It’s important to note that these indicators are general guidelines. Your specific circumstances, water usage, and water quality may vary, impacting the lifespan of your filter. Regularly inspecting the filter and monitoring the aforementioned signs will help you ensure the continued effectiveness of your water filtration system.
Step-by-Step Guide to Changing the Water Filter
Replacing the water filter in your GE fridge is a simple process that can be done in just a few steps. By following this step-by-step guide, you can ensure a smooth and hassle-free filter replacement:
1. Locate the Filter: Start by identifying the location of the water filter in your refrigerator. The filter is typically located at the top or rear of the fridge, either inside the fridge compartment or behind a lower access panel. Consult your refrigerator’s user manual if you’re having trouble finding it.
2. Prepare the Area: Before removing the old filter, it’s important to prepare the area to minimize any potential mess. Lay down a towel or have a container ready to catch any water that may drip from the filter or the lines.
3. Turn Off the Water Supply: To prevent leaks or accidental dispensing of water, you’ll need to turn off the water supply to the fridge. Locate the water shut-off valve, usually located behind the fridge or in the basement, and turn it clockwise to shut off the water flow.
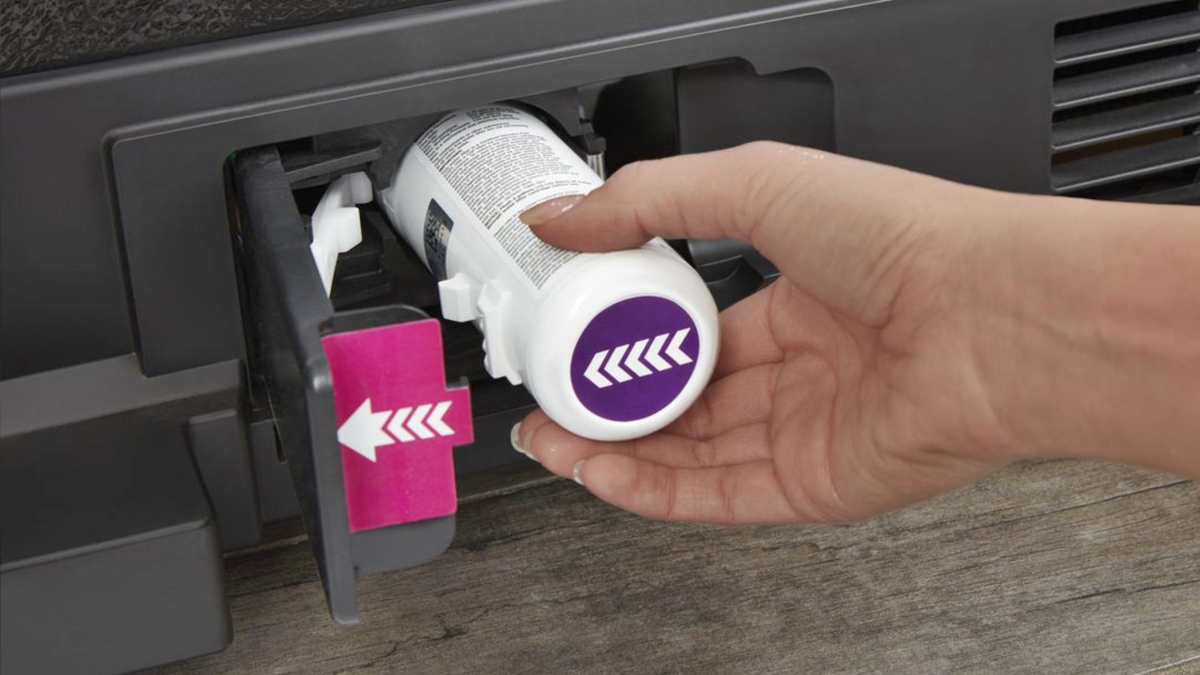
4. Remove the Old Filter: Once the water supply is turned off, it’s time to remove the old water filter. Depending on the model, you may need to twist or push a release button to detach the filter. Follow the arrows or indicators on the filter housing to correctly remove the old filter.
5. Prepare the New Filter: Unpack the new water filter from its packaging. Remove any protective coverings or seals, and ensure that any included O-rings or gaskets are properly attached to the filter. It’s important to use only genuine GE replacement filters to ensure compatibility and optimum performance.
6. Install the New Filter: Align the new water filter with the filter housing and insert it into place. Depending on the model, you may need to twist or push the filter until it locks or clicks into position. Ensure that the filter is securely seated in the housing to prevent leaks.
7. Reset the Filter Indicator Light: If your GE fridge has a filter indicator light, it’s important to reset it after replacing the filter. Refer to your refrigerator’s user manual for specific instructions on resetting the filter indicator.
8. Turn On the Water Supply: Once the new filter is installed and the filter indicator light is reset, you can turn the water supply back on. Locate the water shut-off valve and turn it counterclockwise to restore water flow to the fridge.
9. Flush the System: Before using the filtered water, it’s recommended to run several cups of water through the dispenser to flush out any air or loose carbon particles that may be present due to the filter change.
By following these steps, you can easily replace the water filter in your GE fridge and ensure that your water is consistently clean and fresh. Regularly changing the filter will help maintain the quality of your water and extend the lifespan of your fridge’s water system.
Removing the Old Water Filter
Before replacing the water filter in your GE fridge, you’ll need to remove the old filter. This process may vary slightly depending on your fridge model, but the following steps will guide you through the general procedure:
1. Locate the Filter: Determine the location of the water filter in your refrigerator. It is typically found at the top or rear of the fridge, either inside the fridge compartment or behind a lower access panel. Consult your refrigerator’s user manual if you’re unsure.
2. Prepare the Area: Lay down a towel or place a small container under the filter area to catch any water that may leak during the removal process. This will help prevent any unnecessary mess.
3. Turn Off the Water Supply: To avoid any water leaks, it’s important to turn off the water supply to the fridge. Locate the water shut-off valve, which is usually behind the fridge or in the basement, and turn it clockwise to shut off the water flow.
4. Release the Old Filter: Depending on your refrigerator model, you may need to twist or push a release button to detach the old filter. Look for arrows or indicators on the filter housing to determine the correct direction for removal. Follow the manufacturer’s instructions to ensure proper removal.
5. Slowly Remove the Old Filter: Carefully twist or pull the old filter out of the housing. Be prepared for a small amount of water to come out as you remove the filter. Take your time to cleanly remove the old filter to minimize any spills or splashes.
6. Dispose of the Old Filter: Wrap the old filter in a plastic bag or place it in a sealed container to prevent any residual water from leaking. Dispose of the old filter according to your local recycling or waste disposal guidelines. Some communities have specific instructions on how to handle used water filters.
7. Inspect the Filter Housing: Take a moment to inspect the filter housing for any signs of damage or debris. Wipe down the housing with a clean cloth or sponge to remove any dirt or buildup. This will ensure a clean and secure fit for the new filter.
By following these steps, you can easily remove the old water filter from your GE fridge. Make sure to handle the old filter and any water leaks with care, and dispose of it properly. With the old filter removed, you’re ready to install the new one and continue enjoying clean and refreshing water from your GE fridge.
Installing the New Water Filter
After removing the old water filter from your GE fridge, it’s time to install the new one. The process may vary slightly depending on your model, but the following steps will guide you through the general procedure:
1. Prepare the New Filter: Unpack the new water filter from its packaging. Remove any protective coverings or seals, and check for any included O-rings or gaskets. Ensure that these components are properly attached to the filter to create a secure seal.
2. Locate the Filter Housing: Identify the location of the filter housing in your fridge. It is typically found at the top or rear of the fridge, either inside the fridge compartment or behind a lower access panel. Consult your refrigerator’s user manual if you’re unsure.
3. Align the New Filter: Align the new water filter with the filter housing. Make sure that the arrow or indicator on the filter is facing in the correct direction, which is usually indicated on the housing. The filter should fit snugly into the housing, ensuring a proper connection.
4. Insert the New Filter: Push or twist the new filter into the housing, depending on the instructions for your specific model. Apply gentle pressure until you feel or hear a click, indicating that the filter is securely in place.
5. Secure the Filter: If your GE fridge requires additional securing, such as twisting to lock or pushing a release button, follow the manufacturer’s instructions to ensure the filter is properly locked into position. This will prevent any leaks or malfunctions.
6. Check for Leaks: After installing the new filter, carefully inspect the area around the filter housing for any signs of leaks. Look for water droplets or moisture. If you notice any leaks, double-check the installation to ensure the filter is correctly seated and secured.
7. Reset the Filter Indicator Light: If your fridge is equipped with a filter indicator light, refer to the user manual to learn how to reset it after installing the new filter. This will help you keep track of when the next filter replacement is due.
By following these steps, you can successfully install the new water filter in your GE fridge. Remember to take your time and ensure that the filter is securely attached. With the new filter in place, you can enjoy clean, filtered water from your refrigerator and maintain the optimal performance of your water system.
Resetting the Water Filter Indicator Light
Many GE fridges come equipped with a helpful filter indicator light that alerts you when it’s time to replace the water filter. After installing a new filter, it’s important to reset the indicator light to ensure accurate monitoring of the filter’s lifespan. The process may vary slightly depending on your model, but the following steps will guide you through the general procedure:
1. Locate the Filter Indicator: Find the filter indicator light on your refrigerator. It is usually located on the control panel, near the water and ice dispenser. Refer to your refrigerator’s user manual if you’re unsure about the specific location of the indicator light.
2. Press and Hold the Reset Button: Once you’ve located the filter indicator, press and hold down the reset button. The reset button is generally located either beside or beneath the indicator light. Keep pressing and holding the button for a few seconds.
3. Observe the Indicator Light: Watch the filter indicator light closely while you continue to press and hold the reset button. After a few seconds, the light may change color, blink, or go out completely. The exact behavior will depend on your refrigerator model.
4. Release the Reset Button: Once the filter indicator light has responded to the reset, release the reset button. The light should remain off or return to its normal color, indicating that the reset was successful.
5. Confirm the Reset: To make sure the reset was properly executed, check the filter indicator light again after releasing the reset button. It should show a fresh status, either by staying off, showing a new color, or displaying a full bar or percentage. This confirms that the indicator light has been successfully reset.
It’s important to note that the specific steps for resetting the filter indicator light may vary depending on your refrigerator model. Refer to your user manual for accurate instructions tailored to your particular model. If you no longer have the manual, you can often find digital copies on the manufacturer’s website.
By following these general steps and consulting your refrigerator’s user manual, you can easily reset the water filter indicator light after installing a new filter. Keeping the filter indicator accurate ensures that you can track the lifespan of your water filter and replace it in a timely manner, ensuring your GE fridge continues to provide clean and fresh water.
Maintenance Tips for a Long-Lasting Water Filter
Maintaining your water filter is crucial for ensuring its longevity and optimal performance. By following these maintenance tips, you can help extend the lifespan of your GE fridge’s water filter:
1. Regular Filter Replacement: Follow the manufacturer’s recommendations for replacing the water filter. Most GE fridges require filter replacement every six months. Failing to replace the filter on time can lead to reduced filtration efficiency and compromised water quality.
2. Use Genuine Replacement Filters: It’s important to use genuine GE replacement filters. While generic filters may seem like a cheaper alternative, they might not fit properly or provide the same level of filtration as the official GE filters. Opting for genuine replacement filters ensures compatibility and reliability.
3. Monitor Water Quality: Pay attention to any changes in the taste, odor, or appearance of your water. If you notice a significant decline in water quality, it might indicate that the filter needs replacement. Regularly assessing the water quality helps you stay aware of any issues that may arise.
4. Inspect Filter Housing: Periodically check the filter housing for any signs of damage or leaks. Ensure that the housing is properly sealed and that there are no cracks or loose connections. A damaged filter housing can compromise the effectiveness of the filter and potentially cause water leaks.
5. Flush the System: After replacing the water filter, it’s a good practice to flush the system. Run a few cups of water through the dispenser to remove any air or loose particles from the new filter. This helps prevent any initial contaminants from reaching your drinking water.
6. Maintain Cleanliness: Keep the area surrounding the filter clean and free from debris. Regularly wipe down the filter housing and any accessible parts with a damp cloth to remove dust, dirt, or potential blockages. Maintaining cleanliness helps ensure proper water flow and filtration.
7. Check for Leaks: Regularly inspect the filter and its connections for any signs of leaks. Look for water drips, moisture, or pooling around the filter housing. If you notice any leaks, immediately resolve the issue by properly securing the filter or replacing any damaged parts.
Following these maintenance tips will help you prolong the lifespan of your GE fridge’s water filter and ensure the continued delivery of clean and fresh water. By taking a proactive approach to filter maintenance, you can optimize the performance of your refrigerator’s water system and enjoy the benefits of purified water for a longer period of time.
Troubleshooting Common Issues with Water Filters
While water filters in GE fridges are designed to provide clean and fresh drinking water, occasional issues may arise. Here are some common problems you may encounter and troubleshooting steps to help address them:
1. Low Water Flow: If you notice a decrease in water flow from the dispenser, the filter may be clogged. First, check the filter for any signs of blockage or debris. If necessary, remove the filter and inspect it for clogs. Cleaning or replacing the filter should help restore proper water flow.
2. Water Leaks: Water leaks can occur if the filter is not properly installed or if there is damage to the filter housing or connections. Ensure the filter is securely in place and the housing is intact. If there are visible leaks, try tightening the connections or replacing any damaged parts.
3. Strange Taste or Odor: If your water has an unusual taste or odor, it may indicate that the filter is no longer effective in removing impurities. Check the expiration date on the filter and replace it if necessary. Flushing the system by running a few cups of water can also help remove any trapped air or residual particles causing the taste or odor.
4. Filter Indicator Light Issues: If the filter indicator light is not functioning properly, refer to your refrigerator’s user manual for reset instructions specific to your model. Ensure that you are following the correct steps for resetting the indicator light. If the problem persists, contact GE customer support for further assistance.
5. Unusual Noises: If you hear unusual noises coming from the filter, such as rattling or vibrating, it may indicate a loose connection or an improperly installed filter. Check the connections and ensure that the filter is securely in place. Tighten any loose parts to eliminate the noise.
6. Filter Compatibility: It’s important to use the correct filter model that is compatible with your GE fridge. Using a filter that is not specifically designed for your fridge can cause compatibility issues, leading to poor water quality, leaks, or malfunctioning of the water dispenser. Double-check the compatibility of the filter before installation.
7. Insufficient Filtration: If you believe that the filter is not effectively removing impurities, it may be time to replace the filter. Check the expiration date of the filter and make sure it is within the recommended usage period. If the problem persists, consider upgrading to a higher-grade or specialized filter for enhanced filtration performance.
Whenever troubleshooting your water filter, consult your refrigerator’s user manual for specific instructions and contact GE customer support if needed. Taking prompt action to address issues and performing regular maintenance will help ensure that your water filter functions properly and delivers clean and refreshing water to you and your family.
When to Contact a Professional
While many issues with water filters in GE fridges can be resolved through troubleshooting, there may be instances where it’s best to seek the expertise of a professional. Here are some situations where contacting a professional is recommended:
1. Complex Installation: If you encounter difficulties during the installation of a new water filter, such as unclear instructions or unfamiliar components, it’s wise to consult a professional. They can ensure that the filter is properly installed and the necessary connections are made without causing any damage to the refrigerator.
2. Persistent Leaks: If you’ve tried troubleshooting measures, but water leaks from the filter or its connections continue, it’s best to reach out to a professional. They can identify the underlying cause of the leaks and make the necessary repairs or replacements to resolve the issue.
3. Electrical Malfunctions: Should you experience any electrical malfunctions, such as the filter indicator light not functioning or unusual noises coming from the filter, it’s advisable to seek the assistance of a professional. They have the expertise to diagnose and repair any electrical issues safely.
4. Water Quality Concerns: If you have persistent concerns about the quality of your water, even after replacing the filter, it might be beneficial to consult a professional. They can conduct water tests to determine any underlying issues with your water supply and recommend suitable solutions, such as additional filtration systems.
5. Warranty and Maintenance: If your GE fridge is still under warranty, it’s advisable to contact the manufacturer or an authorized service provider for any maintenance or repair needs related to the water filter. This ensures that warranty guidelines and protocols are followed, protecting your rights as a consumer.
By involving a professional when needed, you can rest assured that any issues with your GE fridge’s water filter are addressed correctly and efficiently. They have the specialized knowledge, tools, and experience to handle complex situations, ensuring the optimal functioning and longevity of your water filter and refrigerator as a whole.