
Gather Your Materials
Before you begin building a shelf in your garage, it’s important to gather all the necessary materials. Having everything you need at hand will save you time and ensure a smooth construction process. Here’s a list of materials you’ll need:
-
Wood: Choose sturdy lumber that is suitable for shelving, such as plywood or 2×4 boards.
-
Screws: Use screws that are long enough to securely attach the support boards to the wall and shelves to the support boards.
-
Brackets (optional): If you want to reinforce your shelves, you’ll need brackets.
-
Measuring tape: A measuring tape is essential for accurately marking where the shelf will go and measuring the length of the support boards and shelves.
-
Pencil: A pencil will be used to mark the wall and studs.
-
Level: To ensure your shelf is straight, you’ll need a level to measure horizontal and vertical alignment.
-
Saw: Depending on the type of wood you choose, you may need a saw to cut the support boards and shelves to the desired lengths.
-
Drill: A drill is necessary to create pilot holes and secure the screws.
-
Screwdriver: You’ll need a screwdriver to tighten the screws if you’re not using a power drill.
-
Safety goggles and gloves: Protect yourself by wearing safety goggles and gloves while working with power tools or handling wood.
Ensure that you have all the necessary materials before you start building your garage shelf. This will make the process much smoother and prevent unnecessary interruptions. With all the materials gathered, you’re ready to move on to the next step.
Measure and Mark the Wall
Once you have gathered all your materials, it’s time to measure and mark the wall where you will be installing your garage shelf. Follow these steps:
-
Choose the location: Decide where you want your shelf to be positioned on the wall. Consider factors such as available space, accessibility, and the weight of the items you plan to store.
-
Measure the length and height: Using a measuring tape, measure the length and height of the space where you want to install the shelf. Take accurate measurements to ensure a proper fit.
-
Mark the wall: With a pencil, mark the desired position and height of the shelf on the wall. Use a level to ensure your marks are straight and level.
-
Find the studs: Use a stud finder or knock on the wall to locate the studs behind the drywall. Mark the positions of the studs on the wall with a pencil.
-
Measure and mark the support board positions: Measure and mark the positions of the support boards on the wall. It’s best to have at least two support boards, evenly spaced along the length of the shelf.
Accurate measurements and markings are crucial in ensuring a sturdy and well-fitted shelf. Take your time to measure and mark the wall carefully, paying attention to the position of the studs and support boards. This will provide a solid foundation for your garage shelf and help distribute the weight evenly. Once you have completed this step, you’re ready to move on to the next phase of the construction process.
Locate and Mark the Studs
Locating and marking the studs in your garage wall is a crucial step in ensuring the stability and strength of your shelf. Here’s how to locate and mark the studs:
-
Use a stud finder: A stud finder is a handy tool that helps detect the presence of studs behind the wall. Place the stud finder against the wall and move it slowly and steadily until it indicates the presence of a stud. Follow the manufacturer’s instructions for accurate results.
-
Knock on the wall: If you don’t have a stud finder, you can also locate studs by tapping lightly on the wall. A solid and sturdy sound indicates the presence of a stud, while a hollow sound indicates an empty space.
-
Mark the stud positions: Once you have located a stud, use a pencil to make a small mark on the wall. Repeat this process to mark the positions of all the studs.
-
Verify the stud positions: To ensure accuracy, use a measuring tape to measure the distance between each stud. Studs are typically spaced 16 inches or 24 inches apart in most construction.
Marking the positions of the studs is crucial as it determines where the support boards will be attached. Attaching the support boards to the studs ensures that your garage shelf can hold heavy items securely without sagging or collapsing. Take your time during this step to locate and mark the studs accurately. Once you have marked the stud positions, you can proceed to the next phase of the installation process.
Cut the Support Boards
Now that you have measured and marked the wall and located the studs, it’s time to cut the support boards for your garage shelf. The support boards will provide the foundation for your shelves and ensure stability. Follow these steps to cut the support boards:
-
Measure the length: Using a measuring tape, measure the distance between the marks you made for the support board positions on the wall. This will determine the length of your support boards.
-
Mark the measurements: Use a pencil to mark the measured length on the boards. Double-check your measurements to ensure accuracy.
-
Cut the boards: Use a saw to cut the boards according to the marked measurements. If you don’t have a saw or are uncomfortable using one, you can ask a hardware store or lumber yard to cut them for you.
It’s essential to ensure that the support boards are cut accurately to match the measurements of your wall. This will ensure that they fit snugly and provide sturdy support for your shelves. Once you have cut the support boards, set them aside and get ready to attach them to the wall in the next step of the installation process.
Attach the Support Boards to the Wall
With the support boards cut to the appropriate length, you can now proceed to attach them to the wall. This step is crucial as it provides the foundation for your garage shelf and ensures stability. Follow these steps to properly attach the support boards:
-
Position the support boards: Hold each support board against the wall, aligning it with the marked positions. Make sure the top edge of the board is level and flush with the marks on the wall.
-
Mark the screw hole positions: Use a pencil to mark the positions on the support boards where you will insert screws to attach them to the wall. Ideally, there should be at least two screw holes per stud.
-
Drill pilot holes: Use a drill with an appropriate-sized drill bit to create pilot holes at the marked positions on the support boards. Pilot holes ensure that the boards won’t split when you insert the screws.
-
Secure the support boards: Place the support boards back against the wall and align the pilot holes with the marks on the wall. Using a drill or screwdriver, insert screws through the pilot holes and into the wall. Ensure that the support boards are securely fastened to the studs.
Attaching the support boards to the wall provides a strong foundation for your garage shelf, ensuring that it can bear the weight of the items you plan to store. Take your time during this step to align the boards and securely fasten them to the studs. With the support boards securely attached, you’re now ready to move on to the next phase of the installation process.
Cut the Shelves
Once you have attached the support boards to the wall, it’s time to cut the shelves for your garage shelf. The shelves will provide the surface area for organizing and storing your items. Follow these steps to cut the shelves:
-
Measure the width and depth: Using a measuring tape, measure the width and depth of the space between the support boards. Take accurate measurements to ensure the shelves fit properly.
-
Mark the measurements: Use a pencil to mark the measured width and depth on the chosen material for the shelves, whether it’s plywood or another suitable wood product.
-
Cut the shelves: Use a saw to cut the shelves according to the marked measurements. Ensure that the cuts are straight and smooth.
It’s important to ensure that the shelves are cut accurately to fit within the space between the support boards. This will provide a solid surface for storing your items without any overhang or gaps. Once you have cut the shelves, place them on top of the support boards and ensure that they fit snugly and securely. With the shelves cut and in place, you’re ready to move on to the next step of the installation process.
Install the Shelves
With the support boards in place and the shelves cut to size, it’s time to install the shelves onto the support boards. Proper installation is essential in ensuring the stability and functionality of your garage shelf. Follow these steps to install the shelves:
-
Place the shelves: Carefully place each cut shelf onto the support boards, ensuring they are centered and aligned with the wall.
-
Secure the shelves: Using screws or nails, attach the shelves to the support boards from the underside. Make sure to drive the fasteners in at an angle to prevent them from protruding through the top of the shelves.
-
Double-check alignment: Ensure that the shelves are level and evenly spaced. Use a level to confirm that they are flat and not sloping or tilting.
-
Test the stability: Give the shelves a gentle push to make sure they are securely attached and do not wobble. If any adjustments are necessary, tighten the screws or reinforce with additional fasteners.
Installing the shelves onto the support boards provides a functional and organized storage space in your garage. Take your time during this step to ensure that the shelves are properly aligned and securely attached. With the shelves installed, you’re one step closer to maximizing the storage potential of your garage.
Reinforce the Shelves with Brackets
To further enhance the stability and weight-bearing capacity of your garage shelves, you can reinforce them with brackets. This step is particularly important if you plan to store heavy or bulky items on the shelves. Follow these steps to reinforce the shelves with brackets:
-
Measure the desired position: Determine where you want to place the brackets along the underside of the shelves. It’s best to position the brackets near the ends of the shelves and evenly along their length.
-
Mark the bracket positions: Use a pencil to mark the positions where the brackets will be attached on the underside of the shelves.
-
Attach the brackets: Using a drill and screws or nails, secure the brackets to the underside of the shelves at the marked positions. Make sure the brackets are fully attached and provide ample support.
-
Test the stability: After installing the brackets, give the shelves a gentle shake to ensure they are stable and reinforced. If there is any wobbling or movement, check the brackets to ensure they are securely fastened.
Reinforcing the shelves with brackets provides extra support and helps distribute the weight more evenly. This is especially important for heavy or bulky items that require added stability. Take your time during this step to properly install the brackets and ensure the shelves are securely reinforced. With the shelves reinforced, you can confidently store your items without worrying about any potential hazards.
Optional: Add a Backing
While not necessary for all garage shelves, adding a backing can provide additional support and stability. It can also prevent items from falling off the back of the shelves. Here’s how you can add a backing to your garage shelves:
-
Measure the dimensions: Measure the height and width of the space between the support boards at the back of the shelves.
-
Cut the backing material: Using a saw or utility knife, cut a piece of plywood or another suitable backing material to match the measured dimensions.
-
Position the backing: Move the shelves slightly forward to create enough space for the backing. Place the cut piece against the back of the shelves, fitting it snugly between the support boards.
-
Secure the backing: Use screws or nails to attach the backing to the support boards and shelves. Place the fasteners in strategic locations, such as the corners and along the edges, to ensure a secure attachment.
-
Finishing touches: If desired, you can paint or stain the backing to match the overall aesthetic of your garage. This will provide a cohesive look to your shelves.
Adding a backing to your garage shelves can help keep items from falling off the back and provide added stability. Consider adding a backing if you plan to store small or loose items on the shelves. Take your time during this optional step to properly measure, cut, and secure the backing to ensure a solid and functional addition to your garage shelves.
Optional: Paint or Stain the Shelves
While not essential, painting or staining your garage shelves can provide aesthetic appeal and help protect the wood from moisture and wear. Here’s how you can paint or stain your shelves:
-
Clean the shelves: Before applying any paint or stain, ensure that the shelves are clean and free of any dust or debris. You can use a damp cloth or a gentle cleaner to wipe them down.
-
Sand the shelves (optional): If the surface of the shelves is rough or uneven, you may choose to lightly sand them to create a smoother finish. Use fine-grit sandpaper and sand in the direction of the wood grain.
-
Choose your finish: Decide whether you want to paint or stain your shelves. Paint provides a wide range of color options, while stain enhances the natural beauty of the wood. Select a paint color or stain that complements your garage’s decor.
-
Apply the paint or stain: Use a paintbrush or a clean cloth to apply the paint or stain evenly on the shelves. Follow the manufacturer’s instructions regarding the application process, drying time, and any additional coats required.
-
Allow for proper drying: Make sure to give the shelves sufficient time to dry completely before placing any items on them. This will help prevent smudging or damage to the finish.
Painting or staining your garage shelves is an optional step that can add a polished look to your space. It allows you to customize the shelves to your liking and create a cohesive style within your garage. Take your time during this process to ensure a smooth and even finish. Once the paint or stain has dried, you can begin organizing and placing items on your freshly painted or stained shelves.
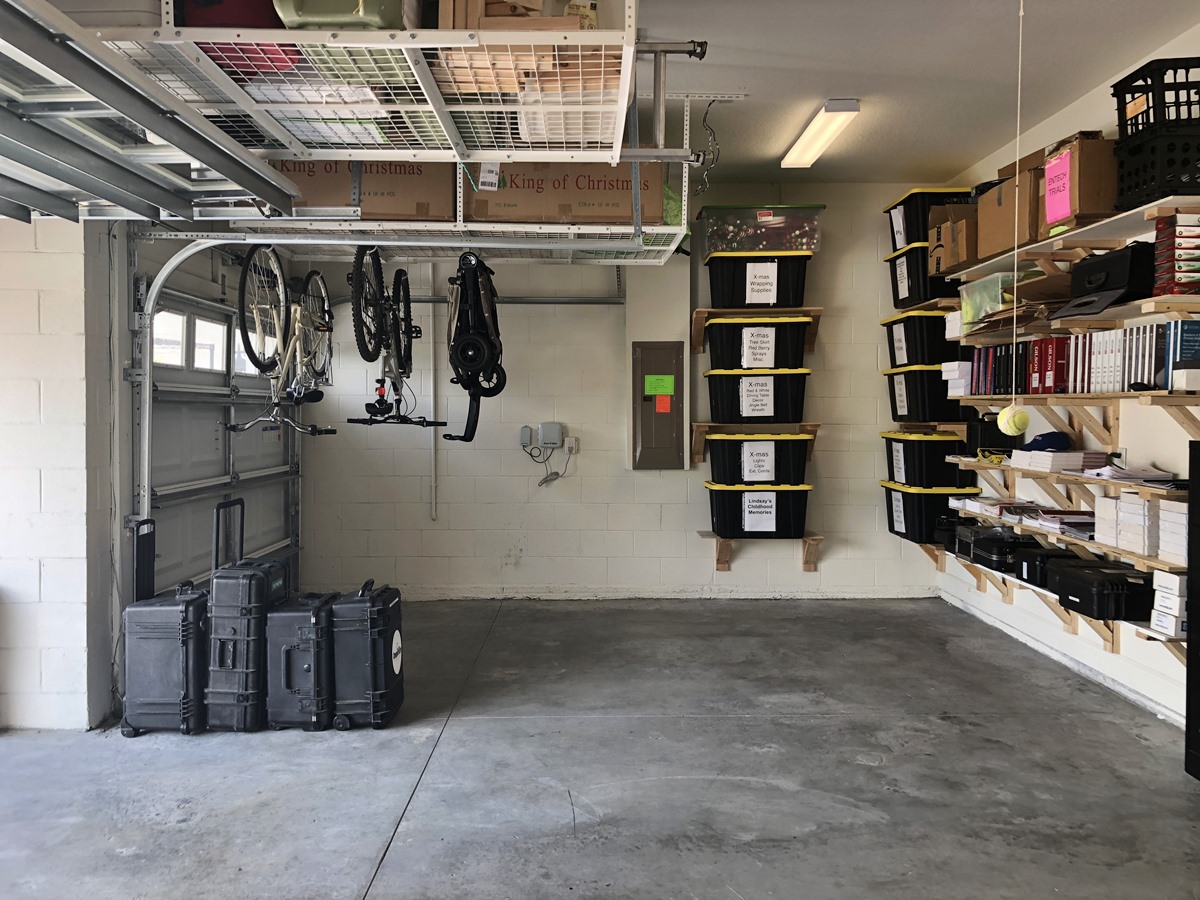
Organize and Place Items on the Shelves
Now that your garage shelves are constructed, it’s time to organize and place your items on them. Proper organization will maximize the efficiency of your storage space and make it easier to find what you need. Follow these tips to organize and arrange your items:
-
Categorize your items: Sort your items into categories such as tools, gardening supplies, sports equipment, and household cleaners. This will make it easier to locate specific items when needed.
-
Use storage bins or containers: To keep smaller items organized and prevent clutter, consider using storage bins or containers. Label them clearly to easily identify the contents.
-
Place frequently used items at eye level: Keep items that you frequently use within easy reach by placing them at eye level. This will save you time and effort when accessing them.
-
Distribute weight evenly: When placing heavy items on the shelves, distribute the weight evenly across the support boards. This will help maintain the stability of the shelves.
-
Leave room for future additions: Leave some open space on the shelves to accommodate any new items that might come along in the future. This will minimize the need for reorganizing and provide flexibility.
Take the time to arrange your items thoughtfully, considering both function and aesthetics. Keep similar items together and maintain a clean and organized appearance. By efficiently organizing your items on the shelves, you’ll make the most of your garage space and create a clutter-free and functional storage area.