
Materials Needed
To build a successful blanket fort, you will need a few essential materials. Gather these items before you embark on your fort-building adventure:
1. Blankets: Choose a variety of blankets in different sizes and textures. Thick blankets will provide a sturdy structure, while softer blankets will create a cozy and comfortable interior.
2. Pillows: Grab a collection of pillows to create a soft seating area inside your fort. Mix and match different sizes and shapes for added comfort.
3. Chairs or Furniture: Depending on the size of your fort, you may need some chairs or furniture to support the structure. Use them as anchor points and structural supports.
4. Clips or Clothespins: These will be essential for attaching the blankets together and securing them to the furniture or other surfaces. Make sure to have enough to keep everything in place.
5. Flashlights or Fairy Lights: Adding some soft lighting will create a magical ambiance inside your fort. Use flashlights or fairy lights to add a touch of warmth and make the space more inviting.
6. Paper and Art Supplies: Get creative and bring some paper and art supplies to decorate the interior of your fort. Draw pictures, make paper chains, or create your own fort-themed artwork.
7. Snacks and Drinks: No fort is complete without some tasty snacks and refreshing drinks. Prepare small finger foods or grab your favorite snacks to enjoy inside your cozy hideout.
8. Entertainment: Bring along your favorite books, board games, or electronic devices to keep yourself entertained during your fort-building adventure.
Remember, the goal is to create a comfortable and enjoyable space, so feel free to personalize your materials based on your preferences. With these materials on hand, you’re ready to take the first step in building your perfect blanket fort!
Choosing the Perfect Location
When it comes to building a blanket fort, the location plays a crucial role in determining the overall experience. Here are some factors to consider when choosing the perfect spot for your fort:
1. Space: Look for an area with enough space to accommodate your fort and allow for comfortable movement inside. It could be a large living room, a spacious bedroom, or even a dedicated playroom.
2. Supportive Surfaces: Opt for a location with sturdy furniture or walls that can support the weight of the blankets. Avoid fragile or delicate items that may be damaged during the fort-building process.
3. Privacy: Choose a location that offers some privacy, especially if you plan on spending extended periods of time in your fort. This will allow you to relax, unwind, and fully immerse yourself in the cozy atmosphere.
4. Light Control: Consider the lighting conditions in the chosen location. If you prefer a dimly lit fort, select an area where you can easily control the amount of natural light or where artificial lighting can be adjusted.
5. Accessibility: Ensure that the location is easily accessible, especially if you plan on bringing in supplies, snacks, or other entertainment items. A convenient location will save you from frequent trips in and out of the fort.
6. Sound Levels: Pay attention to the ambient noise in the area. If possible, choose a location away from loud appliances or high-traffic areas to create a calm and peaceful atmosphere within your fort.
7. Child-Friendly: If you’re building a blanket fort for children, make sure the chosen location is safe and suitable for their age. Consider any potential hazards and take necessary precautions to ensure their comfort and well-being.
8. Flexibility: Sometimes, the perfect location might not be available. In such cases, consider adapting your fort-building plans to fit the available space while still maintaining the cozy and magical vibe.
By taking these factors into account, you’ll be able to select the ideal location for your blanket fort. Remember, the location sets the foundation for your fort-building adventure, so choose wisely and get ready to create a cozy hideaway that’s truly unique and inviting.
Creating a Solid Foundation
Building a blanket fort with a solid foundation is essential for stability and longevity. Here are some steps to help you create a sturdy base for your fort:
1. Clear the Space: Begin by clearing the area of any furniture, toys, or other items that may obstruct the construction. This will provide a clean canvas for building your fort.
2. Lay a Base: Start by placing a large blanket or sheet on the floor to serve as the foundation of your fort. Make sure it covers the desired space and is free of wrinkles to ensure a smooth and even surface.
3. Secure the Base: Use heavy objects, such as books or weights, to hold down the corners and edges of the base blanket. This will prevent it from shifting or sliding while you build the rest of the fort.
4. Utilize Furniture: Utilize chairs, tables, or other sturdy furniture to support the structure of your fort. Arrange them in a way that creates the desired shape and layout for your fort.
5. Reinforce with Pillows: Place pillows or cushions along the edges of the base blanket to provide additional support and stability. This will help create a solid foundation for attaching the rest of the blankets.
6. Test Stability: Before moving forward, double-check the stability of the foundation by gently pushing and pulling on the furniture and blankets. Make any necessary adjustments to ensure a secure base.
7. Consider the Weight: Be mindful of the weight distribution when adding additional layers of blankets. If the structure starts to feel unstable, reinforce the foundation with additional furniture or pillows.
8. Reinforce with Clips or Clothespins: To secure the blankets to the furniture and keep them from slipping, use clips or clothespins to attach the edges of the blankets to the supporting pieces. This will provide extra stability and prevent the blankets from sagging.
9. Check Accessibility: Ensure that the entrance and exit points are easily accessible and do not compromise the stability of the fort. Test them out by crawling in and out of the fort to make sure they are comfortable and secure.
By following these guidelines, you’ll create a solid and stable foundation for your blanket fort. Building a strong base is crucial for maintaining the integrity of your fort structure and ensuring a safe and enjoyable fort-building experience.
Building the Frame
Once you have a solid foundation for your blanket fort, it’s time to build the frame that will give your fort its shape and structure. Follow these steps to construct a sturdy and reliable frame:
1. Choose Your Frame Design: Decide on the type of frame you want for your fort. You can go for a classic “A-frame” by leaning blankets against each other on opposite sides or use furniture to create a more elaborate frame.
2. Position the Furniture: Arrange the furniture in the desired layout to support the frame. Place them strategically to create the shape and height you want for your fort. Consider using chairs, tables, or even a combination of mattress and cushions.
3. Lean and Secure Blankets: Prop the blankets against the furniture to form the frame. Lean them at an angle to create a sloping roof effect. Use clothespins, clips, or other fasteners to secure the blankets to the furniture, ensuring they stay in place.
4. Overlapping Blankets: If you’re using multiple blankets for the frame, overlap their edges to provide a seamless and stable connection. This will prevent gaps and maintain the fort’s structural integrity.
5. Reinforce with Pillows: Place pillows or cushions at the base of the frame to provide additional stability and support. These can act as a buffer between the blankets and the floor, adding extra comfort to your fort.
6. Check the Stability: Once the frame is built, test its stability by gently pushing and shaking it. Make adjustments as needed to ensure that the frame is secure and won’t collapse during use.
7. Create Multiple Rooms: If you desire different sections or rooms within your fort, use additional furniture or blankets to partition off areas. This will give your fort a more dynamic and exciting layout.
8. Use your Imagination: Don’t be afraid to get creative with your frame design. Experiment with different angles, heights, and shapes to make your fort unique and visually appealing.
Remember, building the frame is a crucial step in fort construction. It provides the structure and stability for the rest of your fort-building adventure. Take your time to ensure that the frame is solid and secure, and get ready to move on to the next step of attaching the blankets.
Attaching the Blankets
Now that you have your frame in place, it’s time to attach the blankets to create the walls and roof of your blanket fort. Follow these steps to ensure a secure and snug fit for your blankets:
1. Start with the Roof: Begin by draping a large blanket or sheet over the top of the frame to create the roof. Make sure it hangs evenly on all sides and covers the entire structure.
2. Secure the Roof: Use clips, clothespins, or other fasteners to attach the corners and edges of the roof blanket to the frame. Make sure it is taut and securely fastened to prevent it from slipping or sagging.
3. Attach the Sidewalls: Take additional blankets or sheets and drape them over the sides of the frame to create the walls of your fort. Ensure that they overlap the roof blanket slightly to provide a seamless connection.
4. Secure the Sidewalls: Use clips, clothespins, or other fasteners to attach the sidewalls to the frame and each other. Pay attention to the corners and edges to ensure a secure and snug fit.
5. Fill in Blanket Gaps: If there are any gaps or openings between the blankets, use smaller blankets or towels to fill them in. This will help create a more enclosed and cozy space inside the fort.
6. Consider Window Openings: To allow some light and air into your fort, create window-like openings by folding back sections of the blanket walls. Secure them with clips or clothespins to keep them in place.
7. Test Stability: Once all the blankets are attached, test the stability of the fort by gently pushing and pulling on the walls. Make any necessary adjustments to ensure that the blankets are secure and won’t easily come off.
8. Inspect for Comfort: Take a moment to step inside the fort and evaluate the comfort level. Adjust the blankets if necessary to create a spacious and cozy interior where you can comfortably sit, lie down, or move around.
By properly attaching the blankets, you’ll create a snug and secure fort that will provide hours of fun and relaxation. Take your time to ensure that the blankets are securely fastened and enjoy the sense of accomplishment as your fort takes shape.
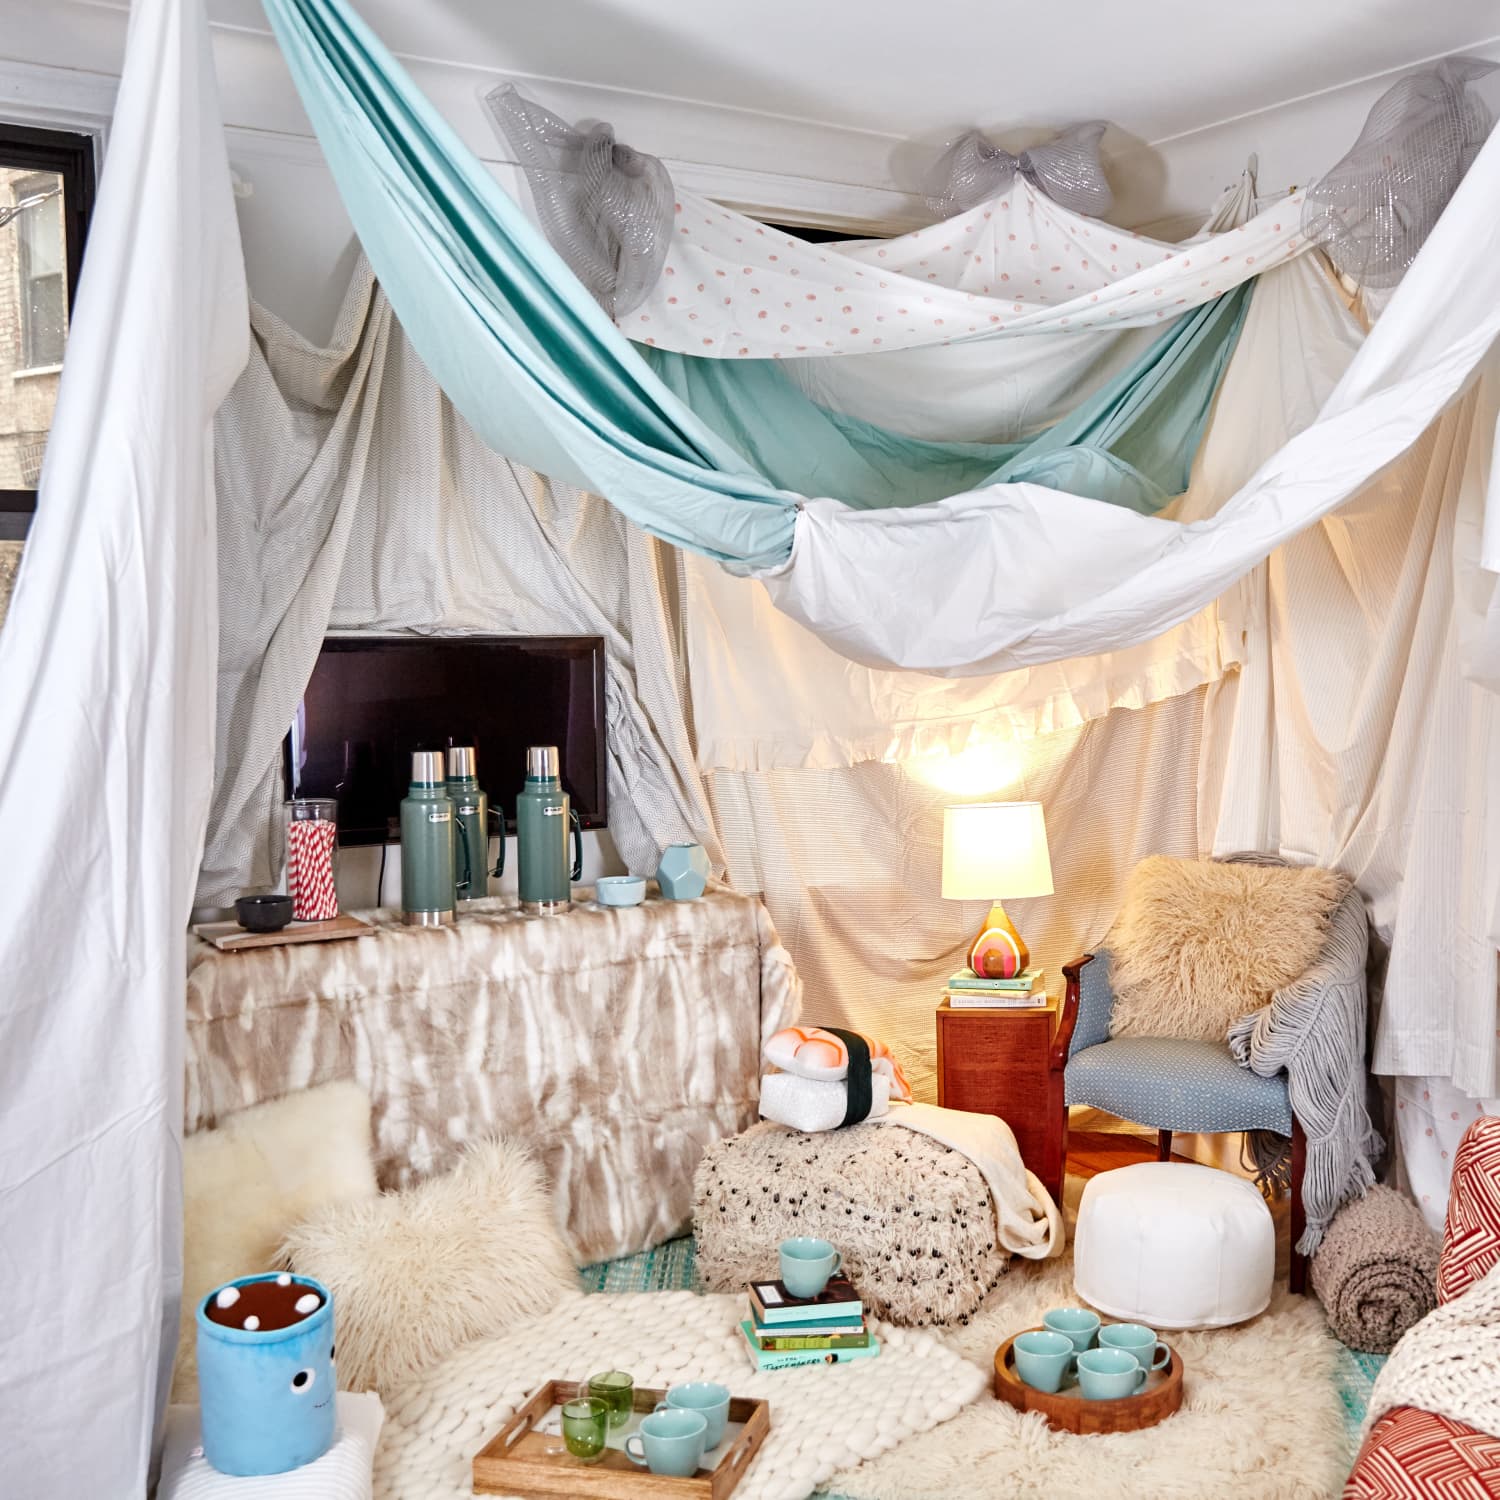
Making it Cozy and Comfortable
Now that your blanket fort is built and the blankets are securely attached, it’s time to transform it into a cozy and comfortable haven. Follow these steps to create the perfect atmosphere inside your fort:
1. Add Soft Lighting: Use fairy lights, string lights, or a dim lamp to create a warm and cozy glow inside your fort. Avoid bright, harsh lighting that can disrupt the cozy ambiance.
2. Arrange Pillows and Cushions: Place pillows and cushions inside the fort to create a soft and comfortable seating area. Arrange them in a way that supports your back and allows you to relax and unwind.
3. Layer Blankets: Add additional blankets or throws to create a plush and cozy interior. Layering different textures and thicknesses will enhance the comfort and make your fort feel like a cozy retreat.
4. Include Snacks and Drinks: Bring in a tray of your favorite snacks and beverages to enjoy while spending time in your fort. This adds an extra touch of indulgence and makes the experience even more enjoyable.
5. Bring in Books or Entertainment: Grab your favorite books, magazines, or electronic devices to keep yourself entertained. Having something to read or watch will make your fort even more inviting and enjoyable.
6. Play Relaxing Music: Set the mood by playing soft and calming music in the background. Choose soothing tunes that help you unwind and create a serene atmosphere inside your fort.
7. Add Cozy Blanket Accents: Use smaller blankets or throws to create a cozy flooring inside the fort. You can also drape them over furniture or create a canopy effect to further enhance the comfort and intimacy.
8. Personalize with Comfort Items: Bring in your favorite stuffed animals, blankets, or personal items to make the fort feel more like your own special sanctuary. Surround yourself with familiar comforts and make the space uniquely yours.
By making your blanket fort cozy and comfortable, you’ll create a space that encourages relaxation, enjoyment, and a sense of calm. Take the time to add these cozy elements and create an inviting atmosphere where you can fully immerse yourself in the comfort of your fort.
Adding Decoration and Personal Touches
To truly make your blanket fort your own, it’s important to add decorative elements and personal touches that reflect your style and personality. Here are some ideas to help you add charm and character to your fort:
1. Hang String Lights: String lights not only provide soft lighting but also add a whimsical and magical touch to your fort. Hang them along the walls or drape them around the entrance for a cozy and enchanting ambiance.
2. Create Paper Decorations: Use colored paper, scissors, and tape to create paper chains, garlands, or cut-out shapes. Hang them from the ceiling or attach them to the walls to add a festive and playful atmosphere to your fort.
3. Display Artwork: Bring in your favorite artwork or drawings to decorate the interior walls of your fort. Attach them using tape or clips to give your fort a personal touch and make it feel uniquely yours.
4. Hang Photos: Print out some of your favorite photos and hang them with clips or string to create a mini photo gallery inside your fort. This will add a nostalgic and personal touch to your cozy space.
5. Use Throw Pillows and Blankets: Incorporate colorful and patterned throw pillows and blankets to add pops of color and texture to your fort. Arrange them in an inviting way to create a cozy and welcoming atmosphere.
6. Add Plants: Bring in small potted plants or fresh flowers to introduce a touch of nature into your fort. Plants not only add a visual appeal but also help create a calming and refreshing environment.
7. Create a DIY Sign: Make a DIY sign with your fort’s name or a personalized message. Use colorful markers, cardboard, or paper and hang the sign near the entrance to add a playful and personalized touch.
8. Hang Fabric or Scarves: Utilize colorful fabric or scarves to create beautiful drapes or curtains inside your fort. This will add a touch of elegance and create a cozy, secluded space.
Remember, the goal is to make your blanket fort a reflection of your personality and style. Experiment with different decorations, colors, and textures to create a fort that feels uniquely yours. Have fun adding these personal touches and watch as your fort transforms into a space filled with charm and character.
Creating Secret Passageways and Escape Routes
Building secret passageways and escape routes in your blanket fort can add an element of excitement and adventure to your fort-building experience. Here are some creative ideas to help you create hidden paths and escape routes:
1. Curtain Entrances: Use curtains or sheets to create hidden entrances to your fort. Hang them in strategic locations, such as behind furniture or along the walls, to conceal the entrance and create a sense of mystery.
2. Tunnel Passages: Construct tunnel-like pathways using boxes, pillows, or other sturdy materials. Create a series of interconnected tunnels that lead to different areas of your fort, making it feel like an intricate labyrinth.
3. Trapdoors or Flaps: Add hidden trapdoors or flaps in the roof or walls of your fort. Lift or open them to reveal secret compartments or escape routes, adding an element of surprise and intrigue.
4. Wall Cutouts: Cut out small sections of the blanket or sheet walls to create hidden peepholes or small hidden passageways. These little cutouts can add a fun and interactive element to your fort.
5. Furniture Slide-outs: Arrange furniture in a way that allows for hidden compartments or concealed pathways. For example, place a bookshelf on wheels that can be moved to reveal secret passages behind it.
6. Underground Tunnels: Drape blankets over tables or chairs to create a “crawl space” beneath them, giving the illusion of exploring an underground tunnel system. This adds an imaginative twist to your fort-building adventure.
7. Invisible Maze: Create an invisible maze within your fort using string or yarn. Tie it around the furniture or secure it between different wall attachments to guide you through the maze and discover hidden treasures.
8. Climbable Structures: Incorporate climbing structures within your fort, such as using stacked pillows, cushions, or makeshift ladders. These structures can lead to elevated areas or secret hideaways.
Remember to prioritize safety when creating secret passageways and escape routes. Ensure that the structures are secure, stable, and safe to navigate. Additionally, communicate and discuss the layout with others to avoid any accidents or misunderstandings.
By incorporating these hidden pathways and escape routes, you’ll elevate the imaginative play in your fort and create a sense of adventure. Get creative and have fun constructing these secret elements within your fort to make it even more captivating and thrilling.
Maintaining and Cleaning Your Blanket Fort
After you’ve enjoyed your cozy blanket fort, it’s important to take steps to maintain its cleanliness and prolong its lifespan. Here are some tips to help you maintain and clean your blanket fort:
1. Regularly Shake Out the Blankets: Depending on how long you keep your fort up, it’s a good idea to shake out the blankets regularly to remove any dust or debris that may have accumulated. Simply take the blankets outside and give them a good shake.
2. Spot Clean Stains: If you notice any spills or stains on the blankets, spot clean them as soon as possible. Use a gentle detergent or stain remover and a clean cloth to dab the affected area. Blot the stain rather than rubbing to avoid spreading it further.
3. Wash the Blankets: If the blankets become dirty or start to smell, it’s time to give them a proper wash. Check the care instructions on the blankets and wash them accordingly. Use a gentle cycle with mild detergent, and remember to dry them thoroughly before reassembling your fort.
4. Store the Blanket Fort Properly: When you’re ready to take down your fort, carefully disassemble it. Fold the blankets neatly and store them in a clean and dry place, away from moisture or pests. This will help to preserve the blankets and keep them in good condition for future use.
5. Vacuum and Dust: After taking down your fort, vacuum or sweep the area where the fort was set up to remove any dirt or crumbs. Dust off the furniture and clean any surfaces that may have been in contact with the fort.
6. Check for Damages: Inspect the furniture and other items used in the construction of your fort for any damages or wear and tear. Repair or replace any broken pieces to ensure they’re in good condition for future use.
7. Avoid Eating Messy Foods Inside the Fort: To minimize potential stains and messes inside your fort, try to avoid eating messy or greasy foods while inside it. Opt for snacks that are less likely to cause crumbs or spills.
8. Encourage Proper Fort Etiquette: If you share your fort with others, make sure everyone understands and follows proper fort etiquette. This includes treating the fort with care, avoiding rough play that could damage the structure, and keeping food and drinks away from sensitive fabrics.
By following these maintenance and cleaning tips, you can ensure that your blanket fort remains in good condition and ready for future adventures. Taking care of your fort will prolong its lifetime, allowing you to create countless memories inside its cozy embrace.
Having Fun and Enjoying Your Blanket Fort
Now that you’ve built and maintained your cozy blanket fort, it’s time to let the fun begin! Here are some ideas to help you make the most of your fort and create memorable experiences:
1. Read or Tell Stories: Retreat to your fort with a stack of your favorite books or gather with friends or family members for storytime. Get lost in the pages or take turns sharing imaginative tales to spark your creativity.
2. Host Movie Nights: Set up a mini movie theater inside your fort by bringing in a laptop or tablet and a cozy blanket for each person. Dim the lights, grab some popcorn, and enjoy a movie marathon or your favorite films.
3. Play Board Games or Card Games: Gather your favorite board games or card games and have a fun game night inside your fort. The cozy atmosphere will add a unique twist to your gaming experience.
4. Build a Fort within a Fort: Take your fort-building to the next level by creating smaller forts or secret hideouts within your main fort. Use additional blankets, pillows, and furniture to create separate spaces for different activities.
5. Have a Picnic: Bring in a basket of snacks or pack a lunch, and have a picnic in your fort. Spread out a blanket, sit back, and enjoy a delightful meal in the comfort of your cozy hideaway.
6. Create Art or Crafts: Set up an art station inside your fort with paper, crayons, markers, or other art supplies. Let your creativity flow as you create artwork or try out fun DIY craft projects.
7. Play Music and Dance: Bring in a portable speaker and create a fort dance party. Play your favorite tunes and groove to the music, adding a dose of fun and energy to your fort experience.
8. Take Photos and Make Memories: Capture the special moments spent inside your fort by taking photos or recording videos. Create lasting memories that you can look back on with a smile.
Remember, the possibilities for fun in your blanket fort are endless. Let your imagination run wild and embrace the cozy and magical atmosphere you’ve created. Whether you’re enjoying quiet solitary moments or sharing laughter and joy with loved ones, make the most of your fort and cherish the delightful experiences it brings.