
Choosing the Right Seed Sprouter Tray
When it comes to sprouting seeds at home, choosing the right seed sprouter tray is crucial. A proper seed sprouter tray provides the optimal conditions for germination and growth, resulting in healthy and abundant sprouts. Here are some factors to consider when selecting a seed sprouter tray.
- Size and Capacity: Consider the amount of sprouts you want to grow. If you have limited space or only need a few sprouts, a small seed sprouter tray will suffice. However, if you’re planning to grow large batches or multiple types of sprouts, opt for a larger tray that can accommodate your needs.
- Material: Seed sprouter trays are available in various materials such as plastic, glass, and stainless steel. Plastic trays are lightweight, affordable, and easy to clean. Glass trays allow you to monitor the sprouting process but may require extra care to avoid breakage. Stainless steel trays are durable and resistant to staining and odors.
- Air Circulation: Good air circulation is essential for healthy sprouts. Look for a seed sprouter tray that has ventilation holes or a mesh screen to ensure proper airflow. This will prevent the growth of mold or bacteria and promote even sprouting.
- Drainage System: Adequate drainage is crucial to prevent waterlogged seeds and promote successful sprouting. Choose a seed sprouter tray with a well-designed drainage system that allows excess water to drain out easily. This will prevent the seeds from sitting in stagnant water, reducing the risk of rot or mold formation.
- Ease of Use and Cleaning: Consider how easy it is to assemble, disassemble, and clean the seed sprouter tray. Look for trays that are dishwasher safe or have removable parts that can be easily washed. This will make the sprouting process more convenient and ensure proper hygiene.
By considering these factors, you can select the perfect seed sprouter tray that suits your needs and ensures successful sprouting. Remember to follow the manufacturer’s instructions for optimal usage of the selected tray. With the right seed sprouter tray, you’ll be on your way to enjoying fresh and nutritious sprouts in no time!
Preparing the Seeds for Sprouting
Before you begin the sprouting process, it’s essential to properly prepare your seeds. Preparing the seeds for sprouting helps to remove any impurities, activate their natural enzymes, and ensure successful germination. Here are the steps to prepare seeds for sprouting:
- Selecting High-Quality Seeds: Choose organic seeds specifically labeled for sprouting. Ensure that the seeds are not treated with chemicals or pesticides, as these can affect the sprouting process and the quality of the sprouts.
- Cleaning the Seeds: Give the seeds a thorough rinse under cool running water to remove any dust, dirt, or debris. This helps to ensure a clean environment for sprouting and prevents the growth of unwanted bacteria or mold.
- Soaking the Seeds: Soaking the seeds before sprouting helps to activate their enzymes, making them more digestible and nutrient-rich. Place the cleaned seeds in a bowl or jar and cover them with filtered water. Let them soak for the recommended time indicated on the seed packaging.
- Rinsing and Draining: After soaking, drain the water and rinse the seeds thoroughly. Use cool water and gently swish the seeds around to remove any leftover residue. Proper rinsing helps to remove enzyme inhibitors and enhances the sprouting process.
- Drying the Seeds: After rinsing, ensure the seeds are properly drained. Spread them out on a clean towel or colander and allow them to air-dry for a few hours. Make sure they are evenly spread out to prevent clumping, as this can lead to mold or spoilage.
- Checking for Unsprouted or Damaged Seeds: Examine the seeds and remove any that are discolored, damaged, or not sprouting. These seeds may hinder the growth of other healthy sprouts or affect the overall quality of the harvest.
By following these steps, you can ensure that your seeds are clean, activated, and ready for sprouting. Remember that each seed may have different soaking and preparation requirements, so it’s essential to refer to the specific guidelines provided by the seed supplier. With properly prepared seeds, you’re one step closer to cultivating delicious and nutritious sprouts at home!
Soaking the Seeds
Soaking seeds is an essential step in the sprouting process as it helps to kickstart the germination process and activate enzymes within the seeds. Soaking allows water to penetrate the seed coat, softening it and initiating the growth. Here are the steps to properly soak seeds:
- Choose the Right Container: Select a clean container that is large enough to accommodate the amount of seeds you are sprouting. A wide-mouthed glass jar or bowl works well for soaking seeds, allowing for easy drainage and rinsing.
- Measure the Seeds: Determine the desired amount of seeds for soaking. Refer to the instructions on the seed packaging or follow a recommended ratio for sprouting, taking into account the type of seed and the desired yield.
- Rinse the Seeds: Before soaking, rinse the seeds thoroughly under cool, running water to remove any debris or impurities. This step helps to ensure a clean environment for germination and sprouting.
- Add Filtered Water: Place the rinsed seeds into the soaking container and cover them with filtered water. The water should be at least double or triple the volume of the seeds to allow for expansion and thorough hydration.
- Soak for the Recommended Time: Each type of seed has a specific soaking time, ranging from a few hours to overnight. It’s essential to follow the recommended soaking time indicated on the seed packaging or provided by the seed supplier.
- Drain and Rinse: After the soaking period, drain the water from the seeds using a sieve or a sprouting lid. Rinse the seeds with fresh, cool water to remove any residue or enzyme inhibitors. Proper rinsing ensures clean and viable sprouts.
- Prepare for Sprouting: Once the seeds are soaked and rinsed, they are ready to be transferred to a seed sprouter tray or a sprouting jar. Follow the specific instructions for your chosen sprouting method to continue the sprouting process.
Soaking seeds is an integral step in sprouting, providing the necessary hydration and activating enzymes for successful germination. Remember to follow the recommended soaking times and ensure proper drainage and rinsing to create an ideal environment for sprouting. With properly soaked seeds, you are on your way to growing flavorful and nutritious sprouts right at home!
Assembling the Seed Sprouter Tray
Assembling the seed sprouter tray is a straightforward process that prepares the tray for successful sprouting. Following the proper assembly steps ensures that all components are in place and ready to provide an optimal environment for sprouting. Here’s how to assemble a seed sprouter tray:
- Gather the Components: Ensure that you have all the necessary components of the seed sprouter tray, including the tray base, sprouting tray, and lid. Check that all parts are clean and free from any debris or residue.
- Attach the Sprouting Tray: Place the sprouting tray onto the tray base, ensuring that it fits snugly and securely. Some sprouter trays may require twisting or locking mechanisms to secure the sprouting tray in place.
- Inspect the Ventilation Holes: Check the sprouting tray for ventilation holes. These holes allow air circulation throughout the tray, promoting even sprouting and preventing the accumulation of moisture.
- Ensure Proper Alignment: Make sure that the sprouting tray is aligned properly with the base, ensuring that all sides and corners are flush. This will prevent any leaks or uneven distribution of water during the sprouting process.
- Secure the Lid: If your seed sprouter tray comes with a lid, place it on top of the sprouting tray. The lid helps to create a controlled environment, maintaining humidity while allowing for air circulation.
- Check for Loose Parts: Before proceeding, double-check that all components are securely attached. This will prevent any accidents or issues during the sprouting process.
By following these steps, you can easily assemble your seed sprouter tray and ensure that it is ready for use. Proper assembly ensures that the tray provides the necessary support, ventilation, and controlled environment for successful sprouting. Once the tray is assembled, it’s time to move on to the next steps in the sprouting process.
Adding Water to the Sprouter Tray
Adding water to the sprouter tray is a critical step in creating the ideal sprouting environment. Proper watering ensures that the sprouting seeds receive adequate moisture for germination and growth. Here’s how to add water to the sprouter tray:
- Prepare Filtered Water: It is important to use clean and filtered water for sprouting. Tap water can contain chemicals, such as chlorine, which may hinder the sprouting process. Fill a container with filtered water to have it ready for use.
- Check the Water Level Indicator: Some seed sprouter trays have a water level indicator, usually marked on the side of the tray or as a removable insert. Check the indicator to determine the appropriate water level for your specific sprouter tray.
- Add Water to the Tray: Slowly pour the filtered water into the seed sprouter tray, ensuring not to overfill it. The water should reach the designated water level according to the indicator or instructions provided with the tray.
- Avoid Submerging the Seeds: It’s important to note that the seeds should not be submerged in water. The water level in the sprouter tray should be enough to keep the bottom of the sprouting tray moist, allowing the seeds to absorb the necessary moisture through the process of capillary action.
- Prevent Water Accumulation: Make sure there is no excess water pooling in the tray. If there is, gently tilt the tray to allow any excess water to drain out. Accumulated water can promote the growth of mold or bacteria, compromising the quality of the sprouts.
- Monitor the Water Level: Throughout the sprouting process, check the water level in the sprouter tray regularly. If the water level decreases, add more filtered water to maintain the appropriate moisture level for the sprouts.
By following these steps, you can ensure that your sprouter tray has the proper amount of water for successful sprouting. Remember to use clean and filtered water, avoid submerging the seeds, and monitor the water level throughout the sprouting process. With the right amount of water, you’ll create a favorable environment for your sprouts to thrive.
Placing the Seeds in the Tray
Placing the seeds in the sprouter tray is a crucial step in the sprouting process. Proper placement ensures that the seeds are evenly distributed and have the ideal conditions for germination and growth. Here’s how to place the seeds in the tray:
- Refer to Seed Packaging Instructions: Different types of seeds may have specific instructions for placement. Refer to the seed packaging or instructions provided by the supplier for any specific guidelines regarding seed placement.
- Distribute the Seeds Evenly: Spread the seeds evenly across the sprouting tray, ensuring that there is ample space between each seed. This allows room for the sprouts to grow without overcrowding, which can lead to poor airflow and mold development.
- Avoid Overcrowding: It’s important to avoid placing too many seeds in the tray, as this can hinder sprouting. Overcrowding can prevent proper airflow and may lead to competition for resources among the sprouts.
- Use a Seed Spreader: To achieve even seed distribution, you can use a seed spreader or your fingers to gently spread the seeds across the sprouting tray. This ensures that the seeds are evenly placed, giving each sprout an equal opportunity for growth.
- Avoid Seed Waste: While it’s important to evenly distribute the seeds, you should also avoid wasting seeds. Make sure to use an appropriate amount of seeds according to the seed type and sprouting container size.
- Cover the Seeds (if instructed): Some seeds require covering with a thin layer of soil, vermiculite, or a sprouting lid. If the seed packaging or specific instructions indicate covering the seeds, follow those guidelines accordingly.
By following these steps, you can ensure that your seeds are properly placed in the sprouter tray, providing them with the necessary conditions for successful germination and sprouting. Remember to refer to any specific instructions provided for each seed type and avoid overcrowding the seeds. With proper seed placement, you’re on your way to growing healthy and vibrant sprouts!
Maintaining the Sprouting Environment
Creating and maintaining the right environment is essential for successful sprouting. By keeping the sprouting environment optimal, you provide the necessary conditions for seeds to germinate and sprouts to grow. Here are some key factors to consider when maintaining the sprouting environment:
- Temperature: Most seeds require a moderate temperature range for optimal sprouting. Keep the sprouting tray in a warm area of your home, away from direct sunlight and extreme temperature fluctuations. Aim for a temperature range between 18 to 24 degrees Celsius (65 to 75 degrees Fahrenheit).
- Light Exposure: Although some seeds benefit from a few hours of indirect sunlight, most sprouts do better in low light conditions. Place the sprouting tray in a location with minimal exposure to direct sunlight to prevent overheating and potential damage to the sprouts.
- Air Circulation: Proper airflow is crucial for preventing the growth of mold or bacteria. Ensure that the sprouting tray has adequate ventilation either through built-in ventilation holes or by allowing for some airflow around the tray. Avoid placing the tray in an area with stagnant air.
- Hydration Management: Regularly check the moisture level in the sprouter tray. Ideally, the sprouting medium should be kept consistently moist but not waterlogged. If the top layer feels dry, mist it with filtered water to maintain the necessary moisture level.
- Rinsing and Draining: Follow the recommended rinsing and draining schedule for your specific seeds. Most sprouts require rinsing and draining two to three times a day to prevent the formation of mold and enhance their growth.
- Minimize Contamination: Keep the sprouting area clean and free from potential contaminants. Wash your hands thoroughly before handling the sprouts or the sprouting tray. Ensure that all utensils, containers, and surfaces that come into contact with the sprouts are properly cleaned and sanitized.
By maintaining these key factors in the sprouting environment, you provide the best conditions for your sprouts to thrive. Regularly monitor and adjust the temperature, light exposure, airflow, and moisture levels as needed throughout the sprouting process. With proper care, you’ll be rewarded with vibrant and healthy sprouts to enjoy!
Rinsing and Draining the Seeds
Rinsing and draining the seeds is a critical step in the sprouting process as it helps to remove any residual debris, activate enzymes, and maintain a healthy sprouting environment. Following the proper rinsing and draining technique ensures that the seeds receive the necessary hydration while avoiding the risk of mold or bacterial growth. Here’s how to properly rinse and drain the seeds:
- Timing: Check the specific sprouting instructions for your seeds as each type may have different rinsing and draining requirements. Typically, seeds need to be rinsed and drained two to three times a day.
- Prepare Clean Water: Use filtered water at room temperature for rinsing the seeds. It’s important to have clean water to prevent the introduction of any contaminants that may hinder the sprouting process.
- Rinse the Sprouts: Gently pour the water over the seeds, allowing it to flow through the tray. Alternatively, you can fill the tray with water and gently swish the seeds around to ensure all surfaces are rinsed. This helps to remove any residue or enzyme inhibitors.
- Drain Excess Water: After rinsing, allow the water to drain from the sprouter tray. Tilt the tray or use a sprouting lid with drainage holes to facilitate the removal of excess water. Ensuring proper drainage prevents water accumulation that can lead to mold or bacterial growth.
- Avoid Over-Draining: While it’s important to remove excess water, make sure not to drain the sprouts completely. They still need some moisture for the sprouting process. Striking a balance between proper drainage and maintaining moisture is crucial.
- Repeat the Process: Follow the rinsing and draining process as recommended for your specific seeds. This may involve repeating the steps multiple times in a day to maintain a clean and moist sprouting environment.
By regularly rinsing and draining the seeds, you promote a clean and optimal environment for sprouting. This helps to prevent the growth of mold or bacteria while ensuring that the sprouts receive the necessary moisture to grow. Following these steps will set you on the path to successfully sprout healthy and delicious sprouts!
Monitoring the Sprouting Progress
Monitoring the sprouting progress is an essential part of the sprouting process as it allows you to ensure that everything is progressing as expected and make any necessary adjustments. Regular monitoring helps you gauge the readiness of the sprouts and identify any issues that may arise. Here’s how to effectively monitor the sprouting progress:
- Observe Daily Growth: Take time each day to observe the growth of the sprouts. Look for any visible changes such as root development, shoot emergence, or the appearance of tiny leaves. This will give you an idea of the sprouts’ progress and indicate if they are developing as expected.
- Check for Mold or Off Odors: Regularly inspect the sprouts for any signs of mold or off odors. Mold growth can occur if the sprouts are not properly rinsed and drained or if the sprouting environment is too damp. Discard any sprouts that show signs of mold or have foul odors.
- Assess Sprout Freshness: As the sprouts grow, make sure to assess their freshness. Sprouts should be crisp, plump, and have a fresh aroma. If the sprouts appear wilted, slimy, or have a strong off odor, it may indicate spoilage, and they should be discarded.
- Adjust Rinsing and Draining Frequency: Based on the progress and observation, you may need to adjust the rinsing and draining frequency. If the sprouts appear too dry, you can increase the frequency of rinsing and/or misting. Conversely, if they appear overly damp or mold-prone, you may need to decrease the frequency of watering.
- Record Progress and Notes: It can be helpful to keep a record of your sprouting progress. Note the date of seed soaking, the start of sprouting, and any observations or adjustments made during the process. This record can help you track patterns, improve future sprouting attempts, and identify any issues that may arise.
By regularly monitoring the sprouting progress, you ensure that the sprouts are developing properly and provide the necessary care to address any concerns. Adjusting watering, identifying potential issues, and maintaining a record will help you achieve successful sprouts and enjoy the fruits of your efforts.
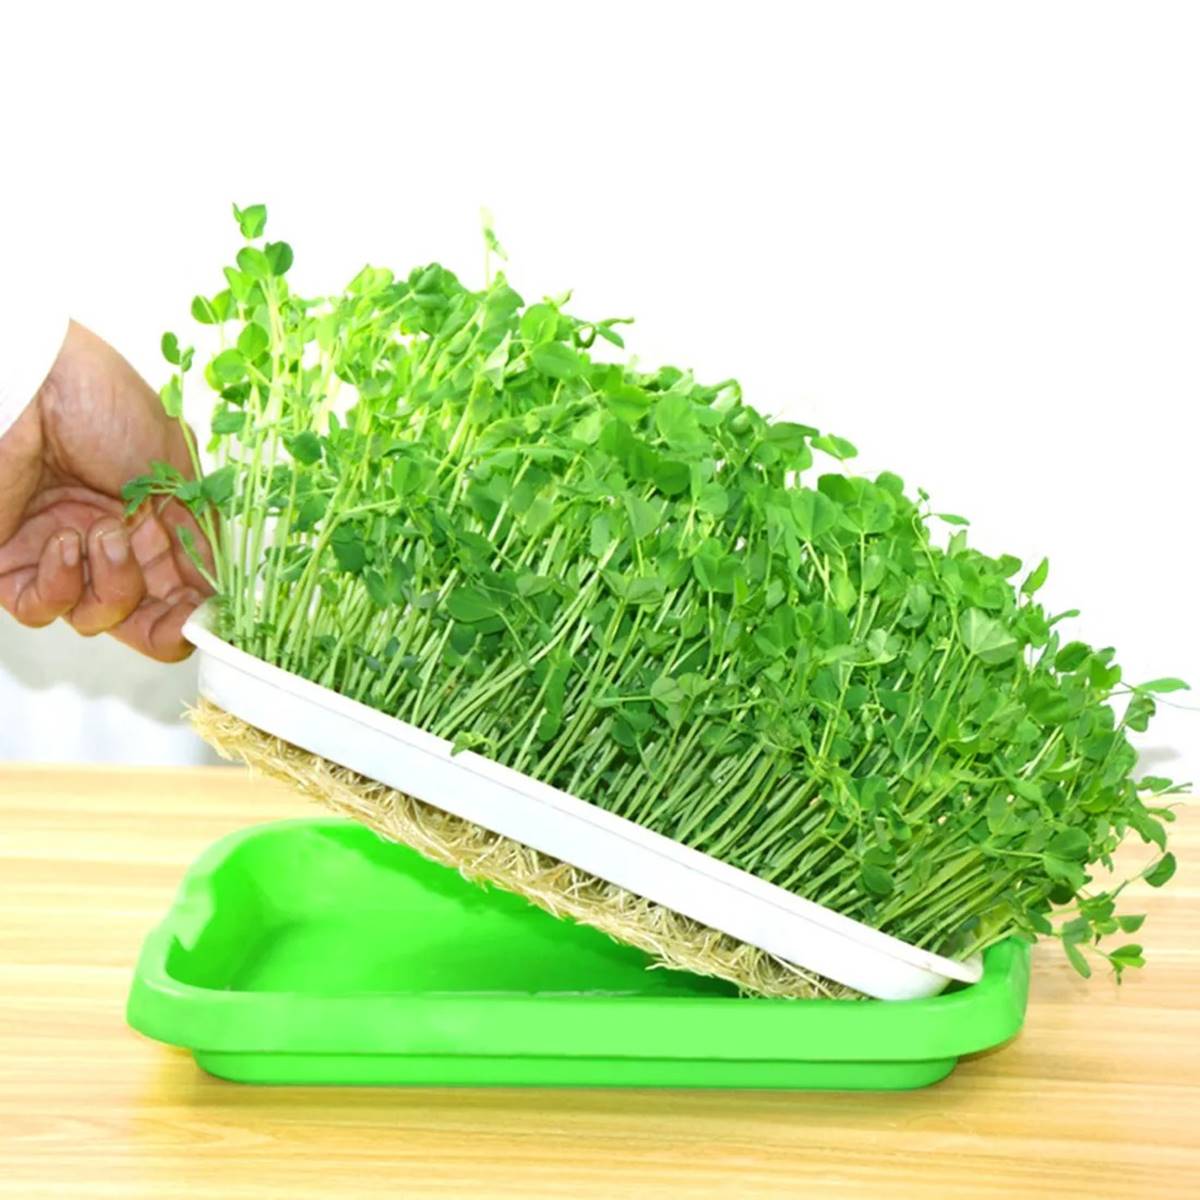
Harvesting the Sprouts
Harvesting the sprouts is an exciting and rewarding part of the sprouting process. It’s crucial to harvest the sprouts at the right time to enjoy their optimal flavor, texture, and nutrient content. Here’s how to properly harvest your sprouts:
- Observe Ready-to-Harvest Signs: Pay close attention to the sprouts as they grow. Different types of sprouts have varying readiness indicators. Look for fully developed leaves, a vibrant color, and a crisp texture. These signs indicate that the sprouts are ready to be harvested.
- Timing: Harvest times can vary depending on the type of sprout. Generally, sprouts are ready for harvest within 3 to 7 days after sprouting. Refer to the specific instructions for the seeds you are sprouting to determine the optimal harvesting time.
- Gently Separate the Sprouts from the Tray: To harvest the sprouts, gently separate them from the sprouter tray. Use your fingers or a pair of clean scissors to trim the sprouts just above the root or seed hull. Be careful not to damage the surrounding sprouts or the tray.
- Inspect for Any Remaining Hulls: After harvesting, inspect the sprouts for any remaining seed hulls. Although most seed hulls will loosen and separate during growth, some may still cling to the sprouts. Remove any remaining hulls by gently rinsing the harvested sprouts under cool water.
- Drain and Dry the Harvested Sprouts: Allow the harvested sprouts to drain thoroughly after rinsing. Use a colander or clean towel to remove excess moisture. Properly draining and drying the sprouts will help maintain their freshness and prevent spoilage.
- Store or Serve Immediately: Once the sprouts are harvested and dried, you can choose to store them or enjoy them right away. If storing, place them in a breathable container, such as a paper bag or a perforated plastic bag, and refrigerate. Consume the sprouts within a few days for the best taste and nutritional quality.
By following these steps, you can harvest your sprouts at the peak of their flavor, freshness, and nutritional value. Enjoy the satisfaction of knowing that you have successfully grown your own delicious and nutritious sprouts. Whether adding them to salads, sandwiches, or other recipes, freshly harvested sprouts are a delightful and healthy addition to your meals.
Storing and Using the Sprouts
Properly storing and utilizing the sprouts is essential to preserve their freshness and maximize their shelf life. By following the appropriate storage guidelines and incorporating them into your meals, you can enjoy the sprouts to their fullest potential. Here’s how to store and use the sprouts:
- Refrigerate the Sprouts: After harvesting, transfer the sprouts to a breathable container such as a paper bag or a perforated plastic bag. Place the container in the refrigerator to keep the sprouts fresh and crisp. Avoid sealing the sprouts in an airtight container, as this can lead to moisture build-up and spoilage.
- Consume Fresh Sprouts: For the best flavor and texture, it’s advisable to consume the sprouts as soon as possible after harvesting. Fresh sprouts are at their peak in terms of taste and nutritional value.
- Use the Sprouts in Various Dishes: Incorporate the sprouts into your favorite dishes to elevate their flavor and add nutritional value. Sprouts work well in salads, sandwiches, wraps, stir-fries, and as a topping for soups or smoothie bowls. Get creative and experiment with different flavor combinations and recipes.
- Rinse Before Consuming: Before using the sprouts, give them a quick rinse under cool water. This helps to remove any residual seed hulls or debris that may have accumulated during storage.
- Avoid Excessive Heat: Sprouts are delicate and can wilt or become mushy when exposed to excessive heat. To preserve their crispness, it’s best to add the sprouts to your dishes towards the end of the cooking process or enjoy them raw.
- Use within a Few Days: While refrigerated sprouts can remain fresh for several days, it’s advisable to consume them within a few days of harvesting for the best quality. Discard any sprouts that appear slimy, have an off smell, or show signs of mold.
- Grow and Harvest in Batches: To ensure a constant supply of fresh sprouts, consider growing and harvesting them in batches. Start a new batch of seeds a few days before finishing the current one, allowing you to have a continuous supply of sprouts.
By properly storing and utilizing the sprouts, you can enjoy their fresh, crisp taste and harness their nutritional benefits. Incorporate them into your meals to bring a vibrant and nourishing element to your dishes. With mindful storage and creative usage, your sprouts will add a delightful touch to your culinary creations.