
Safety Precautions
When setting the clock on your Bosch oven, it is important to follow certain safety precautions to ensure your own well-being and prevent any damage to the appliance. Here are some essential guidelines to keep in mind:
- Before attempting to set the clock, make sure the oven is not in use and has cooled down to avoid burns or injuries.
- Ensure that the power supply to the oven is switched off or unplugged. This will prevent any risk of electric shock while handling the control panel.
- Wear protective gloves or use a cloth to avoid any contact burns when accessing the oven’s control panel, which may still be hot from previous use.
- Refer to the user manual specific to your Bosch oven model for detailed instructions on setting the clock. Each model may have slight variations in the process.
- If you are unsure about any step or encounter any difficulties during the clock setting procedure, it is recommended to reach out to the Bosch customer support team or a qualified technician for assistance.
- Do not attempt to disassemble or repair any part of the oven yourself, especially the control panel, as this might void the warranty and pose safety risks.
- Always keep children and pets away from the oven while performing any maintenance or setting adjustments.
- Regularly check and maintain the cleanliness of the control panel to prevent any malfunctions or errors during clock setting.
By taking these safety precautions into account, you can carry out the clock setting process for your Bosch oven efficiently and without any mishaps. Remember, prioritizing safety ensures a smooth and safe experience while using your oven for all your culinary endeavors.
Step 1: Turn on the Power
Before you can begin setting the clock on your Bosch oven, ensure that the power to the appliance is turned on. Here’s how:
1. Locate the power switch or socket for your oven. It is usually found on the wall behind or near the oven.
2. Ensure that the power switch is in the “On” position. If your oven is directly plugged into a socket, ensure that the socket is receiving power.
3. If the power switch was turned off, flip it back to the “On” position. If the oven was unplugged, plug it back into the socket securely.
4. Wait for a few moments to allow the oven to power up. The control panel should light up, indicating that the oven is receiving power.
5. Double-check the display screen to ensure that it is fully illuminated and ready for you to begin the clock setting process.
It is crucial to have the power turned on before proceeding with the clock setting, as this allows you to access and navigate the control panel functions effectively.
Keep in mind that if you encounter any issues with the power supply or the oven’s display after turning on the power, it is best to seek assistance from a qualified technician or the Bosch customer support team.
Step 2: Access the Clock Setting
Once the power is turned on, you are ready to access the clock setting feature on your Bosch oven. Follow these steps:
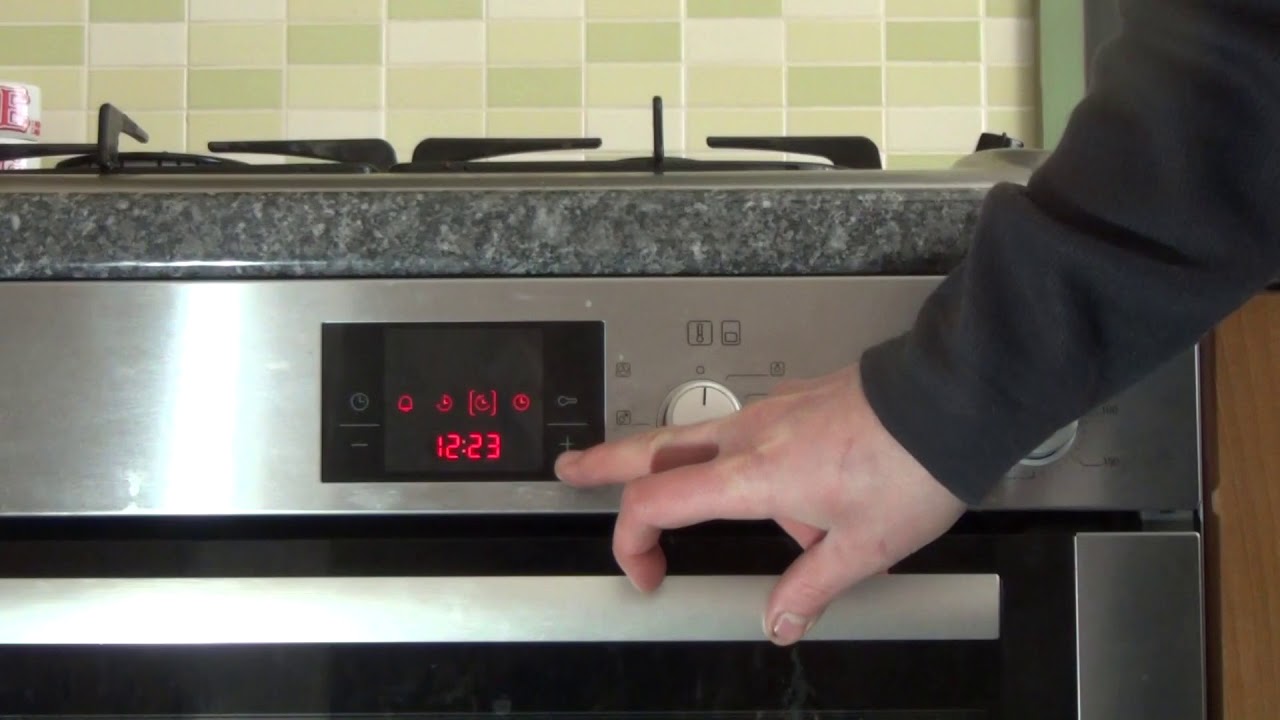
1. Look for the “Settings” or “Menu” button on the oven’s control panel. The location of this button may vary depending on your oven model but is typically labeled or indicated with an icon.
2. Press the “Settings” or “Menu” button to enter the oven’s settings menu. The display screen should change to show a list of available options.
3. Scroll through the menu options using the arrow buttons or the dial on the control panel until you find the “Clock” or “Time” setting. Select it by pressing the corresponding button.
4. The display screen should now show the current time, and you can proceed to adjust it according to your desired settings.
Accessing the clock setting option may differ slightly depending on your specific oven model. If you are having trouble locating the correct menu or have any difficulties navigating the control panel, refer to the user manual provided with your Bosch oven for detailed instructions.
Once you have accessed the clock setting feature, you are ready to move on to the next step, which involves selecting the clock mode.
Step 3: Select the Clock Mode
After accessing the clock setting on your Bosch oven, the next step is to select the clock mode. The clock mode determines how the time will be displayed on the oven’s control panel. Follow these steps:
1. Look for the “Clock Mode” or “Time Format” option in the clock settings menu. It may be listed as one of the available options.
2. Press the corresponding button to enter the clock mode selection. The current clock mode may be highlighted or indicated on the display screen.
3. Scroll through the available clock modes using the arrow buttons or the dial on the control panel. Common clock modes include 12-hour (AM/PM) format and 24-hour format.
4. Choose the desired clock mode by pressing the corresponding button or selecting it on the display screen. The selected clock mode should be indicated or highlighted.
Take note that the clock mode selection may vary depending on your specific Bosch oven model. Refer to the user manual for your oven to ensure you are following the correct steps.
Once you have selected the desired clock mode, you are ready to proceed with adjusting the hour and minute settings in the following steps.
Step 4: Adjust the Hour
Once you have selected the clock mode on your Bosch oven, it’s time to adjust the hour setting. Follow these steps:
1. Locate the hour adjustment button or dial on the control panel. It is usually labeled with “+” and “-” symbols or indicated with arrows pointing up and down.
2. Press the “+” button or turn the dial clockwise to increase the hour setting, or press the “-” button or turn the dial counterclockwise to decrease the hour setting.
3. Pay attention to the display screen as you make the adjustments. The hour digits should change accordingly as you press the buttons or turn the dial.
4. Continue adjusting the hour until the desired time is displayed on the screen.
Remember to consider whether your chosen clock mode is in 12-hour format (AM/PM) or 24-hour format when adjusting the hour. Ensure you set the correct time based on your preference.
If your Bosch oven has a feature that automatically adjusts the time according to your location or daylight savings, it may require connecting to a network or utilizing specific settings. Refer to the user manual for your oven to understand the full functionality and options available.
Once the hour is adjusted, you can move on to the next step, which involves adjusting the minute setting.
Step 5: Adjust the Minute
After successfully adjusting the hour setting on your Bosch oven’s clock, it’s time to move on to adjusting the minute setting. Here are the steps to follow:
1. Locate the minute adjustment button or dial on the control panel. It is typically labeled with “+” and “-” symbols or indicated with arrows pointing up and down.
2. Press the “+” button or turn the dial clockwise to increase the minute setting, or press the “-” button or turn the dial counterclockwise to decrease the minute setting.
3. Monitor the display screen as you make the adjustments. The minute digits should change accordingly as you press the buttons or turn the dial.
4. Continue adjusting the minutes until the desired time is displayed on the screen.
Pay close attention to the minute adjustments to ensure accuracy, as even a small error can impact the displayed time on your oven’s clock.
If your Bosch oven features additional time adjustment options, such as setting a specific second or setting a timer, refer to the user manual for your oven to understand the full functionality and options available to you.
Once you have adjusted the minutes, you can proceed to the next step, which involves confirming the set time on your oven’s clock.
Step 6: Confirm the Time
After adjusting the hour and minute settings on your Bosch oven’s clock, it is essential to confirm and finalize the set time. Follow these steps to ensure the accurate display of the time:
1. Take a moment to review the displayed time on the oven’s control panel. Double-check if the hour and minute settings reflect the correct time you intended to set.
2. If you need to make any further adjustments, follow the previous steps to modify the hour or minute accordingly.
3. Once you are satisfied with the set time, press the “OK” or “Enter” button on the control panel to confirm and save the changes.
4. The display screen should now show the confirmed time, and the clock is set on your Bosch oven.
As an extra precaution, observe the display screen for a few minutes to ensure the time remains accurate and stable. If you notice any discrepancies or inconsistencies, consider repeating the clock-setting process or consulting the user manual for troubleshooting guidance.
It is worth noting that some Bosch oven models may have additional features related to the clock, such as auto time sync or alarm settings. Refer to your oven’s user manual for more information on utilizing these features.
With the time confirmed, you can proceed to the final steps, which involve locking the clock and exploring any additional clock settings, if applicable.
Step 7: Lock the Clock
Once you have successfully set the time on your Bosch oven’s clock, it is recommended to lock the clock to prevent accidental changes or tampering. Follow these steps to lock the clock:
1. Locate the “Lock” or “Lock/Unlock” button on the control panel. It may be labeled with a lock symbol or indicated with a key icon.
2. Press and hold the “Lock” button for a few seconds until the display screen shows a lock symbol or indicates that the clock is locked.
3. Once locked, verify that the clock settings cannot be changed by attempting to adjust the time or accessing the clock settings. The locked status should prevent any modifications.
Locking the clock provides peace of mind that the set time will remain accurate and ensures that accidental adjustments or disturbances will not occur. However, keep in mind that you will need to unlock the clock if you wish to make any future changes to the time settings.
If you want to unlock the clock, follow the same process as above but press and hold the “Lock” button until the lock symbol disappears or the display screen indicates that the clock is unlocked.
Remember to consult your Bosch oven’s user manual for any model-specific instructions or variations in the locking process.
With the clock locked, you can now proceed to explore any additional clock settings that your Bosch oven may offer, as described in the next step.
Step 8: Additional Clock Settings
In addition to setting the time and locking the clock, your Bosch oven may offer additional clock settings that you can customize according to your preferences. Follow these steps to explore any additional clock settings:
1. Navigate to the clock settings menu on your oven’s control panel using the “Settings” or “Menu” button, as mentioned in the earlier steps.
2. Look for options such as “Alarm,” “Timer,” or “Auto Time Sync” within the clock settings menu.
3. Press the corresponding buttons or navigate through the menu using the arrow buttons or dial to access these additional clock settings.
4. Set alarms or timers: If your oven has an alarm or timer function, follow the instructions provided in the user manual to set alarms for specific cooking times or use timers for precise cooking durations.
5. Enable auto time sync: Some Bosch oven models offer the option to automatically synchronize the time with a network or atomic clock. If available, look for the “Auto Time Sync” or similar setting and follow the prompts to enable this feature.
6. Customize clock display: Depending on your oven model, you may have options to customize the clock display, such as changing the brightness or selecting a different time format.
Remember to consult your Bosch oven’s user manual for complete instructions on accessing and customizing any additional clock settings specific to your model.
By exploring and utilizing these additional clock settings, you can enhance your cooking experience and make the most out of your Bosch oven’s features.
Troubleshooting Tips
While setting the clock on your Bosch oven is a straightforward process, you may encounter some common issues or challenges. Here are some troubleshooting tips to help you resolve any problems:
- No power or display: If your oven does not have power or if the display screen remains blank, check the power supply by ensuring the oven is plugged in and the power switch is turned on. If the issue persists, check the circuit breaker or contact a qualified technician.
- Incorrect time: If the clock does not display the correct time after setting it, double-check the hour and minute adjustments to ensure they are accurate. If necessary, repeat the clock-setting process and confirm the time again.
- Unresponsive controls: If the control panel buttons are unresponsive, ensure that the oven is not in use or in a cleaning mode. Additionally, check for any debris or moisture around the buttons and clean them gently with a soft, dry cloth.
- Error messages or codes: If your Bosch oven displays an error message or code during the clock-setting process, refer to the user manual for troubleshooting information pertaining to specific error codes. You may need to perform a reset or seek assistance from Bosch customer support.
- Inconsistent timekeeping: If the clock on your oven consistently loses or gains time, consider enabling the auto time sync feature if available. Alternatively, contact Bosch customer support for further assistance with resolving the timekeeping issue.
If these troubleshooting tips do not resolve the problem you are experiencing, it is advisable to consult the user manual specific to your Bosch oven model. Additionally, you can contact Bosch customer support or seek assistance from a qualified technician for further guidance and troubleshooting.
Remember to prioritize your safety and avoid attempting any repairs or modifications on your own if you are uncertain. Seek professional assistance to ensure proper functioning and avoid potential risks.
Final Thoughts
Setting the clock on your Bosch oven is a simple process that allows you to keep track of time while cooking or baking. By following the step-by-step instructions and safety precautions provided, you can easily and safely adjust the clock to the correct time.
Remember to prioritize safety throughout the clock-setting process, such as ensuring the oven is turned off, wearing protective gloves, and referring to the user manual specific to your Bosch oven model for detailed instructions. These safety precautions help prevent accidents and ensure a smooth experience.
If you encounter any difficulties or have questions during the clock-setting process, do not hesitate to contact Bosch customer support or reach out to a qualified technician for assistance. They have the knowledge and expertise to provide further guidance and address any issues you may face.
Once you have successfully set the clock, it is essential to lock it to prevent accidental changes. Exploring any additional clock settings and utilizing features such as alarms, timers, and auto time sync can enhance your cooking experience and convenience in the kitchen.
Should you come across any troubleshooting issues, refer to the troubleshooting tips provided to help resolve common problems. If the issues persist, reach out to Bosch customer support or seek professional assistance to ensure your oven functions optimally.
By setting the clock on your Bosch oven, you can maintain accuracy and have a reliable time reference while preparing delicious meals. Enjoy the convenience and efficiency that comes with a properly functioning clock on your Bosch oven!