
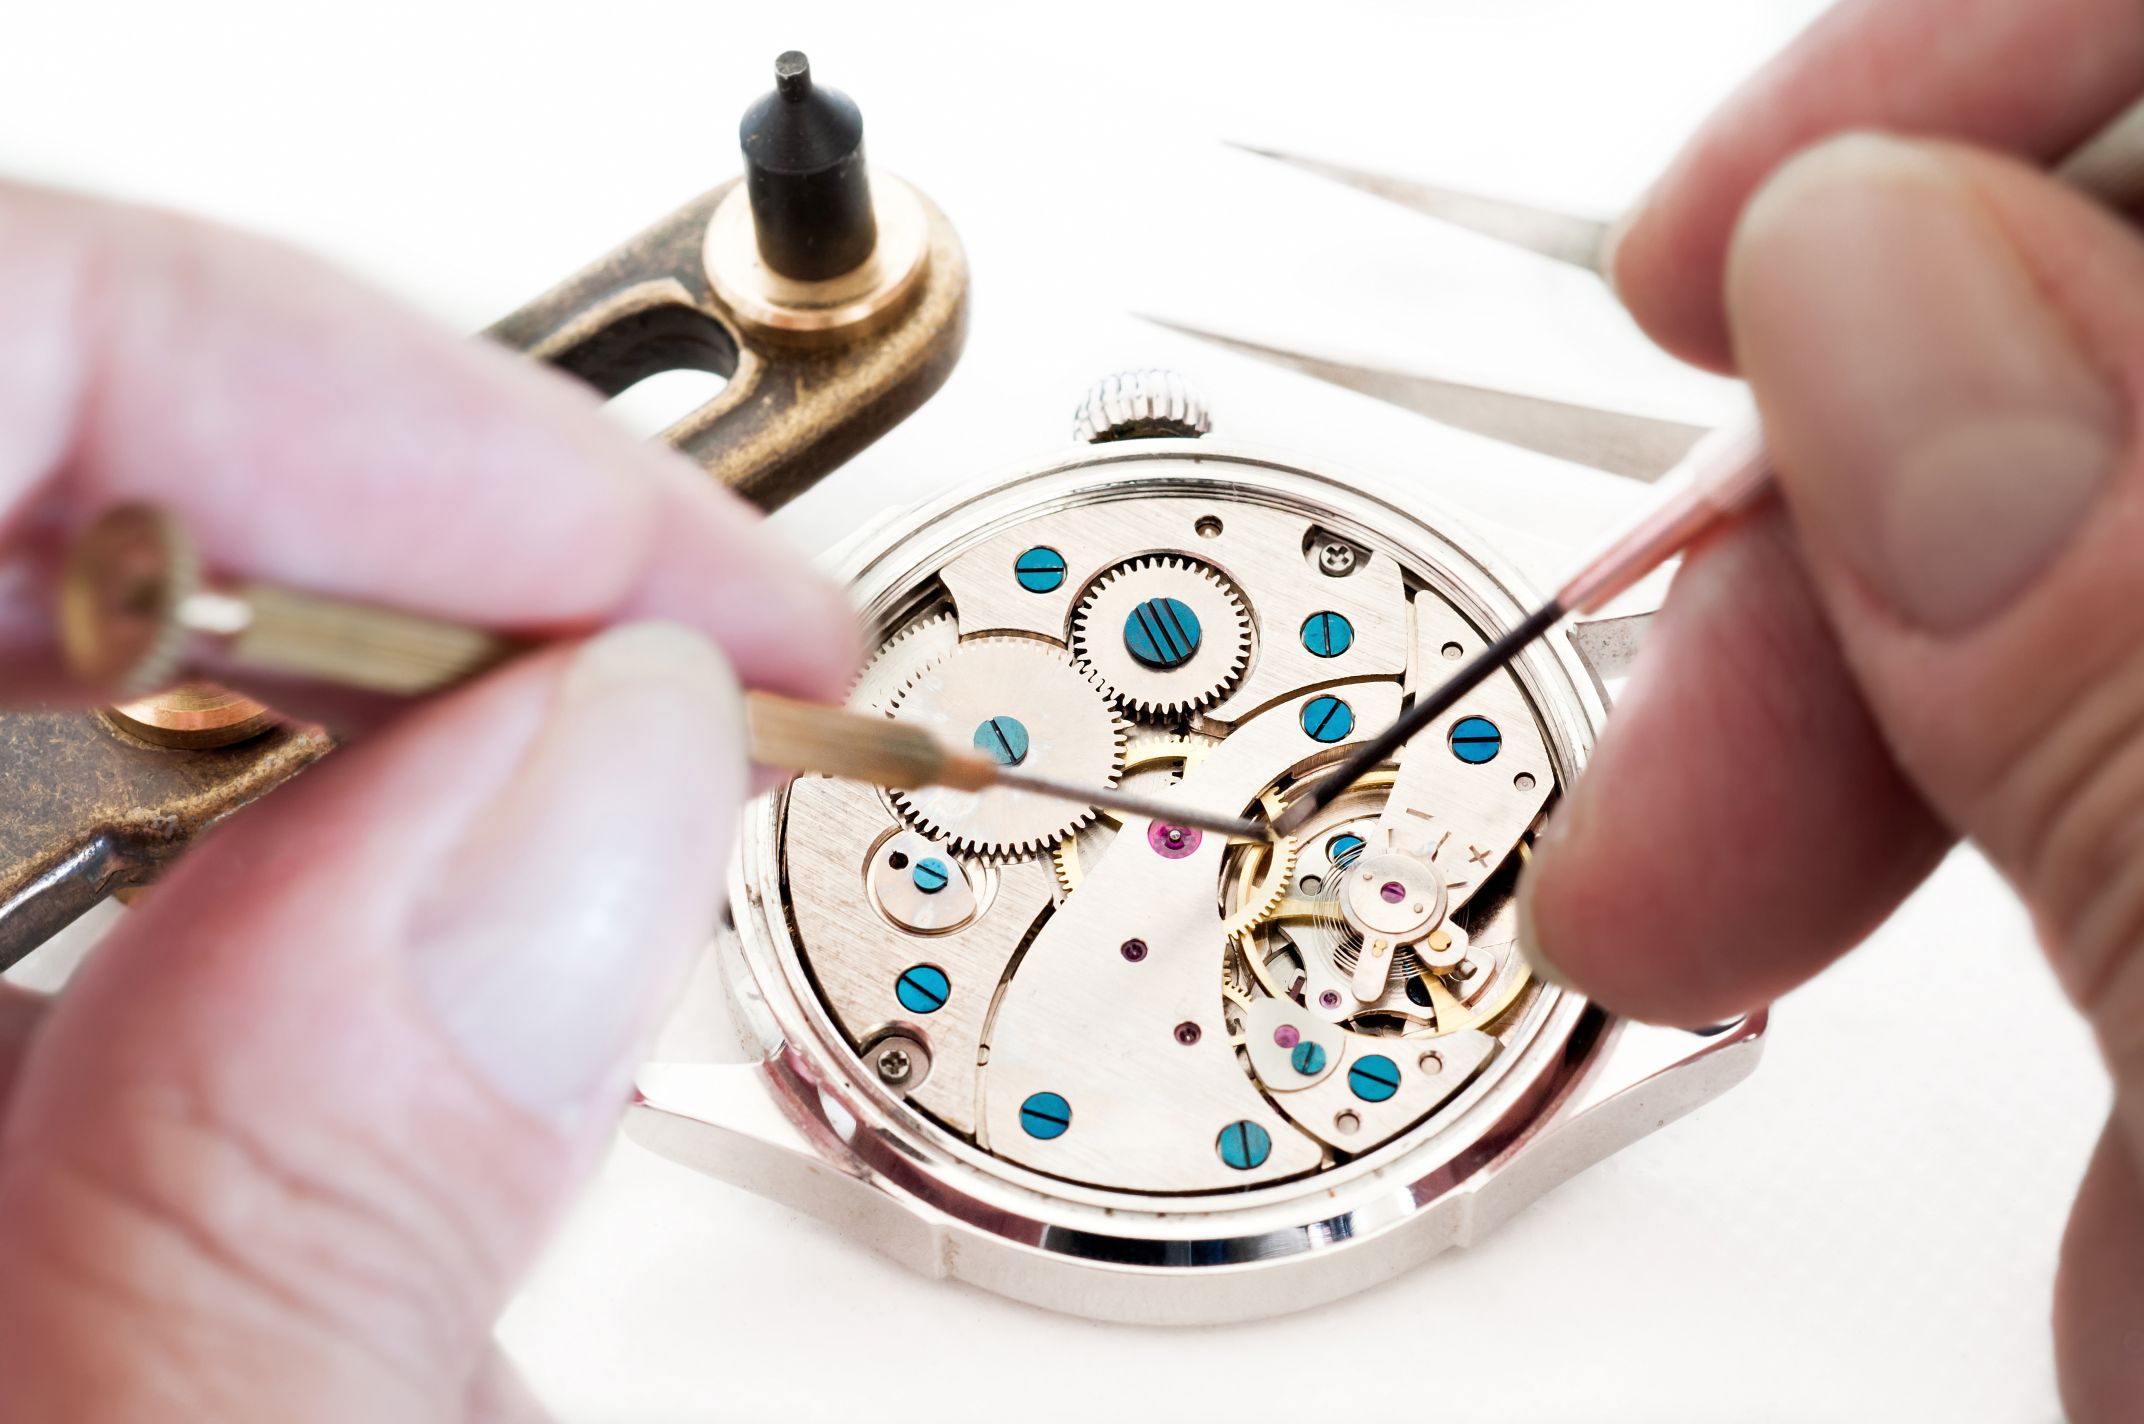
Tools Needed for Clock Repair
Repairing a clock requires specialized tools to ensure the job is done correctly and safely. Whether you are a beginner or an experienced clock repair enthusiast, having the right tools is essential. Here are some of the essential tools you will need for clock repair:
- Screwdrivers: A good set of screwdrivers with various sizes and types of tips is necessary for removing screws and accessing different parts of the clock mechanism.
- Pliers: Pliers, including needle-nose and flat-nose varieties, are useful for holding, bending, and twisting wires or small components during repairs.
- Tweezers: Precision tweezers are indispensable for handling small screws, pins, or other delicate components within the clock movement.
- Brushes: Soft-bristled brushes are ideal for cleaning dust, debris, and old lubricants from the clock parts without damaging them. Nylon brushes, toothbrushes, or dedicated clock brushes are all suitable options.
- Clock Oil: High-quality clock oil is necessary for lubricating the moving parts of the clock to ensure smooth operation. Different types of oil may be required for specific components, such as the mainspring and pivots.
- Clock Cleaning Solution: A clock cleaning solution helps remove dirt and grime buildup on the clock mechanism. It is important to choose a cleaning solution specifically designed for clocks to avoid damaging the delicate parts.
- Polishing Cloth: A soft, lint-free cloth is essential for polishing and removing stains on clock cases, dials, and other visible parts of the clock.
- Magnifying Glass: A magnifying glass or jeweler’s loupe can assist in examining small details and identifying any potential issues within the clock mechanism.
- Hands Removal Tool: This specialized tool allows for the safe removal and installation of clock hands without damaging them or the clock face.
- Parts Organizer: A small container or organizer with compartments will help you keep track of screws, pins, and other small clock parts during disassembly and reassembly.
Having these tools readily available will enable you to effectively repair and maintain clocks of various types and sizes. Remember to handle the tools with care and always follow proper safety precautions when working with delicate clock mechanisms.
Understanding Clock Mechanics
Before delving into clock repair, it is essential to have a basic understanding of how clocks work. Clocks operate on various mechanical principles, but the most common type is the pendulum clock. Here’s a simplified explanation of how a pendulum clock works:
A pendulum clock consists of several key components, including the clock movement, pendulum, escapement mechanism, and gears.
The clock movement acts as the main engine of the clock, driving its timekeeping function. It typically consists of a mainspring, gear train, escapement, and pendulum assembly.
The mainspring is wound manually or automatically and provides the energy needed to power the clock. The mainspring transfers the force to the gear train, which consists of a series of gears that regulate the movement of the clock’s hands.
The pendulum plays a crucial role in maintaining the accuracy of the clock. It swings back and forth, providing a regulated timing mechanism. As the pendulum swings, it interacts with the escapement mechanism.
The escapement mechanism allows the gear train to release a small amount of energy with each swing of the pendulum, driving the movement of the clock hands. It consists of an escapement wheel, anchor, and escape pallets.
The gears within the clock movement transmit the energy from the mainspring to the clock hands. These gears work together in a carefully calculated ratio to ensure the correct movement of the hands as time passes.
By understanding the interplay between these components, you can identify potential problems and determine the necessary repairs. For example, if the clock is running too fast or too slow, adjustments can be made to the escapement mechanism or the pendulum length to restore accurate timekeeping.
It’s worth noting that there are various types of clocks with different mechanisms, such as quartz clocks and electronic clocks. These clocks rely on different principles, including electrical signals or vibrations, to measure and display time.
Having a solid understanding of the mechanics specific to the clock you are working on will greatly assist you in diagnosing and resolving any issues that may arise during the repair process.
Common Clock Problems and Solutions
As with any intricate mechanism, clocks can experience various problems over time. Understanding the common issues that clocks encounter can help you identify and troubleshoot problems effectively. Here are some of the most common clock problems and their potential solutions:
- Clock not running: If your clock is not running at all, the problem may lie with the power source. Ensure that the clock is wound or the batteries are fresh in quartz or electronic clocks. If the clock still doesn’t run, check for any obstructions or damaged gears within the movement that may be causing the issue.
- Incorrect timekeeping: If your clock is consistently running fast or slow, an adjustment to the pendulum length or the escapement mechanism may be required. Increasing the pendulum length slows down the clock, while shortening it speeds up the clock. Adjusting the pendulum nut can help achieve the desired timekeeping accuracy.
- Sticking or sluggish hands: If the clock hands are not moving smoothly or are getting stuck, it may be due to dirt, debris, or dried lubricant on the clock movement. Cleaning and lubricating the gears and pivot points can often resolve this issue.
- Chime or strike problems: Many clocks feature chimes or striking mechanisms. If these functions are not operating correctly, it may be due to worn-out hammers, broken springs, or misaligned levers. Replacing or adjusting these components can restore the proper chime or striking action.
- Loose or broken clock hands: Clock hands can become loose or break over time. To fix this, gently remove the hands using a hands removal tool and reattach them securely. If the hands are broken, replacements can be found at specialized clock supply stores.
- Uneven or noisy ticking: Uneven ticking or excessive noise may indicate an issue with the escapement mechanism. Cleaning and lubricating the escapement components can often resolve this problem. If the issue persists, further adjustments or replacements may be necessary.
It is important to approach clock repair with patience and precision. Take your time to diagnose the problem accurately before attempting any repairs. If you are unsure or uncomfortable with certain repairs, it is always best to consult a professional clock repair technician.
By understanding and addressing these common clock problems, you can extend the lifespan of your clock and ensure accurate and reliable timekeeping for years to come.
Cleaning and Lubricating the Clock
Cleaning and lubrication are essential steps in maintaining the smooth operation and longevity of a clock. Over time, dust, dirt, and old lubricants can accumulate on the clock’s mechanical components, hindering its performance. Here’s a step-by-step guide on how to clean and lubricate your clock:
- Prepare your workspace: Find a clean, well-lit area to work on your clock. Cover the workspace with a soft cloth or a plastic mat to protect the delicate parts and prevent losing any small components.
- Disassemble the clock: Carefully remove the clock’s case and any access panels to reveal the clock movement. Take note of the order and orientation of the components as you disassemble the clock to ensure correct reassembly later.
- Remove dust and debris: Use a soft-bristled brush or a compressed air canister to remove any loose dust and debris from the clock movement. Pay special attention to hard-to-reach areas and intricate details where dirt tends to accumulate.
- Clean the clock parts: Dip a clean brush or cloth into a clock cleaning solution and gently clean the clock’s gears, pivots, and other metal parts. Avoid excess moisture and ensure the cleaning solution is suitable for clock mechanisms.
- Rinse and dry: After cleaning, rinse the clock parts with clean water to remove any cleaning solution residue. Use a soft cloth or compressed air to dry the components thoroughly.
- Lubricate the clock: Apply a small amount of high-quality clock oil to the appropriate points of the clock mechanism. Focus on lubricating the pivot points, gears, and other moving parts that benefit from reduced friction. Be cautious not to over-lubricate, as excess oil can attract dirt and cause further issues.
- Reassemble the clock: Carefully reassemble the clock, ensuring all components are in their correct positions. Refer to any notes or photographs taken during disassembly to guide the reassembly process accurately.
- Test and adjust: Once the clock is reassembled, wind it up or provide power (in the case of quartz or electronic clocks) to test its functionality. Listen for smooth ticking or movement and check for accurate timekeeping. Make any necessary adjustments to the pendulum length or timing mechanisms as required.
Regular cleaning and lubrication are recommended every few years or as needed, depending on the environment and usage of the clock. Remember, if you are uncomfortable or unsure about any of the cleaning or lubrication procedures, it is best to seek the advice of a professional clock repair technician.
By properly cleaning and lubricating your clock, you can keep it running smoothly and preserve its beauty and functionality for years to come.
Replacing Clock Hands and Numerals
Over time, clock hands and numerals can become damaged, discolored, or simply no longer match the aesthetic of the clock. Replacing these components can give your clock a fresh and updated look. Here’s a guide on how to replace clock hands and numerals:
- Identify the correct replacement: Determine the size, style, and color of the clock hands and numerals needed for your specific clock. Take note of any specific measurements or design details to ensure a proper fit.
- Remove the old clock hands: To remove the old clock hands, use a hands removal tool or gently twist and pull them off. Take care not to damage the clock movement or the clock face in the process.
- Attach the new clock hands: Carefully align the new clock hands with the pinion or arbor in the center of the clock movement. Slide the hands onto the pinion, ensuring they are securely in place and positioned correctly.
- Remove the old numerals: If the clock has numerals that need to be replaced, use a small screwdriver or adhesive remover to carefully remove the old numerals. Be cautious not to damage the clock face during this process.
- Attach the new numerals: Depending on the type of numerals you have, follow the manufacturer’s instructions to attach them to the clock face. This may involve using adhesive, screws, or other securing methods.
- Ensure proper alignment and balance: Once the clock hands and numerals are replaced, step back and assess their positioning. Adjust the hands if necessary to ensure they line up with the hour markers, and check that the overall balance and symmetry of the clock’s appearance are maintained.
It’s important to note that some clocks may require specific tools or techniques for replacing the hands or numerals. If you are unsure about the process or encounter any difficulties, consult the clock’s manufacturer or seek the advice of a professional clock repair technician.
Replacing clock hands and numerals can breathe new life into your clock, allowing you to customize its appearance and restore its beauty. With a bit of patience and attention to detail, you can give your clock a fresh look that matches your style and preferences.
Replacing or Repairing the Clock Movement
The clock movement, also known as the clock mechanism or the clockwork, is the heart of the clock. It is responsible for keeping time and ensuring the proper functioning of the clock. Over time, the clock movement may become worn out or damaged, requiring either replacement or repair. Here’s a guide on how to proceed with replacing or repairing the clock movement:
- Assess the condition of the clock movement: Carefully examine the movement to determine the extent of the damage or wear. Look for signs of rust, broken gears, worn-out pivots, or other issues that may affect the clock’s performance.
- If the movement is repairable: For minor issues, such as a misalignment or loose gear, it may be possible to repair the movement. Consult clock repair resources or seek the guidance of a professional clock repair technician to determine the appropriate repairs and techniques required.
- For irreparable or extensively damaged movements: If the movement is beyond repair or requires extensive refurbishment, replacing the movement is the best option. Look for a replacement movement that matches the specifications and fitting of your clock. Take note of the power source (mainspring, battery-powered, etc.) and any other specific requirements to ensure compatibility.
- Prepare for replacement: Before replacing the movement, carefully disassemble the clock, following the appropriate steps for your specific clock design. Take pictures or make notes of the original movement’s positioning and connections to guide the reassembly process later.
- Remove and replace the movement: Remove the old movement by disconnecting any wiring, removing mounting screws, and gently lifting it out. Install the new movement in its place, ensuring all connections, screws, and wires are properly secured and aligned.
- Reassemble and test: Carefully reassemble the clock, following the reverse steps of disassembly. Take your time to ensure all components are in their correct positions and properly secured. Once reassembled, wind the clock or provide power (depending on the type of movement) to test its functionality and timekeeping accuracy.
Replacing or repairing the clock movement requires a certain level of skill and knowledge. If you are unsure or uncomfortable with the process, it is recommended to consult a professional clock repair technician who can guide you through the steps or perform the replacement or repair for you.
By properly addressing issues with the clock movement, you can restore the clock’s reliability and functionality, ensuring it continues to keep time accurately and contribute to the beauty of your space.
Adjusting the Pendulum and Weight
The pendulum and weights are critical components of many clocks, playing a crucial role in regulating the timekeeping accuracy and the functioning of the clock. Over time, these components may require adjustments to ensure the proper operation of the clock. Here’s a guide on how to adjust the pendulum and weight:
- Assess the clock’s timekeeping: Observe the clock’s timekeeping and determine if it is running too fast or too slow. This will guide you in making the necessary adjustments to the pendulum and weight.
- Regulating the pendulum: To adjust the timekeeping accuracy, you will need to regulate the pendulum’s length. Typically, lengthening the pendulum will slow down the clock, while shortening it will speed up the clock. Refer to the manufacturer’s instructions or consult clock repair resources to determine the appropriate adjustment method for your specific clock.
- Adjusting the pendulum nut: Most pendulum clocks feature a nut or some form of adjustment mechanism near the top of the pendulum. Gently turn the nut clockwise to lower the pendulum (speeding up the clock) or counterclockwise to raise the pendulum (slowing down the clock). Make small, incremental adjustments and observe the effect on the clock’s timekeeping.
- Test the timekeeping accuracy: After making adjustments to the pendulum, observe the clock’s timekeeping accuracy for at least a few days to determine if further adjustments are necessary. Fine-tune the pendulum length as needed until the clock maintains the desired accuracy.
- Adjusting weight positions: Some clocks may have adjustable weights that can be moved along the chain or cable. If the clock is still running too fast or too slow after adjusting the pendulum, try moving the weights up or down to achieve the desired timekeeping accuracy. Refer to the clock’s instructions or consult a clock repair guide for specific weight adjustment methods.
It’s important to note that adjusting the pendulum and weight requires patience and precision. Make incremental adjustments and allow the clock to stabilize for a period of time before determining if further adjustments are necessary. If you are unfamiliar or uncomfortable with the process, it is advisable to consult a professional clock repair technician.
By properly adjusting the pendulum and weight, you can ensure the accurate timekeeping and reliable functioning of your clock, allowing it to be a reliable and charming timepiece in your home or workspace.
Troubleshooting and Fine-Tuning the Clock
Even with regular maintenance and care, clocks may encounter issues that require troubleshooting and fine-tuning. Below are some common clock issues and the steps to troubleshoot and fine-tune your clock:
- Uneven ticking or stopping: If the clock’s ticking is uneven or it stops altogether, check if the clock is level. Adjust the position by placing shims under one side if needed. Also, ensure that the clock is not touching the wall or any other objects that may interfere with its movement.
- Skipping or slipping: If the clock hands skip or slip, it may indicate an issue with the clock movement’s power supply. Check if the clock is fully wound or if the batteries (for quartz or electronic clocks) are fresh and properly installed.
- Inaccurate timekeeping: If the clock consistently runs fast or slow despite adjusting the pendulum and weight, it may require further fine-tuning. Consult a clock repair guide or a professional technician to determine if there are other adjustments or repairs that can be made to restore accurate timekeeping.
- Chiming or striking irregularities: If your clock has chimes or striking mechanisms, irregularities in sound or timing may indicate an issue with the hammers, gongs, or chime rods. Check for any obstructions or misalignments and ensure that the hammers are properly adjusted and intact.
- Winding difficulties: If you encounter difficulties when winding the clock, such as excessive resistance or the key not turning smoothly, it may be due to worn out or damaged winding mechanisms. Inspect the winding arbors and gearing for any signs of wear or damage and consider replacing or repairing them as necessary.
- Excessive noise or rattling: If your clock produces excessive noise or rattling during operation, it may indicate loose components or worn-out bushings. Carefully inspect the clock movement for any loose or damaged parts and tighten or replace them accordingly. Lubrication may also help reduce friction and noise.
Troubleshooting and fine-tuning a clock can be a process of trial and error. Take a systematic approach, addressing one issue at a time and allowing time for adjustments to take effect. If you encounter complex problems or are unsure about any adjustments, seeking the assistance of a professional clock repair technician is recommended.
By troubleshooting and fine-tuning your clock, you can maintain its optimal performance, ensuring it remains a reliable and cherished timekeeping device for years to come.
Maintenance Tips for Long-lasting Clocks
Maintaining a clock regularly is key to ensuring its longevity and reliable performance. By following these maintenance tips, you can keep your clock in excellent condition for years to come:
- Keep the clock clean: Dust and dirt can accumulate on the clock’s surface and inside the mechanism, affecting its function. Regularly dust the clock with a soft cloth or a brush, and periodically clean the clock’s movement to remove dirt and debris.
- Avoid extreme temperatures and humidity: Keep your clock in an environment with stable temperatures and moderate humidity levels. Extreme temperature fluctuations and high humidity can cause damage to the clock’s mechanism, wood, and other materials.
- Handle with care: When handling the clock or making adjustments, be gentle and avoid putting excessive pressure on delicate components. Use proper tools and techniques to prevent accidental damage.
- Regularly inspect and lubricate: Periodically inspect the clock’s movement for signs of wear, damage, or dried lubrication. Lubricate the necessary parts with appropriate clock oil to ensure smooth operation.
- Monitor the clock’s timekeeping: Keep an eye on the clock’s timekeeping accuracy. If you notice any significant variations, make necessary adjustments to the pendulum, weight, or other components following the manufacturer’s guidelines.
- Secure the clock: Ensure that the clock is securely fastened to the wall or surface on which it’s displayed. This prevents accidental falls or damage caused by vibrations or movements.
- Wind the clock properly: If your clock requires winding, follow the manufacturer’s instructions for the correct winding process. Overwinding can put unnecessary stress on the clock’s mechanism, while insufficient winding can result in inaccurate timekeeping.
- Keep an eye on the power source: If your clock is battery-powered, replace the batteries regularly before they run out completely. Weak batteries can cause issues like irregular ticking or complete stoppage.
- Consult a professional: If you encounter complex issues, damage, or are uncertain about any maintenance aspects, consider seeking the assistance of a professional clock repair technician. They can provide expert advice and perform necessary repairs and adjustments.
By following these maintenance tips, you can ensure that your clock remains in excellent working condition and preserves its aesthetic appeal for years to come. Remember to always handle your clock with care and address any issues promptly to prevent further damage.