
Materials Needed
Creating a toothbrush holder out of a mason jar is a fun and practical DIY project that can add a touch of creativity to your bathroom decor. Before getting started, gather the following materials:
- A mason jar with a wide mouth
- A marker or pencil
- A ruler or measuring tape
- A glass cutter or a rotary tool with a glass cutting attachment
- Sandpaper or a sanding block
- Decorative materials (optional)
- A sealant (optional)
The mason jar you choose should have a wide enough mouth to comfortably fit toothbrushes. You can use either a new mason jar or repurpose an old one for this project. The glass cutter or rotary tool will be used to cut slots for the toothbrushes, so make sure you have either of these tools available.
When it comes to sanding the edges of the slots, you can use sandpaper or a sanding block. The purpose of this step is to smooth out any rough edges to prevent any accidental cuts or scratches while using the toothbrush holder.
If you want to add a decorative touch to your toothbrush holder, gather any decorative materials you prefer, such as paint, stickers, or ribbon. These materials will allow you to personalize your toothbrush holder and complement your existing bathroom decor.
Lastly, consider using a sealant if you plan to decorate the mason jar. The sealant will help protect the design and ensure it lasts longer, particularly in a bathroom environment where it may be exposed to moisture.
Now that you have gathered all the necessary materials, you are ready to proceed with creating your toothbrush holder out of a mason jar. Follow the steps below to bring your DIY project to life!
Step 1: Gather the Supplies
Before you begin creating your toothbrush holder out of a mason jar, take the time to gather all the necessary supplies. Having everything you need at hand will make the process smoother and more enjoyable. Here’s what you’ll need:
- A mason jar with a wide mouth
- A marker or pencil
- A ruler or measuring tape
- A glass cutter or a rotary tool with a glass cutting attachment
- Sandpaper or a sanding block
- Decorative materials (optional)
- A sealant (optional)
Firstly, select a mason jar that has a wide enough mouth to accommodate your toothbrushes easily. You can choose to repurpose an old mason jar or purchase a new one from a craft store. The choice is up to you and what suits your style and preferences.
In addition to the mason jar, you will need a marker or pencil to mark the spots where you will cut the toothbrush slots. A ruler or measuring tape will come in handy for precise measurements, ensuring that the slots are evenly spaced and aligned.
The next crucial tool is a glass cutter or a rotary tool with a glass cutting attachment. This tool will allow you to create the slots for your toothbrushes. If you don’t have a glass cutter, you can find one at a local hardware store or consider renting one. Alternatively, a rotary tool with a glass cutting attachment can also be used for this purpose.
To ensure safety and a polished look, you will need sandpaper or a sanding block. This will be used to smooth out any rough edges that may occur during the cutting process. Smooth, rounded edges will prevent any accidental cuts or scratches when placing your toothbrushes in the slots.
If you want to add a personal touch to your toothbrush holder, gather any decorative materials you wish to use. Paint, stickers, ribbon, or other craft supplies can be used to customize your mason jar holder. Get creative and make it unique to your taste!
Lastly, consider applying a sealant to protect your decorative design, especially if you plan to decorate the mason jar. A sealant will prolong the life of the design, keeping it intact even in a bathroom with high humidity or occasional splashes of water.
With all the necessary supplies at your disposal, you’re ready to move on to the next step: cleaning the mason jar.
Step 2: Clean the Mason Jar
Before you begin transforming your mason jar into a toothbrush holder, it’s important to ensure that it is clean and free from any dirt, dust, or residue. Follow these simple steps to clean your mason jar:
- Start by removing the lid of the mason jar, if it has one. Set the lid aside as you will not be needing it for this project.
- Rinse the mason jar thoroughly with warm water to remove any loose particles. You can also add a small amount of dish soap to help remove any stubborn dirt or grime.
- Use a sponge or soft cloth to gently scrub the inside and outside of the mason jar. Pay extra attention to the bottom and edges of the jar, as these areas can often accumulate dirt.
- Rinse the mason jar again with warm water to remove any soap residue.
- Inspect the jar to make sure it is completely clean. If you notice any lingering stains or residue, you can use a mixture of baking soda and water to create a paste. Apply the paste to the stained areas and gently scrub with a sponge or cloth. Rinse thoroughly afterwards.
- Once the mason jar is clean, place it upside down on a dish rack or a clean towel to air dry.
It’s important to ensure that the mason jar is completely dry before proceeding to the next steps. Moisture can interfere with the adhesion of any decorative materials or sealant you plan on using.
Cleaning the mason jar properly will ensure that any impurities or residues are eliminated, providing a clean canvas for your toothbrush holder project. Now that your mason jar is clean and dry, you’re ready to move on to the next step: measuring the toothbrush slots.
Step 3: Measure the Toothbrush Slots
Now that your mason jar is clean and dry, it’s time to measure and mark the spots where you will cut the toothbrush slots. Follow these steps to ensure accurate measurements:
- Place the mason jar upright on a flat surface.
- Using a ruler or measuring tape, measure the circumference of the mason jar. This will determine the size of the toothbrush slots and help ensure that they are evenly spaced.
- Divide the circumference by the number of toothbrushes you plan to store in the holder. This will give you the approximate width of each slot.
- Mark the starting point for the first toothbrush slot on the top edge of the mason jar using a marker or pencil. Make sure to leave a small gap between the edge of the jar and the starting point.
- Using the measurement you calculated earlier, measure and mark the position of each subsequent toothbrush slot. Make sure to maintain equal spacing between each mark to ensure a visually appealing and functional toothbrush holder.
It’s important to take your time with this step and double-check your measurements for accuracy. Accurately measured slots will ensure that your toothbrushes fit comfortably and securely in the holder.
Once you have marked the positions for the toothbrush slots, you’re ready to move on to the next step: cutting the slots in the mason jar.
Step 4: Mark the Toothbrush Slots
With the measurements in place, it’s time to mark the spots where you will cut the toothbrush slots on the mason jar. Follow these simple steps to ensure accurate markings:
- Begin by positioning the mason jar upright on a flat surface.
- Using a marker or pencil, locate the first mark you made for the starting point of the first toothbrush slot.
- Hold the marker or pencil upright and carefully create a small dot or line at the marked position. This will act as a guide for cutting later on.
- Repeat the process for each marked position along the circumference of the jar, ensuring that the markings are clear and easily visible.
When marking the toothbrush slots, make sure that the marks are evenly spaced and aligned with your measurements. Double-check the accuracy of your markings to ensure that the slots will accommodate your toothbrushes comfortably.
Take your time with this step to ensure precise markings. Clear and accurate markings will make the next step of cutting the slots easier and more efficient.
Once you have successfully marked the toothbrush slots on the mason jar, you’re ready to move on to the next step: cutting the slots.
Step 5: Cut the Toothbrush Slots
Now that you have marked the toothbrush slots on the mason jar, it’s time to cut them. Follow these steps to safely and accurately cut the slots:
- Ensure that you have the necessary safety equipment, such as safety glasses and gloves, to protect yourself during the cutting process.
- If you are using a glass cutter, position the cutter at the starting point of the first slot. Apply gentle and steady pressure as you score along the marked line. Repeat this process until you have scored the entire circumference of the slot.
- If you are using a rotary tool with a glass cutting attachment, carefully position the attachment at the starting point of the first slot. Turn on the rotary tool and gradually guide the attachment along the marked line to cut through the glass. Be sure to maintain a steady hand and apply gentle pressure.
- Repeat the cutting process for each marked slot, ensuring that you follow the markings accurately. Take your time and be patient to avoid any mistakes or accidents.
- Once all the slots are cut, carefully inspect and smooth out any rough edges using sandpaper or a sanding block. This will ensure a safer and more polished finish for your toothbrush holder.
Remember to follow the manufacturer’s instructions for the glass cutter or rotary tool, and always prioritize safety during the cutting process. Take breaks as needed and work at a steady pace to maintain control and precision.
After cutting the slots and smoothing out the edges, congratulations! You have successfully created the toothbrush slots on your mason jar holder. Now, you’re ready to move on to the next step: sanding the edges.
Step 6: Sand the Edges
After cutting the toothbrush slots on your mason jar holder, it’s important to sand the edges to ensure a smooth and safe finish. Follow these steps to properly sand the edges:
- Prepare your sandpaper or sanding block. Use a medium-grit sandpaper to begin with, and then switch to a finer-grit sandpaper for a smoother finish.
- Hold the mason jar securely and place the sandpaper or sanding block against the rough edges of the slots.
- Gently move the sandpaper or sanding block back and forth along the edges in a smooth motion. Apply even pressure to gradually smooth out any roughness.
- Continue the sanding process until the edges of the slots feel smooth to the touch. Be careful not to apply excessive pressure, as this could crack or damage the glass.
- Once the edges are adequately smoothed, wipe away any dust or debris with a clean cloth or damp paper towel.
- If desired, you can further refine the edges by using a finer-grit sandpaper or a sanding sponge. This will help achieve a more polished and professional-looking finish.
Sanding the edges of the toothbrush slots is important to prevent any potential injury or discomfort when inserting and removing toothbrushes. Smooth, rounded edges will not only provide a safe and comfortable experience but also enhance the overall appearance of your mason jar toothbrush holder.
Remember to take your time during the sanding process and pay attention to detail. By doing so, you will achieve a beautifully finished product that is both functional and aesthetically pleasing. With the edges sanded, you’re ready to move on to the next step: decorating the mason jar (optional).
Step 7: Decorate the Mason Jar (optional)
If you’re looking to add a personal touch or enhance the visual appeal of your mason jar toothbrush holder, you can choose to decorate it. Follow these steps to creatively customize your mason jar:
- Consider the overall style or theme of your bathroom decor. This will help guide your decorative choices and ensure a cohesive look.
- Choose your desired decoration materials, such as paint, stickers, ribbon, or other craft supplies. Select colors and patterns that complement your bathroom’s color scheme and design aesthetic.
- Decide on the placement and design of your decorations. You can create a simple pattern, write a quote or monogram, or experiment with different designs. Sketch your ideas on paper before applying them to the mason jar.
- If using paint, apply thin, even coats for better results. Allow each coat to dry before applying additional layers. You can also use stencils or painter’s tape to create clean lines and precise designs.
- If using stickers or decals, carefully adhere them to the mason jar, ensuring they are aligned and securely attached. Smooth out any bubbles or wrinkles for a polished look.
- If using ribbon, tie it around the mouth of the jar or create bows and glue them onto the surface. Experiment with different placements and arrangements until you achieve your desired look.
- Feel free to explore other creative options like adding gems, beads, or other embellishments to enhance the decorative appeal.
Remember, the decoration process is entirely optional, and you can choose to leave your mason jar toothbrush holder as it is if you prefer a minimalist or clean look. However, adding decorative elements can make your holder and bathroom space more visually intriguing and personalized.
Take your time to ensure precise placement and create a design that reflects your personality and style. With the mason jar decorated, you’re ready for the next step (if applicable): sealing the mason jar.
Step 8: Seal the Mason Jar (optional, if decorating)
If you have chosen to decorate your mason jar toothbrush holder, applying a sealant can help preserve your design and ensure its longevity. Follow these steps to properly seal the mason jar:
- Ensure that the decorations or paint on the mason jar are completely dry before applying the sealant. Refer to the manufacturer’s instructions for proper drying times.
- Choose a suitable sealant for your project. Acrylic sealants or clear lacquer sprays are commonly used for sealing glass surfaces.
- Cover the workspace with newspaper or a protective surface to prevent any potential overspray or spills.
- Hold the mason jar securely and apply a thin, even layer of sealant over the decorated areas. Make sure to cover the entire surface evenly, ensuring no gaps or streaks.
- Allow the sealant to dry completely according to the manufacturer’s instructions. This may take several hours or overnight.
- Inspect the sealed mason jar and check for any missed spots or areas that may need an additional coat of sealant.
- If necessary, repeat the sealing process with additional coats of sealant, allowing each layer to dry before applying the next one.
Adding a sealant to your decorated mason jar toothbrush holder will help protect the design from moisture, potential fading, or peeling. It will also make it easier to clean and maintain over time.
Take your time during the sealing process and ensure proper ventilation in the workspace. Always follow the instructions provided by the sealant manufacturer, as drying times and application methods may vary.
With the mason jar successfully sealed (if applicable), you’re ready for the next step: arranging the toothbrushes in the slots.
Step 9: Arrange the Toothbrushes in the Slots
Now that your mason jar toothbrush holder is ready, it’s time to arrange your toothbrushes in the slots. Follow these steps to ensure a neat and organized display:
- Gather your toothbrushes and clean them thoroughly. Make sure they are dry before inserting them into the slots.
- Hold the mason jar securely and position it upright on a flat surface.
- Insert each toothbrush into its designated slot. Gently push them in until they are snug and secure.
- Arrange the toothbrushes in a way that allows easy access and prevents them from touching each other.
- If desired, you can further personalize the display by arranging the toothbrushes by color, size, or design.
Ensure that the toothbrushes are held securely in the slots and that they are not at risk of falling out. If you find that the slots are too loose, you can add a small amount of adhesive putty or silicone to the bottom of each slot for added stability.
By arranging your toothbrushes neatly, you not only create an organized and visually pleasing display but also ensure easy access and hygiene. Plus, it adds a touch of charm and functionality to your bathroom countertop or vanity.
With the toothbrushes arranged in the slots, you’ve completed this step successfully. Now, let’s move on to the final step: displaying and enjoying your toothbrush holder.
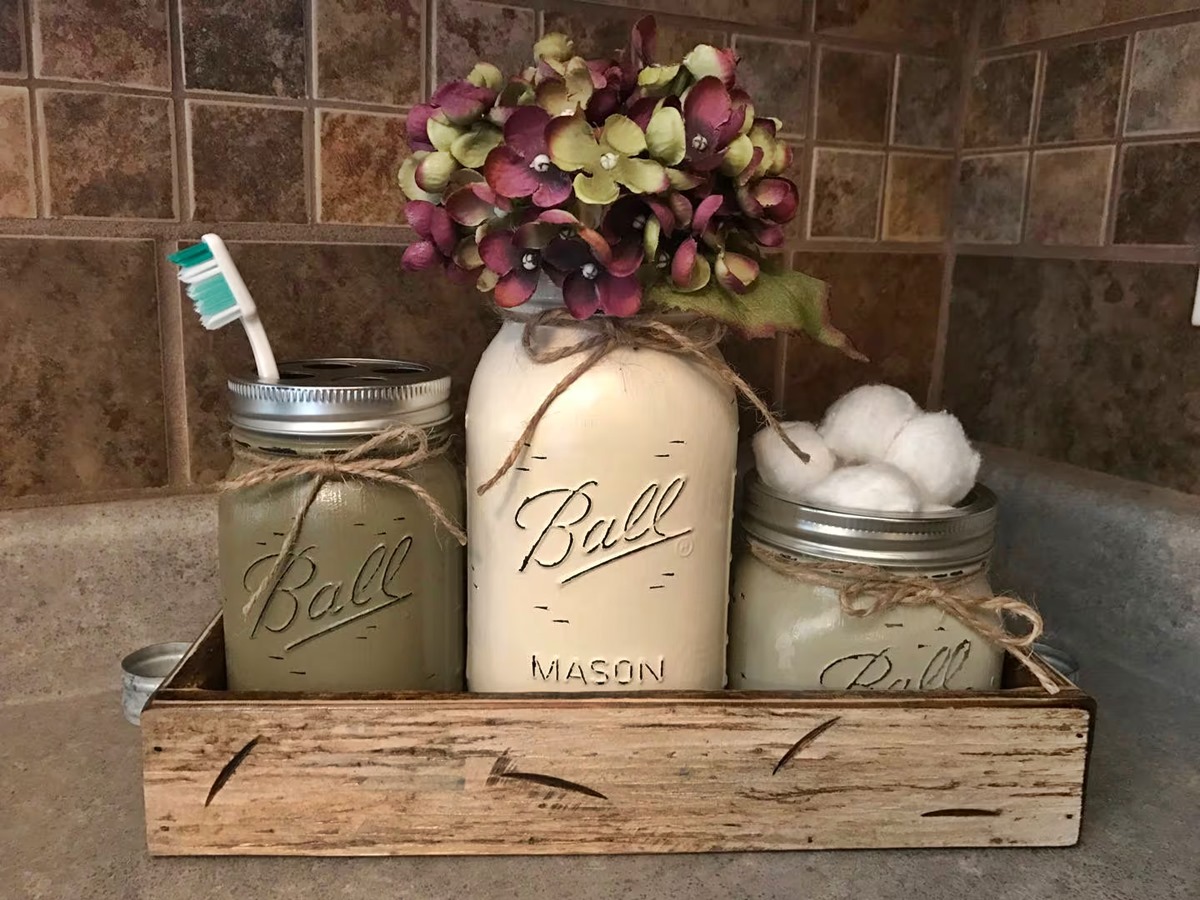
Step 10: Display and Enjoy Your Toothbrush Holder
Congratulations! You have successfully created a unique and functional toothbrush holder out of a mason jar. Now it’s time to showcase your creation and enjoy the benefits it brings. Follow these steps to display and make the most of your toothbrush holder:
- Find a suitable location in your bathroom to display the mason jar toothbrush holder. Consider a spot near the sink or on the countertop, where it is easily accessible and adds a decorative touch.
- Ensure that the toothbrush holder is placed on a stable surface, where it won’t be knocked over or easily toppled.
- Admire your toothbrush holder and appreciate the decorative elements you added. Take a moment to enjoy your personal touch in your bathroom decor.
- Encourage other family members or roommates to use the toothbrush holder to keep their toothbrushes organized and easily accessible.
- Regularly clean and sanitize the toothbrush holder to maintain hygiene. Remove the toothbrushes, wash the mason jar, and dry it thoroughly before reassembling.
- Rotate and replace toothbrushes as needed to ensure everyone has a clean and functional toothbrush when needed.
- Consider periodically checking the slots and edges of the mason jar for any signs of wear or damage. Make any necessary repairs or modifications to ensure the longevity of your toothbrush holder.
Your DIY toothbrush holder not only serves its functional purpose but also adds a touch of creativity and personalization to your bathroom. Enjoy the convenience of having organized toothbrushes and the satisfaction of completing a DIY project.
Remember to maintain cleanliness and ensure that the toothbrush holder remains a sanitary storage solution for your family’s toothbrushes. With proper care and maintenance, your mason jar toothbrush holder will continue to serve you and enhance your bathroom decor.
Now, step back and enjoy the charming display of your toothbrush holder, knowing that you’ve personalized your bathroom with a practical and unique DIY project.