
Choosing the Right Material for Your Mirror
When it comes to creating a beautiful and functional mirror, selecting the right material is crucial. The material you choose will impact the durability, appearance, and overall quality of your mirror. Here are some factors to consider when choosing the right material:
- Glass: Glass is the most common material used for mirrors due to its reflective properties. It is available in various thicknesses and types, such as regular glass or tinted glass. Choose a glass that is sturdy and has a smooth surface to ensure a clear reflection.
- Acrylic: Acrylic, also known as plexiglass, is a lightweight and shatter-resistant alternative to glass. It has excellent clarity and is relatively easy to cut and shape. Acrylic mirrors are a popular choice for DIY projects or situations where safety is a concern, such as in children’s rooms.
- Mirror Tiles: Mirror tiles are small, individual pieces of mirrors that can be arranged to create a larger reflective surface. These tiles are often used for decorative purposes and are available in different shapes and sizes. They can be easily affixed to walls or furniture to add a touch of glamour to any space.
- Antique Mirrors: If you’re looking for a vintage or rustic feel, consider using antique mirrors. These mirrors have aged surfaces that add character and charm to any room. Antique mirrors can be found at antique stores or flea markets, or you can even create an aged effect on a regular mirror using various techniques.
Consider the aesthetic you want to achieve and the purpose of the mirror when choosing the material. If you’re unsure, consult with a professional or do some research to determine which material will best suit your needs and preferences. Remember to prioritize quality and durability to ensure that your mirror will stand the test of time.
Gathering the Necessary Tools and Supplies
Before embarking on your mirror-making journey, it’s important to gather all the necessary tools and supplies. Having everything you need on hand will make the process smoother and more efficient. Here are the essential tools and supplies you’ll need:
- Glass cutter: A glass cutter is a specialized tool designed to score and cut glass with precision. Look for a good-quality glass cutter that is comfortable to hold and has a replaceable cutting wheel.
- Measuring tools: Accurate measurements are crucial when cutting the glass to fit your desired size. Use a tape measure or a ruler to measure the dimensions accurately.
- Protective gloves and goggles: Working with glass can be hazardous, so it’s important to protect yourself. Wear protective gloves to protect your hands from cuts and goggles to shield your eyes from glass shards.
- Frame materials: If you’re making a framed mirror, gather the necessary materials, such as wood, metal, or any other material of your choice, to construct the frame. Make sure you have the appropriate tools for cutting, shaping, and assembling the frame.
- Mirror adhesive or mirror clips: Depending on the type of mirror and frame you choose, you’ll need an adhesive suitable for affixing the mirror to the frame. Alternatively, you can use mirror clips to secure the mirror in place.
- Cleaning supplies: To ensure a polished finish for your mirror, have some glass cleaner, lint-free cloths, or microfiber towels on hand to clean the glass surface.
Having these tools and supplies readily available will make the mirror-making process more convenient and enjoyable. Double-check your inventory before getting started to avoid any unnecessary delays. If you’re missing any tools or supplies, make a list and head to your local hardware store or order online to ensure you have everything you need to create a stunning mirror.
Preparing the Frame for the Mirror
Before you can attach the mirror to a frame, it’s important to properly prepare the frame to ensure a secure and aesthetically pleasing result. Follow these steps to prepare the frame for your mirror:
- Clean and sand: Start by cleaning the frame thoroughly to remove any dust, dirt, or imperfections. If the frame has a rough surface, sand it lightly to create a smooth and even base for the mirror.
- Measure and mark: Measure the dimensions of the mirror and mark the corresponding measurements on the back of the frame. This will help you determine where to place the mirror and ensure a precise fit.
- Cut notches (if applicable): If your frame has moulding or trim pieces, you may need to cut notches to accommodate the thickness of the mirror. Use a saw or chisel to carefully remove the necessary material.
- Paint or stain: If desired, paint or stain the frame to complement your decor. Choose a color or finish that enhances the overall aesthetic of the mirror. Allow the paint or stain to dry completely before proceeding.
- Apply sealant (optional): If your frame is made of wood, consider applying a sealant or finish to protect it from moisture and prolong its lifespan. This step is particularly important for frames in areas with high humidity, such as bathrooms.
By properly preparing the frame, you’ll ensure that the mirror fits securely and enhances the overall look of the piece. Take your time during this step to achieve the best results. Once the frame is ready, you can move on to the next step of cutting the glass and attaching the mirror.
Cutting the Glass to the Desired Size
The next step in making your mirror is cutting the glass to the desired size. This requires precision and caution to ensure a clean and accurate cut. Follow these steps to cut the glass for your mirror:
- Measure and mark: Measure the dimensions of the mirror frame and mark the measurements on the glass using a glass cutter or a marker specifically designed for glass.
- Score the glass: Place a straightedge or a ruler along the marked line and apply pressure with the glass cutter to score the glass. Make a single, continuous score from one end to the other. Be sure to use enough pressure to create a visible score line, but avoid pressing too hard to prevent the glass from cracking.
- Break the glass: Once the glass is scored, carefully hold the glass with both hands on either side of the score line. Apply even pressure to break the glass along the line. You can use a breaker tool or simply snap the glass by hand, depending on the thickness and type of glass.
- Smooth the edges: After cutting the glass, you may notice rough or sharp edges. Use a glass file or sandpaper to carefully smooth and round the edges. Be gentle to avoid damaging the glass or injuring yourself.
It’s important to practice safety while cutting glass. Wear protective gloves and goggles to protect your hands and eyes from any potential injuries. Take your time and be patient during this step to ensure a precise cut. If you’re unsure about cutting the glass yourself, you can also seek the assistance of a professional glass cutter.
Once the glass is cut and the edges are smoothed, you’re ready to move on to the next step of applying mirror backing to the glass, which will give it the reflective properties it needs to function as a mirror.
Smoothing the Glass Edges
After cutting the glass for your mirror, it’s important to smooth the edges to ensure a safe and polished finish. This step will not only enhance the aesthetic appeal of your mirror but also prevent any potential injuries from sharp edges. Here’s how you can smooth the glass edges:
- Inspect the edges: Examine the cut edges of the glass to identify any rough or sharp areas that need to be smoothed. Pay attention to any jagged or uneven sections.
- Choose the right tool: Depending on the thickness and condition of the glass, you can use different tools to achieve a smooth edge. Options include a glass file, sandpaper, or a grinding stone. Select a tool that is suitable for your specific glass type.
- Begin smoothing: Gently rub the chosen tool along the edge of the glass, applying light pressure. Work in a circular or back-and-forth motion to gradually wear down any rough areas. Keep the tool perpendicular to the glass to maintain an even edge.
- Check your progress: Periodically stop and inspect the smoothed edge. Run your finger along it to feel for any remaining roughness. Continue smoothing until the edge feels completely smooth and no sharpness remains.
- Clean the glass: Once you’re satisfied with the smoothness of the edges, clean the glass to remove any debris or residue from the smoothing process. Use a lint-free cloth or a microfiber towel to wipe the glass surface gently.
Remember to work slowly and carefully during the edge-smoothing process to avoid putting too much pressure on the glass, which could cause it to break. Take breaks if needed to prevent overheating the glass or straining your hand.
By taking the time to smooth the glass edges, you’ll create a mirror that not only looks visually appealing but is also safe to handle. The next step is to apply mirror backing, which will give your glass the reflective properties necessary to function as a mirror.
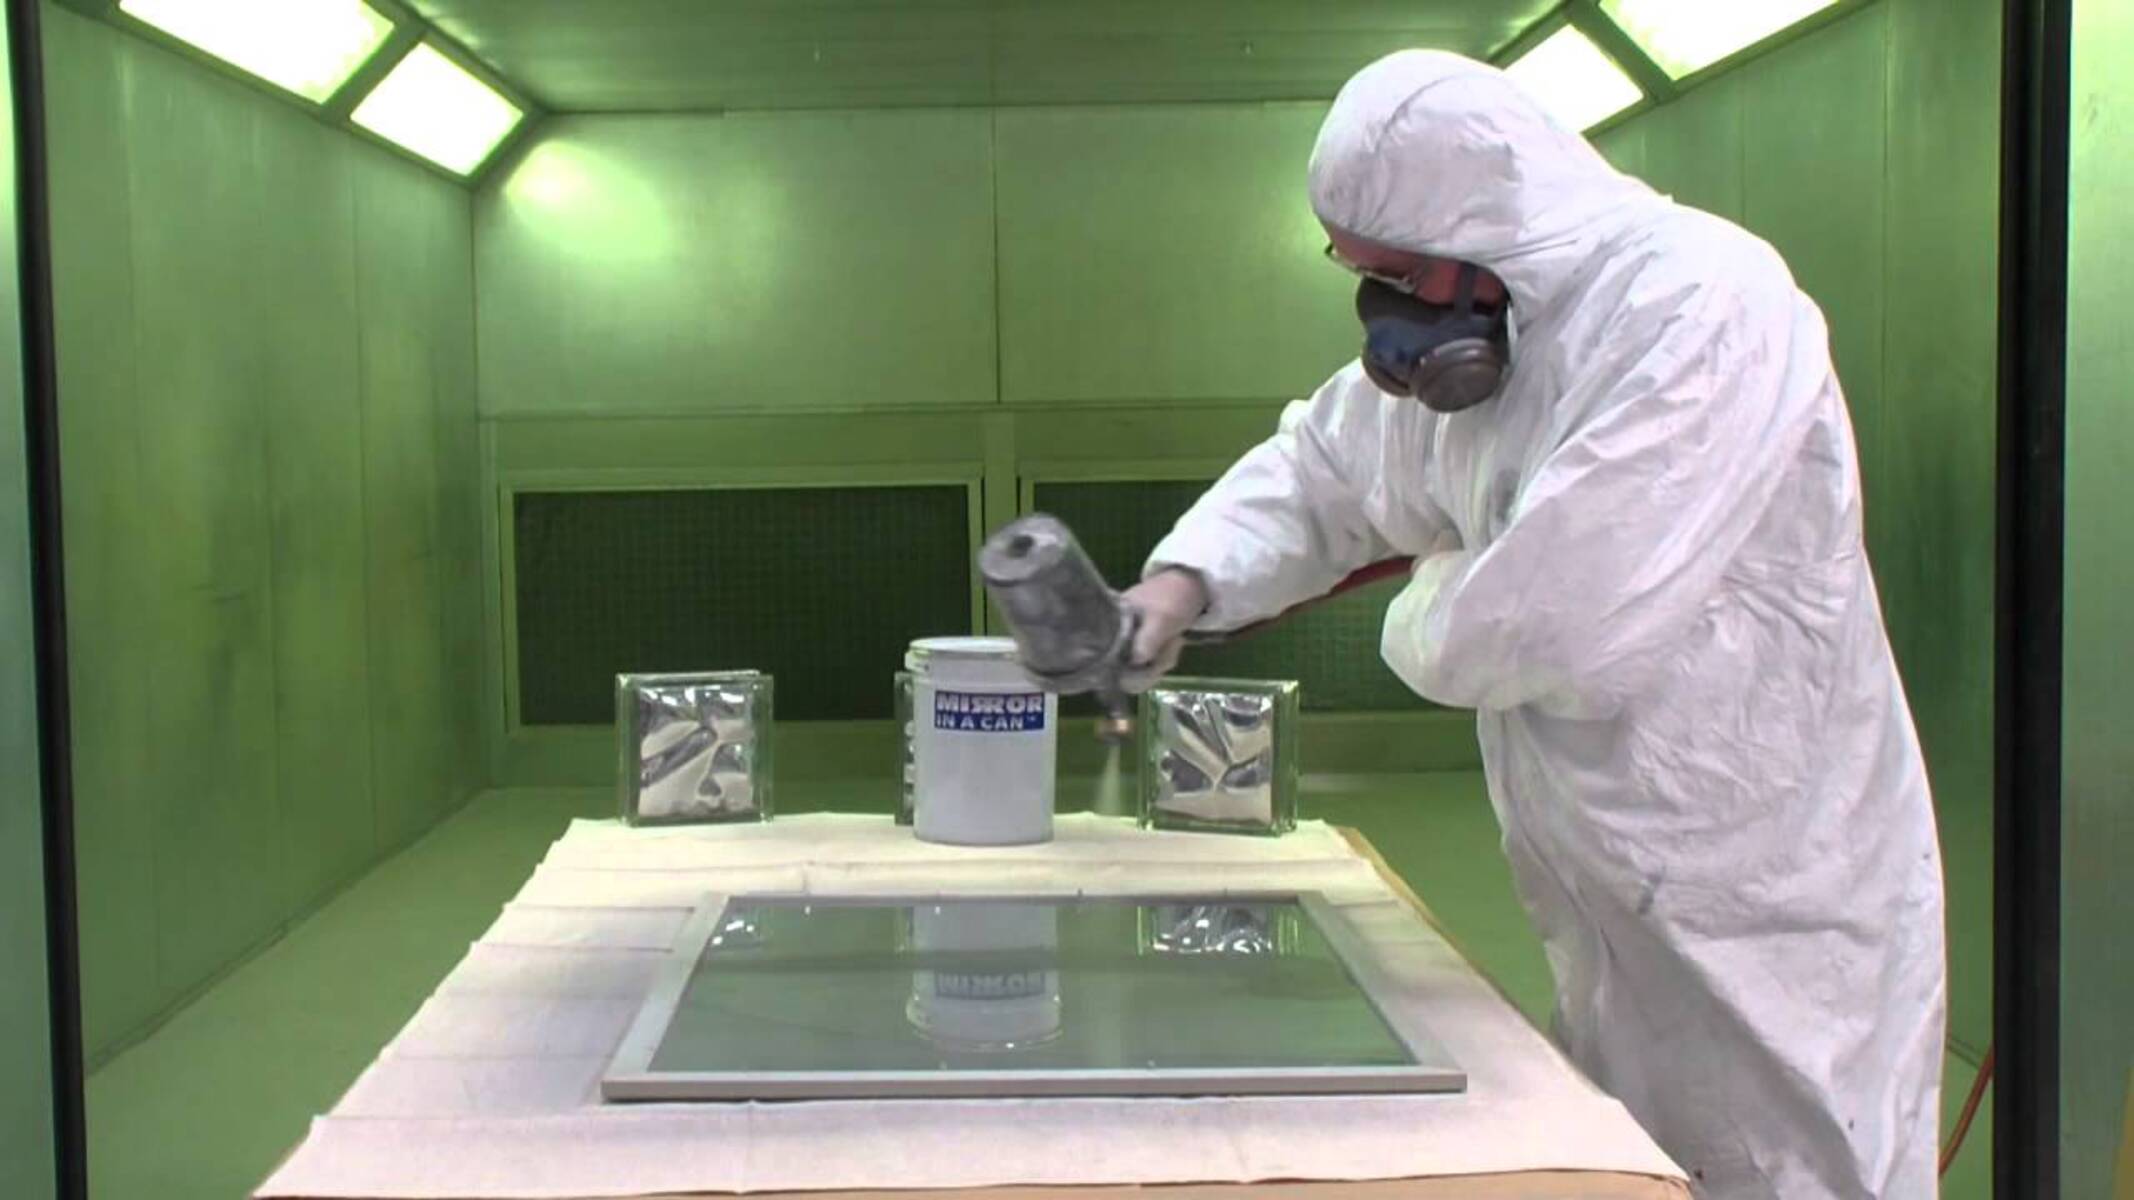
Application of Mirror Backing
Applying mirror backing is a crucial step in the mirror-making process as it provides the reflective surface necessary for the glass to function as a mirror. Here’s a step-by-step guide on how to apply mirror backing:
- Clean the glass: Start by cleaning the glass thoroughly using a glass cleaner and a lint-free cloth. Remove any dust, fingerprints, or debris that may interfere with the adhesion of the mirror backing.
- Prepare the mirror backing kit: Purchase a mirror backing kit from a hardware or craft store. These kits typically include mirror adhesive, a mixing cup, a stirring stick, and instructions. Follow the instructions included in the kit.
- Mix the adhesive: In the mixing cup provided, combine the mirror adhesive components according to the instructions. Stir the mixture thoroughly until it is well-mixed and the consistency is smooth.
- Apply the mirror backing: Use a small brush or a foam roller to apply a thin, even layer of the mixed mirror adhesive to the back of the glass. Make sure to cover the entire surface, reaching all edges and corners.
- Allow the adhesive to dry and cure: Follow the recommended drying and curing time specified in the mirror backing kit instructions. This can vary depending on the specific adhesive used. It’s important to allow sufficient time for the adhesive to set and bond securely.
During the application process, ensure that the mirror backing is applied evenly and without any lumps or bubbles. Smooth out any imperfections with a brush or roller, if necessary. Once the adhesive has dried and cured completely, the mirror backing will provide the reflective surface needed for your mirror.
Please note that while mirror backing kits make the process more convenient, you can also explore alternative options such as mirror mastic or double-sided mirror tape for applying mirror backing. Choose the option that best suits your needs and follow the manufacturer’s instructions for proper application.
The next step is to attach the mirror to the frame, bringing your mirror-making project one step closer to completion.
Attaching the Mirror to the Frame
Now that the mirror backing has been applied and has set, it’s time to attach the mirror to the frame. This step will bring your mirror-making project one step closer to completion. Follow these steps to securely attach the mirror to the frame:
- Prepare the frame: Ensure that the frame is clean, dry, and free from any dust or debris. If necessary, touch up the paint or stain on the frame to ensure a polished appearance.
- Position the mirror: Place the mirror, with the mirror backing facing upwards, onto the frame. Align the edges of the mirror with the edges of the frame, ensuring a centered and symmetrical position.
- Secure the mirror: Depending on the type of frame and mirror you’re using, there are a few options for securing the mirror in place. You can use mirror clips, adhesive strips, or an adhesive suitable for glass and the frame material. Ensure that the chosen method is appropriate for the weight and size of the mirror.
- Attach the mirror: Carefully attach the mirror to the frame using the chosen method. Follow the manufacturer’s instructions if utilizing adhesive strips or specific mirror attachment hardware.
- Check alignment: Once the mirror is attached, double-check the alignment and positioning. Make any necessary adjustments to ensure that the mirror is straight and centered within the frame.
Take your time during this step to achieve a secure and balanced attachment. It’s important to handle the mirror with care to prevent any damage or breakage.
Once the mirror is securely attached to the frame, you’re almost done with your homemade mirror! The final step is to add some finishing touches to enhance its appearance and ensure its longevity.
Adding Finishing Touches to the Mirror
Now that your mirror is securely attached to the frame, it’s time to add some finishing touches to enhance its appearance and ensure its longevity. These final steps will complete your homemade mirror and make it ready for display. Here’s what you can do to add those finishing touches:
- Clean the mirror: Give the mirror a final cleaning using a glass cleaner and a lint-free cloth. Ensure that the glass surface is free from any smudges, fingerprints, or residue for a crystal-clear reflection.
- Inspect and touch up the frame: Carefully examine the frame for any imperfections or areas that may need touch-up. If you notice any scratches, dings, or uneven paint, use a small brush or a touch-up pen to fix the issues and ensure a seamless finish.
- Add decorative elements (optional): If desired, you can add decorative elements to the frame or around the mirror to personalize it further. Consider adding trim, embellishments, or even painting a design directly onto the frame to complement your style and decor.
- Hang or mount the mirror: Determine the best method for hanging or mounting your mirror based on its size and weight, as well as the type of wall or surface you plan to display it on. Use appropriate hardware, such as hooks, brackets, or adhesive strips, to ensure the mirror is securely and safely mounted.
- Step back and admire your work: Finally, step back and take a moment to appreciate your creation. Admire the mirror’s reflection and the craftsmanship you put into making it. You now have a beautiful, handmade mirror that adds style and function to your space!
Remember to exercise caution when handling and hanging the mirror to prevent any accidents or damage. If you’re unsure about proper installation, consult a professional or seek assistance from someone experienced in mirror hanging.
Congratulations! You have successfully added the finishing touches to your homemade mirror. With proper care and maintenance, your mirror will continue to enhance your space for years to come.
Cleaning and Maintaining Your Homemade Mirror
Once your homemade mirror is beautifully displayed, it’s important to have a regular cleaning and maintenance routine to keep it looking its best. By following these simple steps, you can ensure the longevity and clarity of your mirror:
- Choose the right cleaning solution: Select a cleaning solution specifically formulated for glass. Avoid using harsh chemicals or abrasive cleaners that can damage the mirror’s surface or frame. A mixture of mild dish soap and warm water or a gentle glass cleaner will suffice.
- Use a lint-free cloth or microfiber towel: When cleaning the mirror, opt for a soft lint-free cloth or microfiber towel to prevent scratches and streaks. Avoid using rough materials such as paper towels or abrasive sponges that can leave behind lint or damage the mirror’s surface.
- Gently wipe the mirror: Dip the cloth or towel into the cleaning solution and wring out any excess moisture. Starting from the top of the mirror, gently wipe the surface in a horizontal or vertical motion. Take care not to apply too much pressure to avoid causing damage or dislodging the mirror from its frame.
- Pay attention to the frame: If your mirror has a frame, wipe it down with a separate clean cloth or use a soft brush to remove any dust or debris that may accumulate over time. Be cautious not to scratch or damage the frame during this process.
- Buff and dry: After cleaning the mirror, use a clean, dry lint-free cloth or towel to buff the surface gently. This will help remove any remaining streaks or moisture, leaving behind a crystal-clear reflection.
- Avoid excessive moisture: Keep the mirror away from excessive moisture or humidity, as it can lead to the deterioration of the reflective backing or cause the frame to warp. If you have a mirror in a bathroom or any high-moisture area, consider using proper ventilation or placing a moisture-absorbing product nearby.
- Inspect regularly: Regularly inspect the mirror for any signs of damage, such as cracks, chips, or loose frames. Promptly address any issues to prevent further deterioration or potential safety hazards. Replace any damaged parts or seek professional assistance if needed.
By following these cleaning and maintenance practices, you can enjoy a clear and pristine reflection from your homemade mirror for years to come. Remember to be gentle and careful in your cleaning routine to preserve the integrity of the mirror’s surface and frame.
With a little care and attention, your homemade mirror will continue to enhance the beauty of your space and be a source of pride for your craftsmanship.