
Choosing the Right Book
When it comes to creating a folded book art sculpture, one of the most important decisions you’ll make is choosing the right book. The book you select will determine the overall look and feel of your sculpture, so it’s crucial to consider a few key factors.
Firstly, think about the size of the book. Books that are too large may be challenging to work with, while books that are too small might not provide enough surface area for your desired design. Look for a book that has a size that feels comfortable to handle and allows for enough space to create intricate and detailed folds.
Consider the thickness of the book as well. While thicker books offer more opportunities for complex designs, they can be more time-consuming to fold. If you’re a beginner, it might be best to start with a book that has a moderate thickness to gain confidence and proficiency before tackling more elaborate projects.
The condition of the book is another factor to keep in mind. While some people prefer working with vintage or used books for their character and charm, others may opt for newer books with crisp, clean pages. Think about the aesthetic you want to achieve and choose a book accordingly. It’s also important to ensure that the pages are intact and in good condition to prevent any issues during the folding process.
Additionally, consider the content of the book. Some artists choose books that have personal meaning or significance to them or the recipient of the sculpture. Others may select books with specific themes that align with the intended design or purpose of the artwork. No matter your approach, find a book that resonates with you and enhances the overall concept of your sculpture.
Lastly, it’s essential to consider the binding of the book. Hardcovers are generally easier to work with and provide more stability than softcover or paperback books. However, if you prefer the look of a softer spine, you can still achieve stunning results with a little extra care and patience.
Preparing the Book
Before diving into the folding process, it’s crucial to properly prepare the book to ensure smooth and successful sculpting. Here are the steps to follow:
1. Clean the book: Start by gently dusting off the cover and pages of the book to remove any dirt or debris. This will help maintain the cleanliness of your sculpture and prevent any unwanted markings.
2. Assess the book’s condition: Take a closer look at the book’s pages and spine. If you come across any loose pages or sections, use a mild adhesive to carefully reattach them to the book. Pay attention to any torn or damaged pages and consider removing them if they affect the overall appearance of your sculpture.
3. Determine the design or pattern: Decide on the type of design or pattern you want to create with the folded pages. This will help you determine which pages to fold and which ones to leave untouched. You can sketch the design on a piece of paper or mark the pages directly in pencil.
4. Mark the starting point: Before you begin folding the pages, mark a specific starting point at the bottom corner of the book. This will ensure consistency throughout the folding process and help you maintain the desired pattern or design.
5. Secure the book: Once you’ve marked the starting point, use a clip or rubber band to hold the pages tightly together. This will prevent them from shifting or moving while you fold, giving you better control over the process.
6. Protect the cover: If you want to keep the cover of the book pristine, cover it with a plastic wrap or a piece of cloth to protect it from any accidental folds or marks.
Remember, each book is unique, and you may need to adapt these steps based on the specific characteristics and condition of the book you’ve chosen. Taking the time to prepare the book properly will ensure that you achieve the best possible results with your folded book art sculpture.
Creating the Base Fold Pattern
Before delving into the intricate folds and designs, it’s essential to establish a base fold pattern. This pattern will serve as the foundation for your book art sculpture. Follow these steps to create a base fold pattern:
1. Determine the fold style: Decide on the type of fold you want to incorporate into your sculpture. The most common fold style for book art is the “V-fold.” In this style, the corner of each page is folded inward to the center, creating a triangular shape. Experiment with different fold styles to find the one that suits your artistic vision.
2. Begin with the first page: Open the book to the first page. Starting from the bottom corner, fold the page diagonally, aligning the edge with the center of the book. You can use a ruler to ensure precision or simply fold by hand for a more organic look. Press down firmly to create a crisp fold.
3. Repeat the process: Continue folding each subsequent page using the same technique. It’s essential to fold the pages consistently, maintaining the same angle and alignment throughout the process. Take your time and be patient as you work through each page, ensuring that the folds are neat and uniform.
4. Adjust the folding angle: As you progress through the book, you may notice that the angle of the fold becomes steeper. This is normal and will create a beautiful tapered effect. However, if you want a more consistent look, you can adjust the folding angle to keep it relatively uniform throughout the book. It’s all about personal preference and the overall aesthetic you want to achieve.
5. Take breaks if needed: Folding each individual page can be a time-consuming process, so it’s important to take breaks if needed. Pausing periodically will not only prevent fatigue but also give you a chance to step back and evaluate your progress. Don’t rush the folding process; take your time and enjoy the creative journey.
Remember, the base fold pattern will form the framework for the rest of your sculpture. Pay attention to detail and strive for consistency as you create each fold. Once you have established the base pattern, you can move on to adding more complex and intricate designs to transform your book into a true work of art.
Folding the Pages
Now that you have established the base fold pattern, it’s time to dive into the exciting process of folding the pages of your book. Follow these steps to fold with precision and create stunning visual effects:
1. Work systematically: Start from the first folded page and move towards the back of the book. This systematic approach ensures that you maintain a consistent pattern and avoid any confusion or mistakes along the way.
2. Fold with precision: Take each page and fold it according to your desired design. Whether you opt for simple folds or more intricate patterns, ensure that each fold is precise and aligns with the overall concept of your sculpture. Pay attention to angles, symmetry, and the placement of each fold.
3. Use a bone folder or ruler: For a clean and sharp fold, consider using a bone folder or a ruler to help press down on the creases. This will create crisp and professional-looking folds, enhancing the overall appearance of your sculpture.
4. Check for symmetry: As you fold each page, periodically step back and assess the symmetry and balance of the sculpture. Make adjustments as needed to ensure that the overall design looks harmonious and visually appealing.
5. Take breaks and pace yourself: Folding the pages can be a time-consuming process, so it’s important to take breaks to rest your hands and rejuvenate your creativity. It’s better to approach the task with patience and enjoyment rather than rushing through it.
6. Experiment and get creative: While following a predetermined pattern is a great starting point, don’t be afraid to deviate and experiment. Add your own unique touches and variations to make the sculpture truly yours. Let your creativity run wild and don’t be afraid to try new techniques and designs.
Remember, folding the pages is a labor of love and artistry. Take your time, enjoy the process, and stay focused on creating a captivating and visually stunning book art sculpture.
Adding More Complex Patterns
Once you have mastered the art of folding the pages with precision, it’s time to elevate your book art sculpture by incorporating more complex patterns. Here are some techniques to add depth and intricacy to your creation:
1. Reverse folds: Experiment with reverse folds to create stunning visual effects. Instead of folding the pages inward, fold them outward or alternate between inward and outward folds. This technique adds texture and dimension to your sculpture.
2. Diagonal folds: Introduce diagonal folds to create diagonal lines or patterns within your sculpture. These folds add a dynamic element and can be used to create unique designs such as chevrons, diamonds, or zigzags.
3. Fan folds: Explore the technique of fan folding, where a series of folds are made along one edge of the book, creating a fan-like effect. This technique introduces a sense of movement and can be used to add visual interest to specific areas of your sculpture.
4. Layered folds: Create layered folds by folding multiple pages together. This technique allows you to form larger shapes or intricate designs by combining the folds of several pages. It adds depth and complexity to your sculpture, making it visually captivating.
5. Symmetrical patterns: Incorporate symmetrical patterns, such as circles, spirals, or symmetrical shapes, to create a sense of balance and harmony within your sculpture. These patterns can be achieved by carefully planning and aligning the folds of the pages.
6. Cut-outs and windows: For a more avant-garde approach, consider experimenting with cut-outs or windows within the pages of the book. Carefully cut out specific shapes or patterns, allowing you to create negative space and intriguing visual peeks throughout your sculpture.
Remember to maintain consistency and cohesion within your design while incorporating more complex patterns. Each fold and pattern should complement the overall aesthetic of your sculpture. Don’t be afraid to push your creative boundaries and explore new techniques to achieve the desired artistic effect.
Shaping the Sculpture
Once you have created the base folds and added more intricate patterns, it’s time to shape your book art sculpture into its final form. Shaping the sculpture will give it depth, dimension, and a unique visual appeal. Here are some tips for shaping your sculpture:
1. Manipulate the folds: Use your hands, fingers, or a small tool like a toothpick to manipulate the folds of the pages. By gently pushing and pulling on the folded pages, you can create curves, waves, or even sharp angles, adding dynamic shapes and contours to your sculpture.
2. Create focal points: Determine the focal points of your sculpture and emphasize them by shaping the folds around those areas. For example, if you have a specific design or element you want to highlight, shape the folds in a way that draws attention to it and makes it stand out.
3. Experiment with asymmetry: Consider introducing asymmetrical elements into your sculpture to add visual interest and complexity. Vary the depth and shape of the folds across different sections of the book, creating a visually dynamic and engaging composition.
4. Curve the pages: Utilize bending and curving techniques to give your sculpture a more three-dimensional quality. For example, gently curve the pages inward or outward to create an arched effect or to mimic the shape of other objects or natural forms.
5. Play with negative space: Incorporate the empty space between the folds and pages to enhance the overall shape and composition of your sculpture. Negative space can create a sense of balance, contrast, and intrigue, adding an element of uniqueness to the artwork.
6. Be patient and precise: As you shape the sculpture, take your time and ensure that each fold and contour is defined and deliberate. Pay attention to the small details and make adjustments as needed to achieve the desired shape and form.
Remember, shaping the sculpture is a crucial step in bringing your book art to life. It allows you to transform the pages into a three-dimensional artwork that catches the eye and captivates the viewer. Take creative risks, follow your instincts, and shape the sculpture in a way that truly expresses your artistic vision.
Finishing Touches
As you near the completion of your book art sculpture, it’s time to add those final finishing touches that will elevate your creation to the next level. These small details can make a big difference in the overall presentation and aesthetic of your sculpture. Consider the following suggestions for adding those final touches:
1. Trim the edges: If the edges of your book are uneven or messy, carefully trim them with a sharp craft knife or scissors. This step will give your sculpture clean and polished edges, enhancing its overall appearance.
2. Smooth out the folds: Take a moment to smooth out any rough or misaligned folds. Use your fingers or a small tool to gently flatten and neaten the pages, ensuring that each fold is crisp and well-defined.
3. Reinforce the structure: Depending on the size and complexity of your sculpture, you may need to reinforce the structure to ensure its stability and longevity. Consider using a clear adhesive to secure the folds together, particularly if certain areas feel loose or unstable.
4. Add embellishments: Personalize your book art sculpture by adding embellishments that enhance the overall design. This can include elements such as ribbons, beads, small trinkets, or even pressed flowers. Choose embellishments that complement the theme or aesthetic of your sculpture.
5. Paint or stain the pages: If desired, you can paint or stain the pages of the book to further enhance the visual impact of your sculpture. Use water-based paints or diluted dyes to gently brush color onto the pages, creating a unique and artistic effect.
6. Seal the finished sculpture: To preserve your book art sculpture and protect it from dust and damage, consider sealing it with a clear coat of varnish or a protective spray. This step will help maintain its integrity and ensure its longevity for years to come.
Remember, the finishing touches are the final steps in perfecting your book art sculpture. Take your time and pay attention to detail as you complete the process. Each choice you make in these final stages will contribute to the overall beauty and impact of your finished artwork.
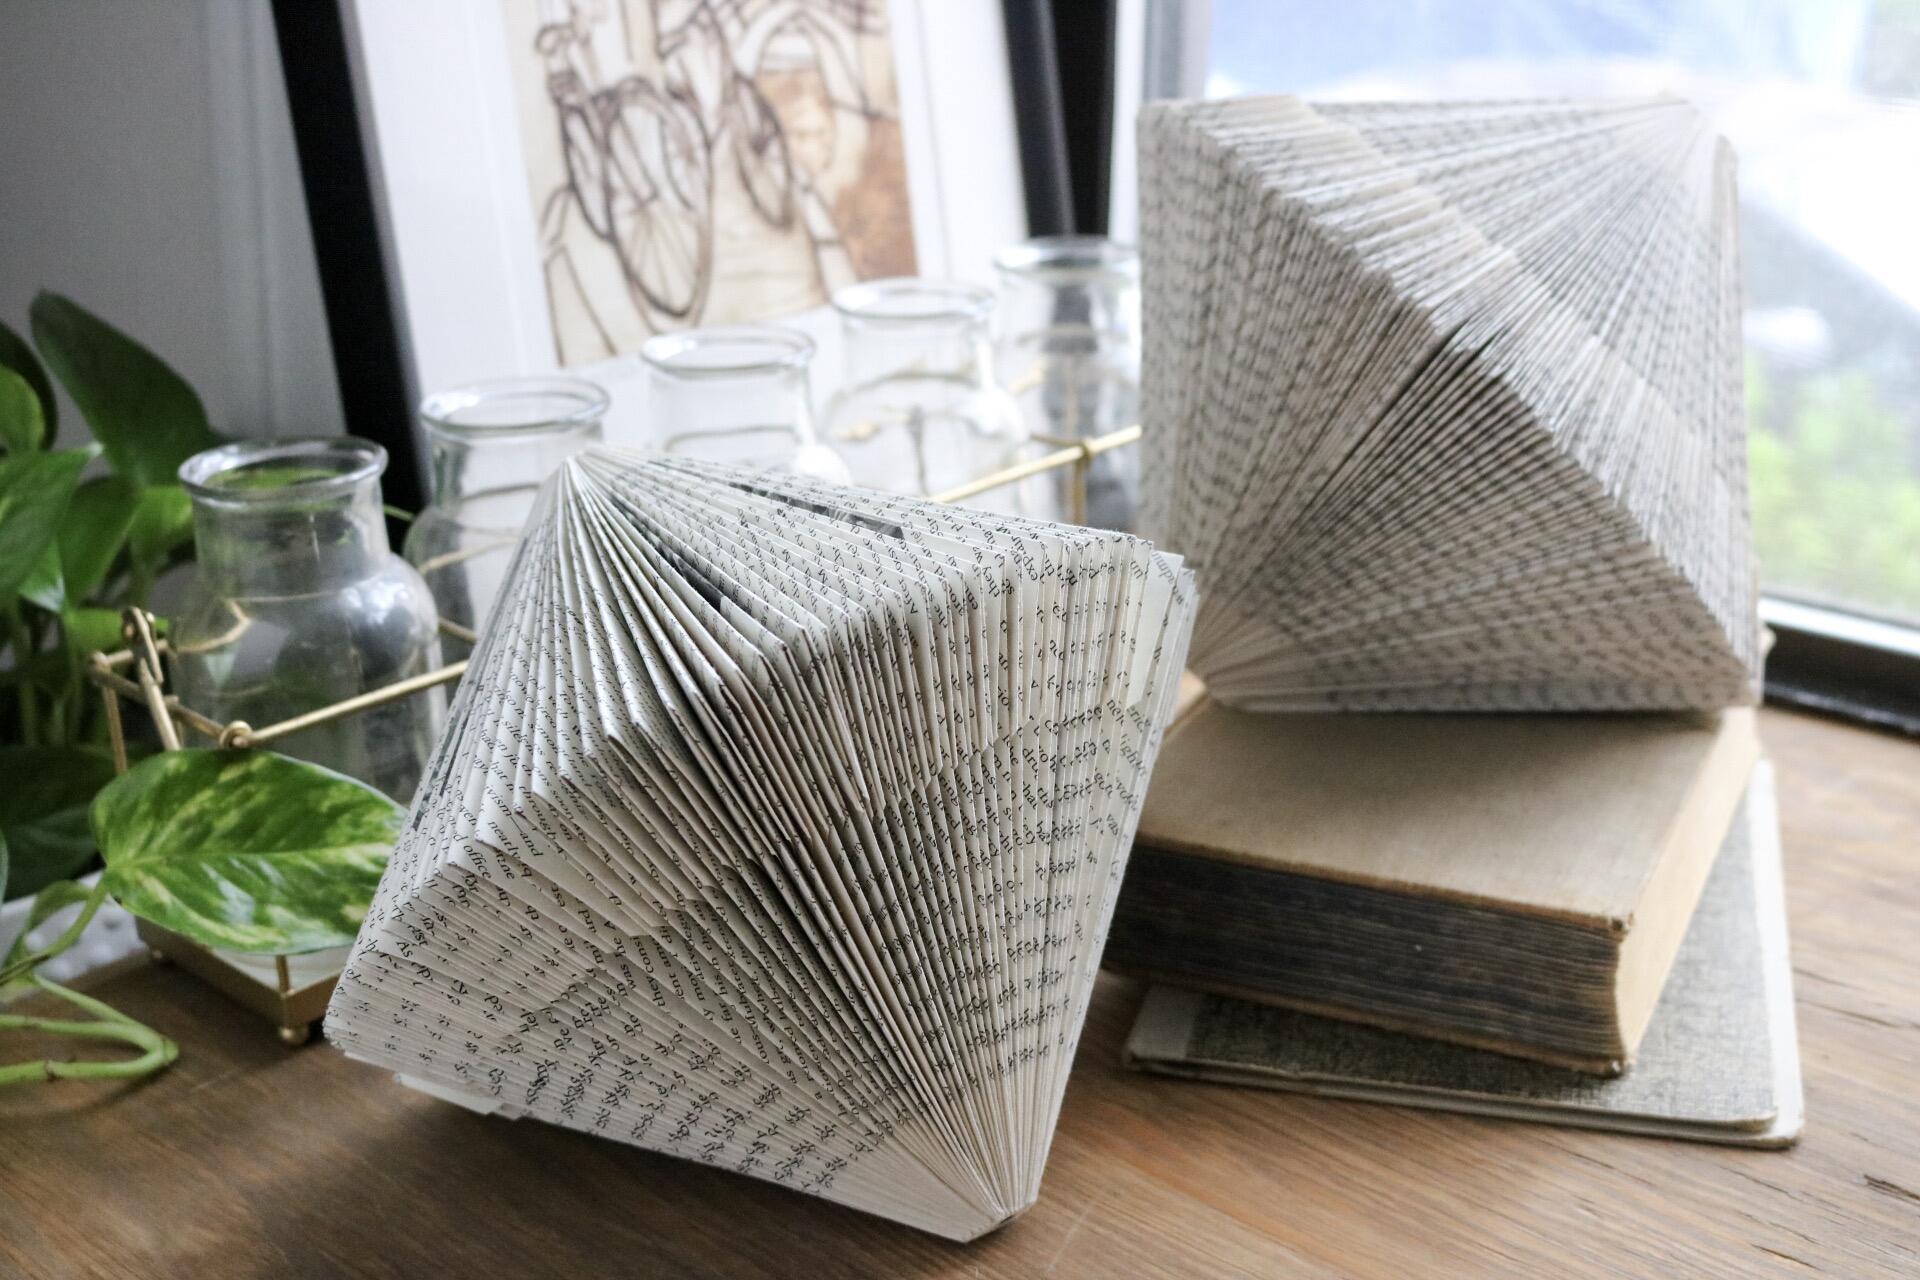
Displaying Your Book Art Sculpture
After all the hard work you’ve put into creating your book art sculpture, it’s time to showcase and display it in a way that truly highlights its beauty and craftsmanship. Here are some tips for effectively displaying your sculpture:
1. Choose a stable base: Ensure that your book sculpture has a stable and sturdy base to rest on. Consider using a wooden or acrylic stand that can securely hold the weight of the book. This will not only provide support but also elevate the sculpture, allowing it to be seen more easily.
2. Positioning and lighting: Find the perfect spot to display your sculpture. Consider the lighting conditions in the area to bring out the textures and details of the folded pages. Natural light or soft, indirect lighting can enhance the nuances of your sculpture, making it more visually appealing.
3. Create a focal point: Use your book art sculpture as a focal point in a room or on a bookshelf. Arrange other decor or items around it, allowing the sculpture to take center stage. This will draw attention and create a striking visual impact.
4. Showcase different angles: Experiment with displaying your book sculpture from different angles. Rotate it periodically so that viewers can appreciate the intricate folds and patterns from all sides. Consider placing a mirror nearby to provide a 360-degree view of the sculpture.
5. Supportive background: Choose a background that complements the colors and theme of your sculpture. Consider placing a solid-colored backdrop or even a patterned fabric behind the sculpture to create contrast and make it stand out. The background should enhance the overall visual appeal, without overpowering the sculpture.
6. Protect from dust and damage: Keep your book art sculpture safe from dust and potential damage by placing it under a glass display case or in a display box. This will protect it while still allowing viewers to admire it up close without the risk of accidental handling or environmental factors.
Remember, displaying your book art sculpture is an opportunity to showcase your creativity and the unique beauty of your work. Find a space that does justice to the intricate folds and designs, allowing others to appreciate the artistry and skill involved in creating this unique form of artwork.