
Materials Needed
Before you begin making your own shower curtain rod for a clawfoot tub, it’s important to gather all the necessary materials. Here’s a list of items you’ll need:
- 1-inch diameter metal pipe: This will serve as the main rod for your shower curtain.
- Two ceiling mounts: These will be used to securely attach the rod to the ceiling.
- Two wall mounts: These will support the ends of the rod and keep it stable.
- Screws and anchors: These will be used to attach the mounts to the ceiling and walls securely.
- Shower curtain rings: These will allow you to hang your shower curtain with ease.
- Measuring tape: This will help you accurately measure the dimensions of your clawfoot tub.
- Drill and drill bits: You’ll need these to create holes for the screws and anchors.
- Screwdriver: This will be used to tighten the screws and secure the mounts.
- Level: A level will help ensure that your shower curtain rod is installed horizontally.
- Pencil or marker: You’ll need this to mark the positions for the mounts and holes.
Once you have gathered all the materials, you’ll be ready to move on to the next steps of creating and installing your own shower curtain rod for your clawfoot tub. Make sure to double-check that you have everything listed to avoid any unnecessary delays during the process.
Step 1: Measure the Clawfoot Tub
Before you start making your shower curtain rod, it’s crucial to accurately measure your clawfoot tub. This will ensure that the rod fits perfectly and functions effectively. Here’s how to do it:
- Begin by measuring the length of the tub. Use a measuring tape to measure the distance from end to end. Note down this measurement as it will be useful later on.
- Next, measure the height of the tub. This measurement will help determine the ideal height for your shower curtain rod and curtain. Measure from the top rim of the tub to the floor or desired height.
- Take note of the distance between the wall and the tub. Measure from the wall to the outer edge of the tub to determine how far the curtain rod needs to extend.
- Consider any obstructions or obstacles in the way. Take note of any faucets, showerheads, or other fixtures that may affect the positioning of the rod. Make sure to leave enough clearance for these elements.
Take your time to get accurate measurements, as they will dictate the overall success and functionality of your shower curtain rod. If you’re unsure about any measurements, double-check them or seek assistance from a knowledgeable friend or professional. Once you have the measurements, you’re ready to move on to the next step of selecting the type of shower curtain rod that suits your needs and preferences.
Step 2: Choose the Type of Shower Curtain Rod
Now that you have measured your clawfoot tub, it’s time to choose the type of shower curtain rod that will best suit your needs and complement the aesthetics of your bathroom. There are several options to consider:
- Straight Rod: A straight rod is a classic choice. It spans the length of the tub and attaches to the wall on both ends. This type of rod is suitable for tubs placed against one wall.
- Corner Rod: If your clawfoot tub is positioned in a corner, a corner rod is an excellent choice. It creates a curtain enclosure on two sides, providing extra privacy and space.
- Curved Rod: Curved rods are designed to create a more spacious and luxurious showering experience. They offer additional elbow room and can make a small bathroom feel more open.
- Ceiling-Mounted Rod: For a unique and stylish look, consider a ceiling-mounted curtain rod. This type of rod is installed directly on the ceiling, providing a clean and seamless appearance.
- Custom Rod: If you have specific design preferences or limitations, you may opt for a custom-made curtain rod. This allows you to create a rod that perfectly fits your clawfoot tub and complements your bathroom decor.
Consider the style, functionality, and practicality of each type of rod. Also, take into account the measurements you obtained in step 1 to ensure a proper fit. Once you have chosen the type of shower curtain rod, you’ll be ready to gather the necessary supplies for the installation process in the next step.
Step 3: Purchase the Necessary Supplies
With the type of shower curtain rod chosen, it’s time to gather all the necessary supplies for the installation process. Here’s what you’ll need:
- Shower curtain rod: Purchase a rod that matches the type you have chosen, whether it’s a straight rod, corner rod, curved rod, ceiling-mounted rod, or custom-made rod. Ensure that the length of the rod matches the measurements you obtained in Step 1.
- Mounting hardware: Depending on the type of rod and your specific installation requirements, you may need various mounting hardware such as ceiling mounts, wall mounts, brackets, or flanges. Consider the instructions provided with your chosen rod to determine the appropriate mounting hardware needed.
- Screws and anchors: Make sure to purchase screws and anchors that are compatible with the type of mounting hardware you’re using and the surface you’ll be attaching the rod to. If you’re unsure, consult with a professional or a knowledgeable staff member at your local hardware store.
- Shower curtain rings: Choose shower curtain rings that match your curtain rod and complement your bathroom decor. Make sure to purchase enough rings to securely hang your shower curtain.
- Tools: Ensure that you have the necessary tools on hand, such as a drill, drill bits, a screwdriver, a level, and a measuring tape. These tools will assist in the installation process and ensure a secure and level installation.
When purchasing supplies, it’s always a good idea to have some extra screws, anchors, and curtain rings, in case any need to be replaced or if you decide to make adjustments during the installation process. Once you have gathered all the necessary supplies, you’ll be ready to move on to the next steps of installing your homemade shower curtain rod.
Step 4: Install the Ceiling Support
Now that you have all the necessary supplies, it’s time to begin installing your DIY shower curtain rod. The first step is to install the ceiling support, which will ensure the stability and durability of your rod. Here’s how to do it:
- Locate the position where you want to install the ceiling support. It should be centered and aligned with the length of your clawfoot tub. Use a pencil or marker to mark the spot on the ceiling.
- Drill pilot holes into the marked spot on the ceiling. The size of the drill bit should match the diameter of the screws you’ll be using for the support.
- Attach the ceiling support using the screws provided with the mounting hardware. Make sure to tighten them securely, ensuring that the support is level and stable.
- Repeat the process for the second ceiling support, measuring and marking the position opposite to the first one. Drill pilot holes and attach the support using screws.
Double-check the stability and levelness of the ceiling supports before proceeding to the next step. Any imbalances or instability at this stage can affect the overall functionality of the curtain rod. Once the ceiling supports are securely installed, you’re ready to move on to the next step of installing the shower curtain rod itself.
Step 5: Install the Shower Curtain Rod
With the ceiling supports in place, it’s time to install the shower curtain rod itself. Follow these steps to ensure a secure and stable installation:
- Take the shower curtain rod and insert one end into the wall mount or bracket on one side of the clawfoot tub. The rod should fit snugly into the mount or bracket.
- Hold the other end of the rod and insert it into the wall mount or bracket on the opposite side of the tub. Ensure that the rod is level and centered.
- Adjust the length of the rod if necessary to ensure a tight and secure fit. Some rods may have an adjustable mechanism that allows for easy length adjustment.
- Tighten the screws on the wall mounts or brackets using a screwdriver to firmly secure the rod in place. Make sure that the rod is level and stable before proceeding.
- Check the overall stability of the shower curtain rod by gently shaking it. If there is any noticeable movement or instability, adjust the rod and the mounting hardware as needed.
It’s important to ensure that the shower curtain rod is securely installed to prevent it from accidentally falling or causing any damage. Take your time to properly align and secure the rod in place. Once the rod is securely installed, you’re ready to move on to the next step of attaching the shower curtain rings.
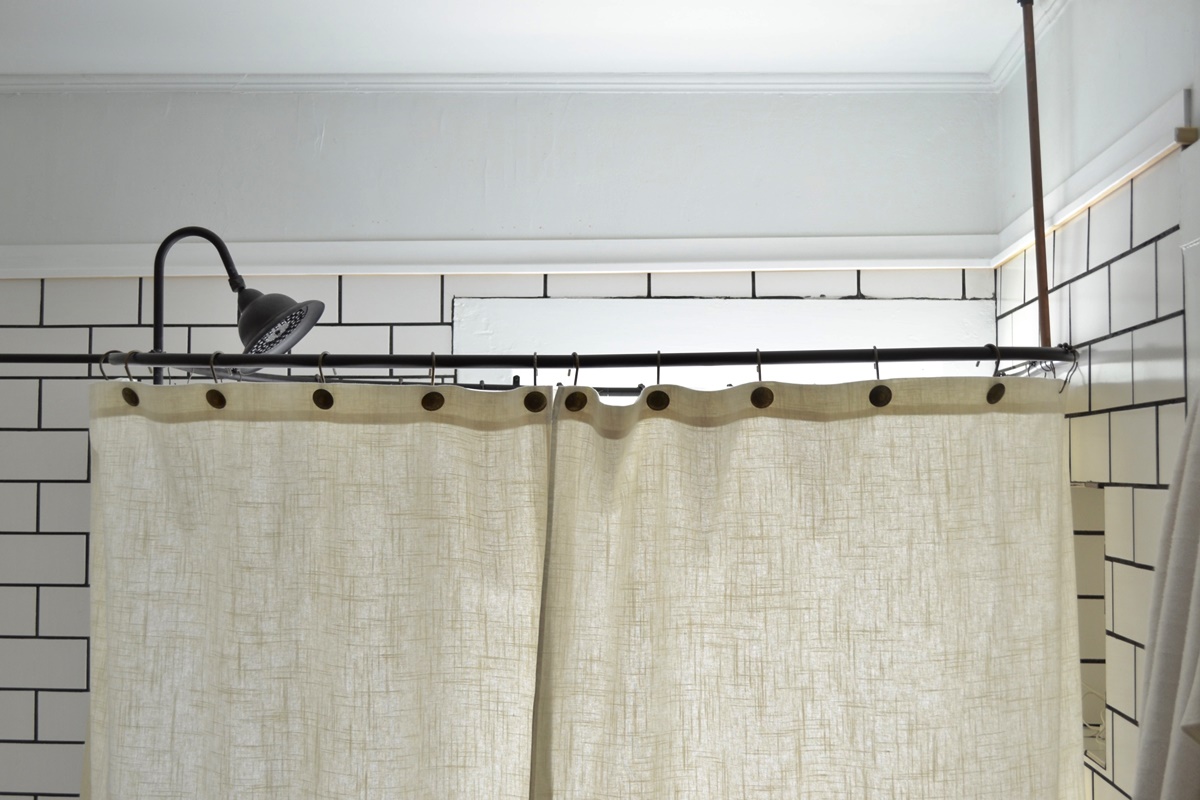
Step 6: Attach the Shower Curtain Rings
With the shower curtain rod installed, it’s time to attach the shower curtain rings. Follow these steps to properly hang your shower curtain:
- Take the shower curtain rings and open them by pulling or sliding them apart.
- Slide one end of each ring onto the shower curtain rod, starting from one side. Ensure that the rings are evenly spaced along the length of the rod.
- Once all the rings are in place, position the shower curtain so that it is evenly distributed along the rod.
- Take each ring and thread the shower curtain through it, making sure it hangs evenly.
- Continue threading the curtain through each ring until the entire curtain is attached.
While attaching the shower curtain rings, ensure that the curtain hangs straight and is not twisted or bunched up. This will help it to function properly and create a visually appealing display. Take the time to adjust the curtain and rings as needed to achieve the desired look.
Once the shower curtain rings are securely attached and the curtain is hanging properly, you’re ready to move on to the next step of hanging the shower curtain itself.
Step 7: Hang the Shower Curtain
Now that you have attached the shower curtain rings, it’s time to hang the shower curtain onto the rod. Follow these steps to properly hang your curtain:
- Hold the shower curtain by the top edge or the designated holes and align it with the shower curtain rings.
- Starting from one end, thread each hole of the shower curtain onto the corresponding shower curtain ring. Take your time to ensure that each hole is securely attached to its respective ring.
- As you go along, distribute the fabric evenly across the curtain rod, making sure there are no bunches or wrinkles.
- Once all the holes are threaded onto the rings, adjust the curtain as needed to ensure it hangs straight and evenly.
Take a step back and examine the shower curtain to ensure it is properly aligned and hanging as desired. Make any necessary adjustments to ensure a neat and polished appearance. Smooth out any wrinkles or folds in the curtain to achieve the desired drape.
Now that you have successfully hung the shower curtain, you’re almost done with the installation process. The next step involves testing the curtain rod for stability and making any necessary adjustments.
Step 8: Test the Curtain Rod for Stability and Adjustments
After hanging the shower curtain, it’s important to test the stability of the curtain rod and make any necessary adjustments. This step ensures that the rod is securely installed and will function properly. Follow these guidelines:
- Gently pull the shower curtain to check for any movement or instability of the curtain rod. If there is any noticeable swaying or shifting, it may indicate that the rod needs further reinforcement or adjustment.
- Inspect the wall mounts or brackets to ensure that they are firmly attached and tightened. If there is any looseness or movement, use a screwdriver to tighten the screws further.
- If the curtain rod is not level or appears crooked, loosen the screws on the wall mounts or brackets and adjust the position of the rod. Use a level to ensure that the rod is even and straight before tightening the screws again.
- Check the tension of the curtain rod by giving it a gentle push. It should remain stable and not slide or detach from the wall mounts or brackets. If needed, adjust the tension mechanism or consult the instructions provided with your specific curtain rod.
By testing the curtain rod for stability and making any necessary adjustments, you ensure that it will securely hold the shower curtain over your clawfoot tub. Taking the time to fine-tune the installation will provide you with a functional and aesthetically pleasing result.
Once you’re satisfied with the stability and adjustments of the curtain rod, you’re now ready to enjoy your DIY shower curtain rod and take pleasure in a beautifully decorated and functional clawfoot tub.
Step 9: Enjoy Your DIY Shower Curtain Rod!
Congratulations! You have successfully completed the installation of your DIY shower curtain rod for your clawfoot tub. Now it’s time to sit back, relax, and enjoy the benefits of your hard work. Here are a few tips to enhance your experience:
- Step into your clawfoot tub and appreciate the privacy and style that your new shower curtain provides. The curtain adds a functional barrier while creating a visually appealing atmosphere in your bathroom.
- Take a moment to admire the seamless integration of your DIY shower curtain rod with the existing decor of your bathroom. The customized look adds a personal touch that can elevate the overall aesthetic appeal.
- Enjoy the convenience and functionality of your new shower curtain rod. With the proper installation and stability, you can confidently use your clawfoot tub without any worries of the curtain coming loose or the rod shifting.
- Experiment with different shower curtain designs and colors to change the ambiance of your bathroom. Switching up the curtain style can be a simple and cost-effective way to refresh your space whenever you desire.
- Maintain the longevity of your DIY shower curtain rod by regularly inspecting the mounts or brackets for any signs of wear or loosening. Tighten the screws if necessary to ensure continuous stability.
Now that you are enjoying the benefits of your DIY shower curtain rod, take pride in your accomplishment and the cost savings compared to purchasing a pre-made rod. Embrace the rewards of your hard work and bask in the satisfaction of a successful project!