
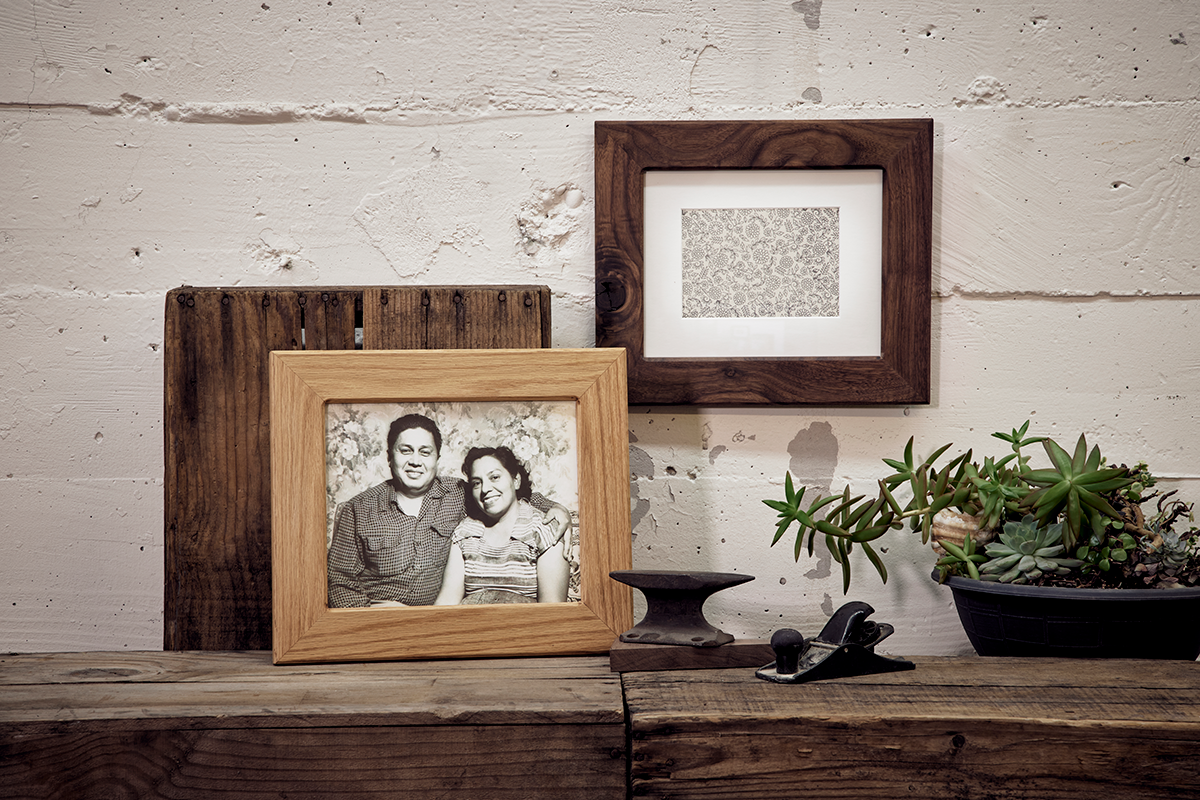
Materials Needed
Before you embark on making your rustic wood picture frame, ensure you have the following materials handy:
- 1×4 or 2×4 wood boards
- Saw (circular or miter)
- Sandpaper (medium and fine grit)
- Wood stain
- Brush or rag for staining
- Wood glue
- Clamps
- Backboard (plywood or cardboard)
- Glass or acrylic sheet
- Picture for framing
- Hanging hardware (sawtooth hanger, D-rings, or wire)
- Nail or screw for hanging
- Optional: Decorative elements (such as twine, burlap, or embellishments)
These materials can be easily found at your local home improvement store or even online. Feel free to customize the size of the wood boards according to your preferences and the dimensions of the picture you want to frame. Additionally, choose a wood stain that aligns with your desired rustic aesthetic or opt for a clear coat for a more natural look.
It’s also a good idea to gather all your tools, including a ruler or tape measure, pencil, and a workbench or sawhorse, to create a comfortable and organized workspace.
Step 1: Gather Your Supplies
Before diving into the process of making your rustic wood picture frame, it’s essential to gather all the necessary supplies. Having everything prepared will streamline the construction process and ensure a smooth workflow. Here’s what you’ll need:
- 1×4 or 2×4 wood boards: Choose boards that are the appropriate width for your desired frame size.
- Saw (circular or miter): Use a saw to cut the wood boards to the correct dimensions.
- Sandpaper (medium and fine grit): Sand the wood boards to create a smooth surface for staining and painting.
- Wood stain: Select a stain color that matches your desired rustic aesthetic.
- Brush or rag for staining: Use a brush or a rag to apply the wood stain evenly across the boards.
- Wood glue: Use wood glue to securely attach the corners of the frame.
- Clamps: Clamps will hold the frame together while the wood glue dries.
- Backboard (plywood or cardboard): Choose a sturdy material as the backing for your frame.
- Glass or acrylic sheet: Protect your picture by placing glass or acrylic in front of it.
- Picture for framing: Select a photo, artwork, or print that you want to display.
- Hanging hardware (sawtooth hanger, D-rings, or wire): Attach hanging hardware to the back of the frame for easy wall mounting.
- Nail or screw for hanging: Depending on your wall type, use an appropriate nail or screw to secure the frame in place.
- Optional: Decorative elements (such as twine, burlap, or embellishments): Add personal touches to your frame with decorative elements.
Make sure to gather these supplies beforehand, as it will save you time and prevent any interruptions during the construction process. Once you have everything ready, you can proceed to the next step of measuring and cutting the wood boards.
Step 2: Measure and Cut the Wood
Now that you have all your supplies in place, it’s time to measure and cut the wood for your rustic wood picture frame. Follow these steps to ensure accurate measurements and clean cuts:
- Measure the desired dimensions of your frame: Use a tape measure or ruler to determine the width and height you want for your frame. Remember to account for the overlap of the frame on the picture.
- Mark the measurements on the wood boards: Using a pencil, make precise marks on the wood boards according to the measurements you took. Double-check the measurements to avoid any mistakes.
- Set up your workbench or sawhorse: Find a suitable workspace to safely cut the wood boards. If using a sawhorse, make sure it is stable and secure.
- Use a saw to cut the boards: Place the wood boards on the sawhorse or workbench and carefully cut along the marked lines using a circular saw or miter saw. Follow proper safety precautions and use safety goggles and gloves.
- Check the accuracy of the cuts: Once you have cut all the pieces for your frame, ensure that they fit together without any gaps or misalignments. Make any necessary adjustments or recuts if needed.
By accurately measuring and cutting the wood, you will have the foundation for a well-built rustic picture frame. Taking your time during this step will ensure that the frame comes together seamlessly and looks professional. Now that you have the individual pieces, it’s time to move on to the next step: sanding the wood.
Step 3: Sand the Wood
To achieve a smooth and polished finish for your rustic wood picture frame, it’s crucial to sand the wood boards. Sanding helps remove any rough edges or blemishes and prepares the surface for staining or painting. Follow these steps to properly sand your wood:
- Start with medium-grit sandpaper: Begin the sanding process by using medium-grit sandpaper (around 120-150 grit) to smooth out any rough surfaces, splinters, or imperfections on the wood boards. Sand in the direction of the wood grain to ensure an even finish.
- Move to fine-grit sandpaper: Once the rough areas have been smoothed out, switch to a finer-grit sandpaper (around 220-240 grit). This step will further refine the surface and create a silky-smooth texture.
- Sand all sides and edges: Ensure that you sand all sides and edges of the wood boards, including the front, back, and sides. Pay careful attention to any corners or joints to achieve a uniform finish.
- Wipe away dust: After sanding, use a clean cloth or tack cloth to wipe away any dust or debris from the wood surface. This step is crucial before proceeding to the next stages of staining and assembly.
Sanding the wood not only enhances the overall look of your rustic picture frame but also allows the stain or paint to adhere better to the surface. It helps create a professional and polished finish that showcases the natural beauty of the wood. Once you’ve completed the sanding process, you’re ready to move on to the next step: staining the wood.
Step 4: Stain the Wood
Staining the wood is an essential step in creating a rustic look for your picture frame. The stain adds color and depth to the wood grain, enhancing its natural beauty. Follow these steps to properly stain your wood:
- Choose the right stain: Select a wood stain color that aligns with your desired rustic aesthetic. Whether you prefer a dark, rich tone or a lighter, more natural look, there are various options available.
- Prepare the wood surface: Ensure that the wood boards are clean and free of any dust or debris from the sanding process. This will allow the stain to penetrate evenly into the wood.
- Apply the stain: Use a brush or a rag to apply an even coat of the stain onto the wood surface. Work in the direction of the wood grain for a smooth and consistent finish. Pay attention to any corners, edges, or details of the frame.
- Let the stain penetrate: Allow the stain to sit on the wood boards for the recommended amount of time specified on the stain’s instructions. This will ensure that the color fully develops and adheres to the wood.
- Wipe off excess stain: After the recommended time, use a clean cloth to gently wipe off any excess stain. This step helps achieve an even and balanced color, preventing any blotches or uneven patches.
- Allow the wood to dry: Give the stained wood sufficient time to dry completely. This is typically around 24 hours or as mentioned in the stain instructions. Make sure to keep the wood in a well-ventilated area during the drying process.
The stain adds a beautiful richness and depth to the wood, enhancing the rustic appeal of your picture frame. Once the wood is dry, it’s time to proceed to the next step: assembling the frame.
Step 5: Assemble the Frame
With your wood boards stained and dried, it’s time to assemble the rustic wood picture frame. Follow these steps to ensure a sturdy and well-constructed frame:
- Arrange the wood boards: Lay the stained wood boards on a flat surface and position them to form the frame shape. Ensure that the corners align perfectly and the edges are flush.
- Apply wood glue: Apply a thin layer of wood glue to the ends of each wood board where they will meet. This will help secure the corners and prevent any movement or shifting of the frame.
- Join the corners: Carefully bring the corners together, matching them at a 90-degree angle. Press firmly to ensure a strong bond between the wood boards.
- Use clamps for reinforcement: To hold the corners together tightly while the wood glue dries, use clamps. Place the clamps across the corners and tighten them securely. Make sure the frame remains square during this process.
- Remove excess glue: Wipe away any excess wood glue that may have seeped out from the corners. Use a damp cloth or sponge to clean the frame and create a neater appearance.
- Let the frame dry: Allow sufficient time for the wood glue to dry completely as per the recommended drying time mentioned on the glue’s instructions. This may take a few hours, so be patient.
Assembling the frame is a crucial step in creating a sturdy and durable structure that will hold your picture securely. Take your time during this step to ensure accurate alignment and a solid bond between the wood boards. Once the frame is dry and secure, it’s time to move on to the next step: attaching the backing.
Step 6: Attach the Backing
Attaching the backing to your rustic wood picture frame is an important step to provide stability and protection for your artwork or photo. Follow these steps to securely attach the backing:
- Select the right backing material: Choose a sturdy material such as plywood or cardboard as the backing for your frame. Ensure it is cut to the same size as the frame to fit snugly.
- Position the backing: Place the backing material onto the backside of the frame, ensuring it is centered and aligned correctly.
- Secure with clips or nails: Use small clips or nails to secure the backing to the wood frame. Place them evenly around the perimeter, making sure they are tightly secured but not too close to the edges.
- Check for stability: Gently shake the frame to ensure the backing is securely fastened and does not wiggle or come loose. Make any necessary adjustments if needed.
The backing provides support and protection for your picture, preventing it from slipping or becoming damaged. It also helps maintain the shape and integrity of the frame. With the backing securely attached, you’re ready to move on to the next step: adding the glass and picture.
Step 7: Add the Glass and Picture
Now that the frame and backing are securely in place, it’s time to add the glass or acrylic sheet and the picture you want to display. Follow these steps to complete this stage:
- Clean the glass or acrylic: Ensure that the glass or acrylic sheet is free from any dust or smudges. Use a glass cleaner or a damp cloth to wipe it clean.
- Position the glass: Place the glass or acrylic sheet onto the frame, aligning it with the edges. Be careful not to scratch the surface of the material.
- Add the picture: Carefully position your picture onto the backboard, ensuring that it is centered and aligned properly within the frame.
- Secure the picture: If necessary, use small pieces of tape or photo corners to secure the picture in place. Make sure the picture is flat and does not have any wrinkles or bends.
Adding the glass or acrylic sheet protects your picture from dust, moisture, and damage, while also providing a clear and polished look. Make sure that the glass or acrylic fits snugly within the frame and that your picture is securely held in place. With the glass and picture in position, you’re ready to move on to the next step: attaching the hanging hardware.
Step 8: Attach the Hanging Hardware
To easily hang your rustic wood picture frame on the wall, you’ll need to attach the appropriate hanging hardware. Follow these steps to securely attach the hanging hardware:
- Determine the hanging method: Decide whether you want to use a sawtooth hanger, D-rings, or wire as your hanging hardware. Consider the weight of your frame and the type of wall you’ll be hanging it on.
- Position the hanging hardware: Measure the desired placement of your hanging hardware on the backside of the frame. Ensure that it is centered and aligned with the frame’s structure.
- Attach the hardware: Depending on the chosen hanging method, use nails, screws, or adhesive to attach the hardware to the wood frame. Make sure the hardware is secure and properly aligned.
- Test the stability: Before hanging your frame, check the stability of the hanging hardware. Gently tug on the frame to ensure that it is firmly attached and will not come loose when hung on the wall.
Attaching the appropriate hanging hardware makes it easy to display your rustic wood picture frame on any wall. Ensure that the hardware is suitable for the weight of your frame and the wall type. Take the time to properly align and secure the hardware, ensuring the stability and safety of your frame. Once the hanging hardware is in place, you’re ready for the final step: optional decorative elements.
Step 9: Optional: Add Decorative Elements
If you want to add a personal touch and enhance the rustic charm of your wood picture frame, consider incorporating decorative elements. Here are some optional ideas to consider:
- Twine or rope: Wrap a length of twine or rope around the frame to create a rustic and natural border. Secure the ends at the back with small nails or glue.
- Burlap or fabric: Cut a piece of burlap or fabric slightly larger than the frame’s dimensions. Attach it to the back of the frame using a staple gun or glue to create a textured and rustic backdrop.
- Embellishments: Add small decorative elements such as buttons, beads, or small ornaments to the corners or edges of the frame. Choose items that complement your overall aesthetic.
- Painted designs: Use acrylic paint to create unique designs or patterns on the frame. This can be intricate floral designs or simple distressed accents to enhance the rustic look.
- Natural elements: Glue dried flowers, leaves, or small branches onto the frame for a nature-inspired touch. Alternatively, add small pinecones or seashells for a whimsical touch.
These decorative elements are entirely optional and depend on your personal preference. Feel free to get creative and experiment with different ideas to make your rustic wood picture frame truly unique and special. Remember to secure the embellishments properly to ensure they withstand the test of time.
Step 10: Hang and Enjoy!
Congratulations! You have successfully completed all the steps to create your rustic wood picture frame. Now it’s time to hang it on the wall and enjoy your beautifully displayed artwork or photo. Follow these final steps:
- Choose the location: Select a prominent spot on your wall where you want to showcase your rustic wood picture frame. Make sure it’s at eye level and complements the surrounding decor.
- Measure and mark: Use a tape measure and pencil to measure and mark the desired placement of your frame on the wall. Ensure it is level and centered according to your preferences.
- Hang the frame: Depending on the type of hanging hardware you used, align the hardware with the marked spots on the wall. Carefully hang the frame, ensuring it is secure and level.
- Step back and admire: Stand back and admire your handiwork. Take a moment to appreciate the rustic beauty of your wood picture frame and how it complements your chosen picture.
Now, every time you see your rustic wood picture frame on the wall, it will remind you of the effort and creativity you put into its creation. Enjoy the warmth and charm it adds to your space, and proudly showcase your favorite memories or artwork for all to see.