
Materials Needed
To create a stunning mirror tray for your wedding ring decoration, you will need the following materials:
- A mirror: Choose a mirror that fits the size and style you desire for your tray. It can be a round, square, or rectangular mirror, depending on your preference.
- A base for the tray: Opt for a solid and sturdy base that will provide stability and support to the mirror.
- Adhesive: Select a strong adhesive that is suitable for adhering the mirror to the base securely.
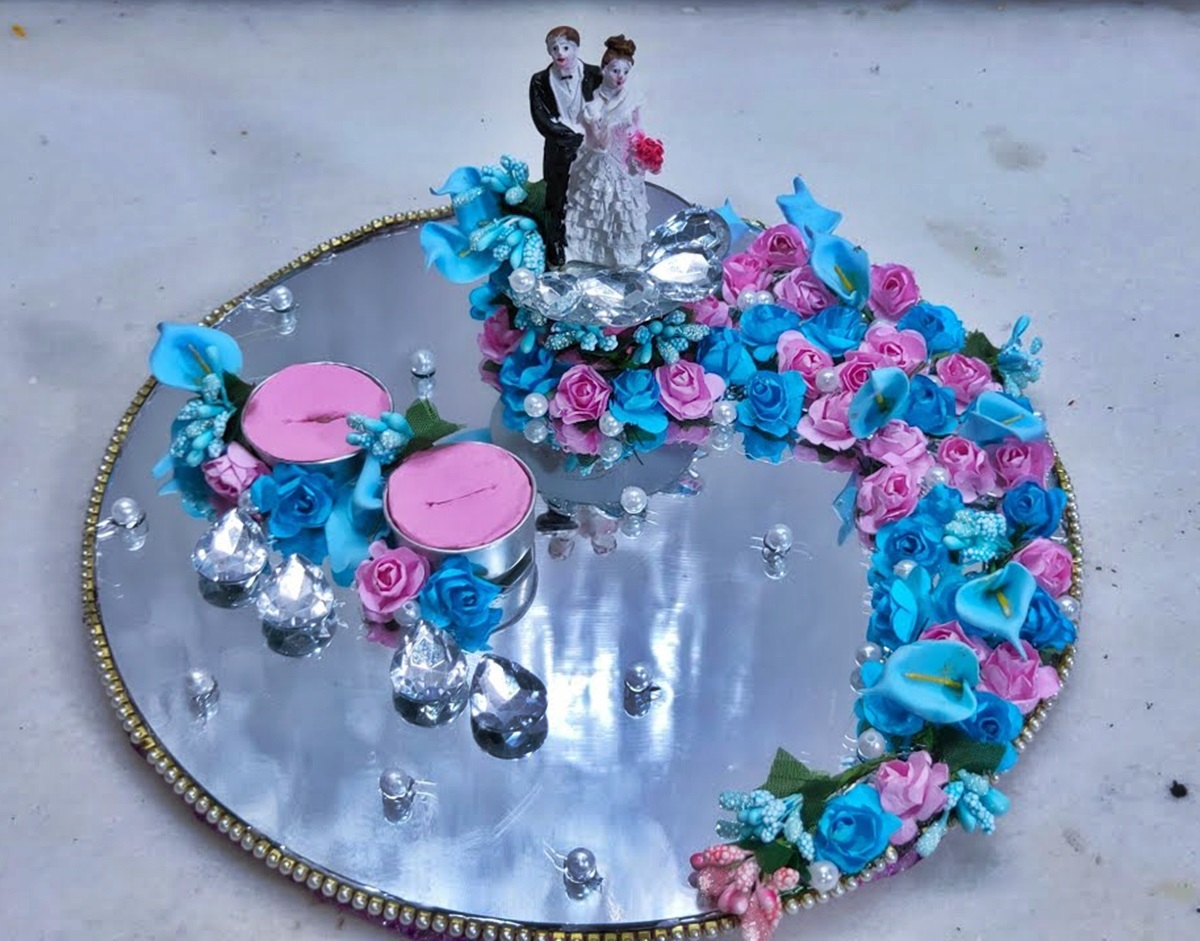
- Decorations and accents: Prepare various decorative elements such as faux flowers, ribbons, pearls, or gemstones to adorn the tray and create an elegant ambiance.
- Wedding rings: Of course, don’t forget to have your wedding rings ready to be showcased on the beautifully crafted mirror tray.
- Scissors: You’ll need a pair of scissors to trim any excess materials and ensure a neat finish.
- Protective gloves: Safety is important, so consider wearing protective gloves when handling adhesive or working with sharp objects.
With these materials in hand, you’re well on your way to constructing a dazzling mirror tray that will showcase your wedding rings in style. Remember to choose high-quality materials that complement your wedding theme and personal taste. Let’s move on to the next step!
Step 1: Choose a Mirror
Choosing the right mirror for your wedding ring tray is crucial to achieve the desired aesthetic look. Here are some considerations when selecting your mirror:
- Size: Determine the size of the mirror based on the number of rings you want to display and the available space. A larger mirror allows for more elaborate ring arrangements, while a smaller one offers a more intimate and delicate display.
- Shape: Decide on a mirror shape that best complements your wedding theme and personal style. Round mirrors exude a classic and romantic feel, while square or rectangular mirrors offer a modern and contemporary touch.
- Frame or frameless: Consider whether you prefer a mirror with a decorative frame or a sleek frameless design. Frames can add an extra element of elegance and can be chosen to match your wedding decor.
- Reflective surface: Ensure that the mirror has a high-quality reflective surface that is free from blemishes or distortions. A clear and flawless mirror will enhance the overall appearance of your ring display.
While beauty is important, also prioritize the practicality of the mirror. It should be durable and easy to clean, as it will be frequently handled and displayed during your wedding festivities.
With these considerations in mind, take your time to browse various mirror options and select the perfect one that will serve as the centerpiece for your exquisite wedding ring tray. Once you have chosen your mirror, you can move on to the next step to complete the tray.
Step 2: Select a Base for the Tray
Now that you have chosen the mirror for your wedding ring tray, it’s time to select a suitable base that will provide stability and support to the tray. Here are some factors to consider when choosing the base:
- Material: Determine the material you prefer for the base. Common options include wood, acrylic, glass, or metal. Consider the overall style of your wedding and choose a base material that complements the theme.
- Shape and size: Select a base shape and size that fits well with the chosen mirror. It should have enough surface area to support the mirror and leave some space for the decorative elements.
- Color and finish: Decide on the color and finish of the base that will harmonize with the mirror and the overall wedding decor. You may opt for a natural wood finish, a glossy black or white base, or even a metallic finish for a touch of elegance.
- Sturdiness: Ensure that the base is sturdy enough to support the weight of the mirror and any additional decorations. It should be able to withstand movement and provide a stable foundation for the tray.
Keep in mind that the base will not only serve as a support but also contribute to the overall visual appeal of the tray. Therefore, choose a base that enhances the beauty of the mirror and creates a cohesive and captivating display for your wedding rings.
Once you have carefully considered these factors, you can proceed to the next step to prepare the mirror and the base for assembly.
Step 3: Prepare the Mirror and Base
With the mirror and base selected, it’s time to prepare them for assembly. Follow these steps to ensure a smooth and successful construction of your wedding ring tray:
- Clean the mirror: Before attaching the mirror to the base, it’s essential to ensure that the surface is clean and free from any dust, fingerprints, or smudges. Use a gentle glass cleaner and a soft, lint-free cloth to wipe the mirror thoroughly.
- Clean the base: Similarly, clean the chosen base to remove any dirt or debris. Depending on the material, you can use a suitable cleaner or simply wipe it with a damp cloth.
- Measure and mark: Take careful measurements of the mirror and the base to determine the positioning for attaching them together. Use a pencil or a removable marker to mark the desired placement on the base.
- Protective covering (optional): If desired, you can apply a thin layer of protective covering or padding on the base to prevent any scratches or damage to the mirror during the assembly process.
By preparing the mirror and base adequately, you ensure a clean and secure attachment, as well as protect the surfaces from any potential harm. With these steps completed, you can move on to the next exciting stage: attaching the mirror to the base.
Step 4: Attach the Mirror to the Base
Now that the mirror and base are prepared, it’s time to securely attach them together to create your wedding ring tray. Follow these steps for a successful attachment:
- Apply adhesive: Use a strong adhesive that is suitable for the materials of both the mirror and the base. Apply a thin, even layer of adhesive onto the marked area of the base.
- Position the mirror: Carefully place the mirror onto the marked area of the base, ensuring that it aligns properly and sits evenly.
- Press and hold: Firmly press the mirror onto the adhesive and hold it in place for the recommended time specified by the adhesive manufacturer. This will allow the adhesive to bond securely.
- Remove excess adhesive: Use a cloth or a cotton swab dampened with a suitable solvent to gently remove any excess adhesive that may have squeezed out around the edges of the mirror.
- Allow time to dry: Follow the adhesive manufacturer’s instructions regarding the drying time. It is essential to allow sufficient time for the adhesive to fully cure and create a strong bond.
Ensure that the mirror is securely attached to the base before moving forward. A secure attachment will not only provide stability to your tray but also ensure the safety of your precious wedding rings.
Congratulations! You have successfully completed the assembly of your wedding ring tray. Now it’s time to add the finishing touches and enhance its visual appeal with decorations and accents.
Step 5: Add Decorations and Accents
Now that you have the mirror securely attached to the base, it’s time to add some creative flair by incorporating decorations and accents to enhance the overall look of your wedding ring tray. Follow these steps to add the finishing touches:
- Choose decorations: Select decorations that complement your wedding theme and personal style. Consider using faux flowers, ribbons, pearls, gemstones, or any other decorative elements that resonate with your vision.
- Create a layout: Plan the arrangement of the decorations on the tray to create an aesthetically pleasing display. Experiment with different layouts and consider the placement of the wedding rings.
- Attach the decorations: Use adhesive, small hooks, or wire to attach the decorations to the mirror or the base securely. Take care to ensure that the adhesive or attachment method is suitable for the materials used.
- Consider balance: Maintain a sense of balance and harmony in your design by distributing the decorations evenly and avoiding overcrowding. Leave enough space for each element to stand out and make an impact.
- Add personal touches: Infuse personal touches that reflect your unique love story or shared interests as a couple. This can include small trinkets, engraved initials, or meaningful symbols.
Remember to step back and assess your arrangement as you add each decoration. Make adjustments as needed to achieve the desired visual impact.
By adding decorations and accents, you transform your wedding ring tray into a personalized and captivating centerpiece. Now, let’s move on to the next step and ensure that the rings are securely in place.
Step 6: Secure the Wedding Rings
With the decorations in place, it’s time to ensure that your precious wedding rings are securely positioned on the tray. Follow these steps to safely display and secure the rings:
- Choose a ring holder: Select a ring holder or stand that complements the style of your wedding ring tray. It can be a ring dish, a velvet ring holder, or any other suitable option that keeps the rings secure.
- Position the ring holder: Decide on the placement of the ring holder on the tray. Consider the overall layout and visual balance when determining the ideal spot.
- Attach the ring holder (optional): If necessary, use adhesive or a small amount of clay to secure the ring holder onto the tray. Ensure that it is firmly attached and will not move or tip over.
- Arrange the rings: Carefully place the wedding rings onto the ring holder. Ensure that they are displayed prominently and positioned in a way that highlights their beauty.
- Add additional support (optional): For added security and peace of mind, you may consider using transparent gel or putty to hold the rings in place on the ring holder. Be cautious not to damage the rings or leave any residue behind.
By securely positioning the wedding rings on the tray, you can showcase them elegantly while ensuring their safety. Take your time to arrange the rings in a visually pleasing manner that reflects their significance.
Now that the rings are securely displayed, let’s move on to the final step: displaying and enjoying your beautifully crafted wedding ring tray.
Step 7: Display and Enjoy
Congratulations! You have successfully created a stunning wedding ring tray. Now it’s time to display it and enjoy the beauty it brings to your special day. Follow these steps to showcase your creation:
- Find the perfect spot: Choose a prominent location at your wedding venue to display the tray. It could be on the welcome table, the gift table, or even the sweetheart table.
- Consider the backdrop: Take into account the surrounding decor and choose a backdrop that enhances the visual impact of the tray. A tablecloth, flowers, or a textured fabric can provide an elegant background.
- Setting the mood: Ensure that the lighting in the area accentuates the tray and makes it sparkle. Soft, dim lights or strategically placed spotlights can create a romantic ambiance.
- Add personal touches: Consider adding personal touches like framed photos, sentimental objects, or a small sign with a special message to make the display more meaningful.
- Invite admiration: Encourage your guests to take a closer look and appreciate the details of your wedding ring tray. It’s a unique and beautiful addition to your wedding decor.
- Photograph the tray: Capture the beauty of your wedding ring tray by taking close-up shots and incorporating it into your wedding photo album or sharing it on social media.
- Enjoy the symbolism: As you and your partner exchange rings during the ceremony, the tray serves as a symbol of your love and commitment. Take a moment to appreciate the significance.
Remember to handle the tray with care throughout the wedding day and ensure that it remains in a safe and visible location. It will be a cherished piece of your wedding memories.
Now that you have displayed your beautiful wedding ring tray, it’s time to enjoy the special moments it brings and celebrate your love.