Reasons why the pull string light on a Hunter fan may not be working
The pull string light on a Hunter fan can be a convenient and efficient way to control the lighting in a room. However, there are several reasons why it may stop working. understanding these reasons can help you troubleshoot and fix the issue. Here are some common reasons why the pull string light on a Hunter fan may not be working:
- Broken pull string: One of the most common reasons for a non-functioning pull string light is a broken or frayed pull string. Over time, the constant pulling and twisting can cause the string to break or become damaged. If the string is visibly worn or broken, it will need to be replaced.
- Loose or disconnected wiring: Another possible reason for a malfunctioning pull string light is loose or disconnected wiring. If the wiring inside the fan housing becomes loose or disconnected, it can prevent power from reaching the light bulb. Checking the wiring connections and ensuring they are securely connected is crucial.
- Tripped circuit breaker: Sometimes, the issue with the pull string light may not be directly related to the fan itself. If the pull string light has suddenly stopped working, it is a good idea to check the circuit breaker. A tripped circuit breaker can cut off power supply to the fan and its light. Resetting the circuit breaker may resolve the problem.
- Defective light bulb: It is also possible that a defective light bulb is the cause of the malfunctioning pull string light. If the bulb has burnt out or is faulty, it will need to be replaced. Be sure to choose a light bulb with the correct wattage and type as recommended by the manufacturer.
- Faulty light socket: Another potential issue could be a faulty light socket. Over time, the light socket may become worn out or damaged, preventing the bulb from making proper contact. In such cases, replacing the socket may be necessary to restore the functionality of the pull string light.
These are just a few of the possible reasons why the pull string light on a Hunter fan may not be working. By identifying the underlying cause, you can take the necessary steps to fix the problem and enjoy the convenience and functionality of your pull string light once again.
Tools and materials needed to fix the pull string light on a Hunter fan
Fixing the pull string light on a Hunter fan requires a few essential tools and materials. Gather the following items before starting the repair process:
- Screwdriver: You will need a screwdriver to remove the screws that hold the fan housing in place. Depending on the type of screws used, a Phillips or flathead screwdriver may be required.
- Replacement pull string: If the pull string on your Hunter fan is broken or damaged, you will need a new pull string to replace the old one. Make sure to choose a pull string that matches the length and style of the original string.
- Wire connectors: If the issue with the pull string light lies in loose or disconnected wiring, wire connectors will come in handy for securing the connections. These connectors help ensure a secure and reliable electrical connection.
- Tape measure: A tape measure can be useful for taking accurate measurements when installing a new pull string or replacing the light socket. It will help ensure that the string is the correct length and the new socket fits properly.
- Wire stripper: If you need to replace the light socket, a wire stripper will be necessary for removing the insulation from the ends of the wires. This tool allows for a clean and precise stripping of the wires.
- New light bulb: If the pull string light is not working due to a faulty or burned-out bulb, you will need a replacement bulb. Ensure that you choose a bulb with the appropriate wattage and fitting for your fan.
- Replacement light socket: If the issue lies within the light socket, you may need to replace it. Make sure to purchase a compatible light socket that matches the specifications of your Hunter fan.
Having these tools and materials readily available will make the process of fixing the pull string light on your Hunter fan more efficient and convenient. It is important to use the appropriate tools and ensure the quality of the materials to achieve a successful repair.
Step-by-step instructions to replace the pull string on a Hunter fan
If the pull string on your Hunter fan is broken or damaged, you can easily replace it by following these simple steps:
- Turn off the power: Before you begin any electrical repair, always ensure the power is turned off to prevent any accidents. Locate the circuit breaker that controls the fan and turn it off.
- Remove the fan housing: Use a screwdriver to remove the screws that secure the fan housing in place. Carefully lift off the housing and set it aside.
- Remove the old pull string: Locate the pull string mechanism inside the fan housing. Unfasten any screws or clips that hold the old pull string in place. Gently pull out the old string, making note of how it was attached.
- Attach the new pull string: Take the new pull string and thread it through the hole in the pull string mechanism. If there are any clips or screws, fasten them securely to ensure the string is firmly in place.
- Reassemble the fan housing: Carefully position the fan housing back onto the fan and secure it with the screws. Ensure that all the screws are tightened properly to prevent any wobbling or instability.
- Turn on the power: Once the fan housing is securely in place, go back to the circuit breaker and switch on the power to the fan. Test the pull string light to ensure it is functioning correctly.
- Adjust the pull string length: If the new pull string is longer than desired, you can adjust its length by pulling it out to the desired length and tying a knot at the desired position. Trim any excess string with scissors.
Following these step-by-step instructions will allow you to easily replace the pull string on your Hunter fan. Remember to exercise caution when working with electrical components and always ensure the power is turned off before starting any repairs.
Troubleshooting tips for a non-functioning pull string light on a Hunter fan
If your pull string light on a Hunter fan is not functioning, try these troubleshooting tips to identify and resolve the issue:
- Check the light bulb: Start by ensuring that the light bulb is properly seated and screwed in. If it is loose or appears burnt out, replace it with a new bulb of the correct wattage and fitting.
- Inspect the pull string: Examine the pull string for any signs of damage or breakage. If the string is frayed or broken, you will need to replace it with a new one.
- Verify the power supply: Make sure the fan is receiving power by checking the circuit breaker. If the breaker has tripped, reset it and see if the pull string light starts working again.
- Inspect the pull chain switch: The pull chain switch controls the on/off function of the light. Look for any loose connections or damaged wires. If necessary, replace the switch with a new one.
- Check the light socket: Examine the light socket for any signs of damage or corrosion. Clean the socket contacts with a soft cloth and ensure a secure connection between the bulb and the socket.
- Inspect the wiring connections: Ensure that all wiring connections inside the fan housing are securely attached. Loose or disconnected wires can prevent power from reaching the pull string light. Use wire connectors to secure any loose connections.
- Test with a different bulb: If the light bulb and socket appear to be in good condition, try testing with a different bulb to rule out any potential issues with the original bulb.
- Consider professional help: If you have tried all the troubleshooting steps and the pull string light is still not working, it may be best to consult a professional electrician or contact the Hunter fan support team for further assistance.
By following these troubleshooting tips, you can potentially identify and resolve the issues causing the non-functioning pull string light on your Hunter fan. Always prioritize safety and turn off the power before performing any inspections or repairs.
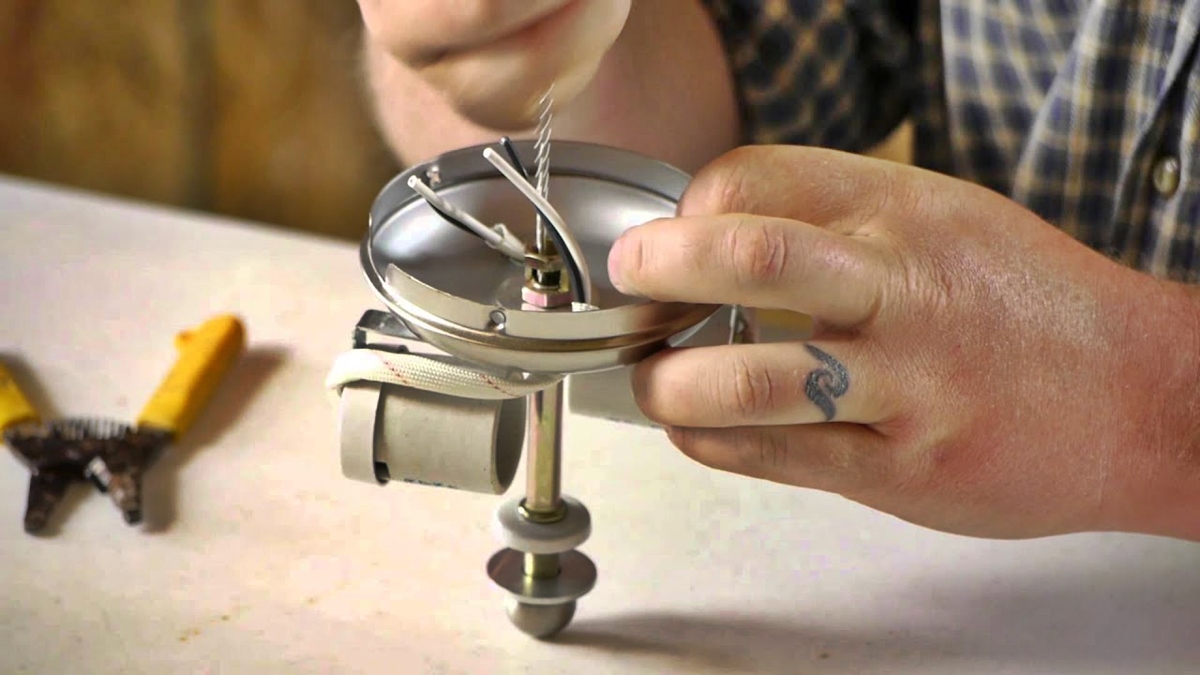
How to replace the light socket on a Hunter fan with a pull string
If the light socket on your Hunter fan with a pull string is faulty or damaged, here are the steps to replace it:
- Turn off the power: Before starting any electrical repairs, ensure that the power to the fan is turned off. Locate the circuit breaker that controls the fan and switch it off.
- Remove the fan housing: Use a screwdriver to remove the screws that secure the fan housing in place. Carefully lift off the housing and set it aside.
- Disconnect the wires: Locate the light socket inside the fan housing, and carefully disconnect the wiring connections. Take note of how the wires are attached for easy reassembly.
- Remove the old socket: Depending on the type of socket used, you may need to unscrew it or detach it from the housing. Disconnect any screws or clips that secure the socket in place and remove it.
- Install the new socket: Take the new light socket and attach it to the housing, ensuring a secure fit. Connect the wires to their respective terminals on the new socket, following the same configuration as before.
- Reassemble the fan housing: Carefully position the fan housing back onto the fan and secure it with the screws. Ensure that all the screws are tightened properly to avoid any instability.
- Turn on the power: Once the fan housing is securely in place, go back to the circuit breaker and switch on the power to the fan. Test the pull string light to ensure that the new socket is functioning correctly.
Replacing the light socket on a Hunter fan with a pull string can restore the functionality of the pull string light. Remember to exercise caution when working with electrical components and always ensure the power is turned off before starting any repairs. If you are unsure about any step of the process, seek the assistance of a professional electrician.
Common mistakes to avoid when fixing the pull string light on a Hunter fan
While fixing the pull string light on a Hunter fan, it’s important to be mindful of potential mistakes. Avoiding these common errors can help ensure a successful repair process:
- Not turning off the power: Failing to turn off the power before starting any electrical repairs can put you at risk of electric shock or damage to the fan. Always switch off the circuit breaker that controls the fan before beginning any work.
- Using incorrect replacement parts: Using incorrect replacement parts, such as an incompatible pull string or light bulb, can result in further damage to the fan or ineffective functionality. Ensure that you choose the correct parts based on the manufacturer’s recommendations.
- Forgetting to secure wiring connections: Inadequately securing the wiring connections inside the fan housing can lead to unreliable electrical connections and the pull string light not functioning properly. Use wire connectors and ensure all connections are securely fastened.
- Not following the manufacturer’s instructions: Each Hunter fan model may have specific instructions and guidelines for repairs. Neglecting to follow these instructions could result in improper installation or further damage to the fan. Refer to the manufacturer’s manual or online resources for guidance.
- Overtightening screws: While securing the fan housing or any components, be cautious not to overtighten the screws. Over-tightening can damage the housing or strip the screw holes, leading to instability or difficulty in future repairs.
- Skipping troubleshooting steps: It’s essential to go through the troubleshooting process before assuming the issue lies with the pull string light itself. Skipping troubleshooting steps may lead to unnecessary repairs or overlooking a simple fix.
- Working without proper lighting and visibility: Working on the pull string light in dim lighting or without proper visibility can make it challenging to accurately diagnose and fix the problem. Ensure you have sufficient lighting and a clear view of the components.
- Neglecting personal safety: Don’t forget to prioritize personal safety throughout the repair process. Use appropriate safety equipment, such as gloves or safety glasses, and be cautious when handling electrical components.
By being aware of these common mistakes and actively avoiding them, you can increase the chance of successfully fixing the pull string light on your Hunter fan without any complications or additional damage. If you’re uncertain about any step or encounter any difficulties, seeking professional assistance is always recommended.
Additional tips and tricks for maintaining the pull string light on a Hunter fan
In addition to fixing any issues with the pull string light on your Hunter fan, implementing proper maintenance practices can help prolong its lifespan and ensure optimal performance. Here are some additional tips and tricks to consider:
- Regular cleaning: Dust and debris can accumulate on the light bulb and inside the fan housing, affecting the quality of light and airflow. Regularly clean the fan blades, housing, and light bulb to maintain its efficiency.
- Inspect and tighten screws: Over time, screws may become loose due to fan vibrations. Periodically inspect and tighten all screws to prevent wobbling or instability.
- Lubricate moving parts: Lubricating the moving parts of your Hunter fan, such as the pull chain switch and bearings, can help reduce friction and ensure smooth operation. Follow the manufacturer’s guidelines for proper lubrication techniques.
- Use proper bulbs: Always use light bulbs that are compatible with your Hunter fan and follow the recommended wattage. Using bulbs with a higher wattage can cause excessive heat and potentially damage the light socket or fan.
- Replace worn-out pull strings: Over time, pull strings may become worn out or damaged. Keep spare pull strings on hand and replace them as needed to prevent further issues and ensure convenient control of the pull string light.
- Keep an eye on the fan’s balance: If you notice any wobbling or imbalance in your Hunter fan, it’s important to address it promptly. Imbalance can strain the pull string mechanism and potentially lead to premature wear or damage.
- Regularly check wiring connections: Periodically inspect the wiring connections inside the fan housing to ensure they are secure. Loose connections can cause electrical problems and affect the functioning of the pull string light.
- Consider professional maintenance: If you are unsure about any maintenance tasks or encounter complex issues with your Hunter fan’s pull string light, it’s advisable to seek assistance from a professional electrician or the Hunter fan support team.
By incorporating these additional tips and tricks into your regular maintenance routine, you can keep the pull string light on your Hunter fan in excellent condition and enjoy its functionality for years to come.