
Materials Needed
Before you begin the process of dyeing your lamp shades, it’s important to gather all the necessary materials. Having everything on hand will make the process smoother and more efficient. Here is a list of materials you’ll need:
- Lamp shade
- Fabric dye
- Rubber gloves
- Bucket or basin
- Hot water
- Stirring utensil
- Old newspapers or drop cloth
- Plastic wrap
- Optional: Dye fixative
When choosing your lamp shade, keep in mind that certain materials may dye better than others. Natural fibers like cotton, linen, or silk tend to absorb dyes more effectively, resulting in vibrant and long-lasting colors. Synthetic materials like polyester may not yield the same results, so it’s important to check the composition of your lamp shade before proceeding.
For the dye, you’ll find various options available in most craft stores. Fabric dyes come in a wide range of colors, so you can select a shade that complements your existing décor. It’s also worth noting that some dyes require additional fixatives to ensure the color sets properly. Read the instructions on your chosen dye to determine if a fixative is necessary.
Rubber gloves are essential for protecting your hands from staining during the dyeing process. It’s important to use gloves that will not be damaged by the dye or hot water. A bucket or basin will be needed to mix and hold the dye solution. Make sure it is large enough to accommodate the lamp shade.
Hot water is crucial for activating the dye and allowing it to penetrate the lamp shade fabric. You will need enough hot water to cover the shade completely in the dye bath. Be cautious and use water at a temperature suitable for the fabric of your lamp shade to avoid any damage.
A stirring utensil, such as a long spoon or stick, will help you mix the dye thoroughly and ensure an even distribution of color. Additionally, it’s vital to protect your workspace from potential spills or splatters, so spreading old newspapers or using a drop cloth is highly recommended.
Finally, plastic wrap can be handy for wrapping the dyed lamp shade after the application. This helps to keep the dye from drying too quickly and promotes better absorption into the fabric.
Now that you have gathered all the necessary materials, you are ready to begin transforming your lamp shade with a beautiful new color.
Step 1: Prepare the Lamp Shade
Before diving into the dyeing process, it’s important to properly prepare your lamp shade. This will ensure that the dye adheres evenly and achieves the desired results. Follow these steps to prepare the lamp shade:
- Remove the lamp shade from the lamp base, if necessary. This will allow you to work on it more easily and prevent any accidental damage to the lamp.
- If the lamp shade is dirty or dusty, gently wipe it down with a soft cloth or use a vacuum cleaner with a brush attachment to remove any debris. Cleaning the lamp shade beforehand will ensure that the dye adheres smoothly to the fabric.
- If there are any embellishments or trims on the lamp shade, consider removing them temporarily. This will prevent them from getting stained or interfering with the dyeing process. Keep them in a safe place until the dyeing is complete.
- If your lamp shade is made of fabric and is in good condition, there is no need to wash it before dyeing. However, if it is stained or dirty, follow the manufacturer’s instructions for washing and drying to ensure the best results.
By taking the time to prepare the lamp shade, you are setting the foundation for a successful dyeing process. Making sure the surface is clean and free from any obstructions will allow the dye to penetrate the fabric evenly and create a more vibrant and attractive result.
Once the lamp shade is prepared, you can move on to the next step of choosing the dye color that will transform it into a stunning focal point for your space.
Step 2: Choose Your Dye
The choice of dye color is a crucial step in transforming your lamp shade. It allows you to personalize and coordinate the shade with your existing decor. Follow these guidelines to select the perfect dye:
- Consider the overall aesthetic of the room where the lamp will be placed. Look at the color scheme, patterns, and textures in the space, and choose a dye color that will complement or create a striking contrast.
- Take into account the material and texture of the lamp shade. Different dyes work better on certain fabrics. Natural fibers like cotton or linen tend to absorb dye better, while synthetic materials like polyester may require special dye formulas. Check the instructions on the dye packaging to ensure compatibility with your lamp shade fabric.
- If you’re uncertain about a specific color, consider purchasing a small amount of fabric in a similar material and testing different dye colors on it. This will give you a preview of how the dye will look on your lamp shade and allow for adjustments before committing to the final color.
- Experiment with mixing different dye colors to create a custom shade that perfectly complements your space. Keep in mind that mixing different colors may require adjusting the dye concentration or proportions, so carefully follow the dye manufacturer’s instructions.
- If you’re hesitant about permanently changing the lamp shade’s color, you can choose a fabric dye that is designed to be temporary or removable. These dyes typically allow you to wash out the color and revert to the original shade.
Remember, the choice of dye color is an opportunity to showcase your creativity and inject new life into your lamp shade. Take some time to explore different options and envision how each color will enhance the overall ambiance of the room.
Once you have selected the dye color, it’s time to mix the dye solution and prepare for the actual dyeing process.
Step 3: Mix the Dye
With your chosen dye color in hand, it’s time to mix the dye solution. Follow these steps to ensure a well-mixed and vibrant dye:
- Put on rubber gloves to protect your hands from staining.
- Read the dye manufacturer’s instructions carefully. The instructions will provide specific guidance on the water-to-dye ratio and any additional ingredients, such as salt or vinegar, that may be required.
- Fill a bucket or basin with hot water according to the instructions. Be sure to use water at an appropriate temperature for the fabric of your lamp shade.
- Pour the dye powder or liquid into the hot water. Use a stirring utensil to mix the dye thoroughly. Ensure that all the dye particles are dissolved for a smooth and consistent color.
- If the instructions recommend adding salt or vinegar, measure the recommended amount and add it to the dye solution. These additives can help enhance the dye’s absorption and fixation on the fabric.
- Continue stirring the mixture until the dye is completely dissolved and evenly distributed in the solution.
It’s important to follow the dye manufacturer’s instructions closely to ensure the best possible results. Deviating from the recommended dye-to-water ratio or additional ingredient measurements may lead to uneven dye application or color fading.
Once the dye is well mixed, you’re ready to move on to the next step: testing the dye on a small area of the lamp shade to determine the desired color intensity.
Step 4: Test the Dye on a Small Area
Before applying the dye to the entire lamp shade, it’s important to perform a test to ensure that the color intensity is to your liking. Follow these steps to test the dye on a small area:
- Select a discreet or hidden area on the lamp shade to perform the dye test. This can be the inside or bottom of the shade.
- Dip a clean cloth or sponge into the mixed dye solution and apply it to the chosen test area. Make sure to saturate the fabric evenly to achieve balanced results.
- Allow the dye to set for the recommended amount of time. This can vary depending on the dye brand and the desired color intensity. Follow the instructions provided by the dye manufacturer.
- After the designated time has passed, rinse the test area with clean water until the water runs clear. This will remove any excess dye and allow you to evaluate the final color result.
- Inspect the test area and assess the color. If the shade appears too light, you can repeat the dyeing process for a longer duration. Alternatively, if it appears too dark, you can dilute the dye solution with more hot water to achieve a lighter shade.
The dye test will give you a good indication of how the final color will look on the lamp shade. It gives you the opportunity to make any necessary adjustments or refinements before dyeing the entire shade. Remember to document the dye concentration and duration to reproduce the desired color during the full dyeing process.
Once you are satisfied with the test result, you are ready to move on to the exciting part: applying the dye to the entire lamp shade.
Step 5: Apply the Dye to the Lamp Shade
Now that you have tested the dye and are satisfied with the color result, it’s time to apply the dye to the entire lamp shade. Follow these steps to ensure an even and beautiful dye application:
- Put on your rubber gloves to protect your hands from staining.
- Place your prepared lamp shade in a clean and well-ventilated area. It’s a good idea to lay down old newspapers or a drop cloth to protect the surface underneath.
- Begin by dipping a clean cloth, sponge, or brush into the dye solution. Saturate the applicator with dye, making sure to remove any excess to avoid dripping.
- Starting from the top of the lamp shade, apply the dye evenly in downward strokes. Work in sections, moving gradually around the shade to ensure uniform coverage. Take your time to ensure that all areas of the shade are adequately saturated with the dye. Pay extra attention to any creases or folds in the fabric.
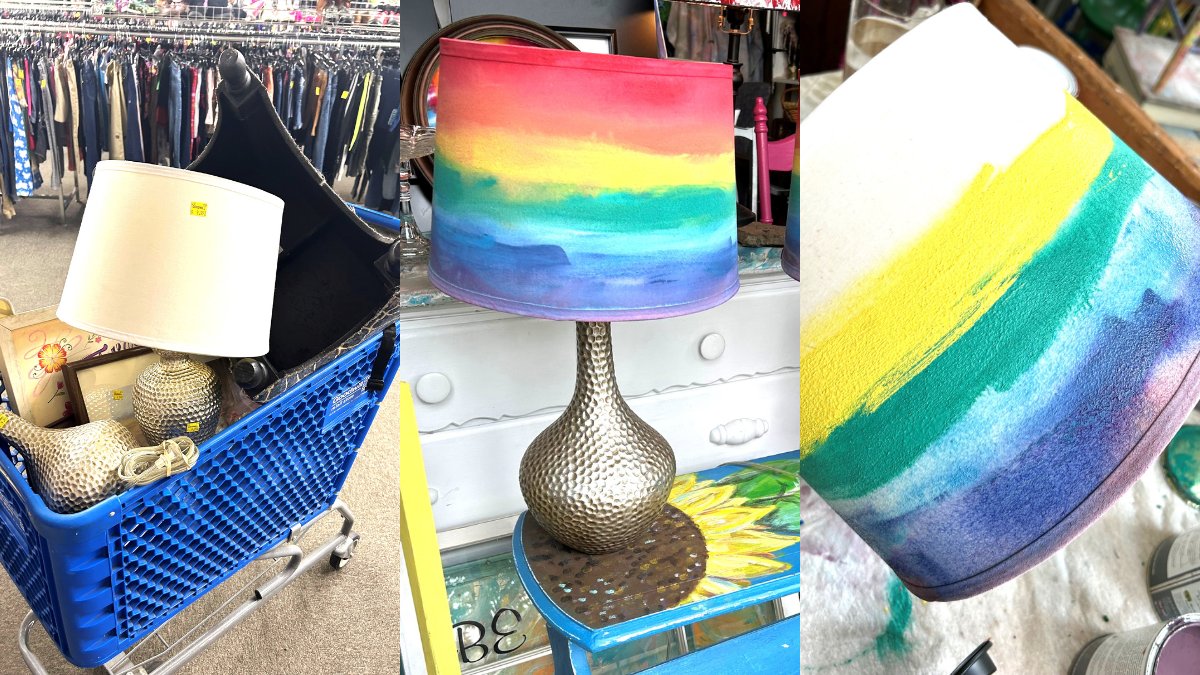
- If you prefer a more subtle color variation or an ombre effect, you can vary the intensity of the dye application by diluting the dye solution with water. This will create a gradient effect as you move from top to bottom of the shade.
- Continue dyeing the lamp shade until you are satisfied with the color intensity. If needed, mix additional dye solution to ensure there is enough to cover the entire shade.
Throughout the dye application process, it’s essential to step back occasionally and examine the lamp shade from different angles to ensure even color distribution. If you notice any uneven areas or missed spots, gently blend the dye using your applicator to create a seamless finish.
Once the entire lamp shade is evenly dyed, you can proceed to the next step: allowing the dye to set and penetrate the fabric.
Step 6: Let the Dye Set
After applying the dye to the lamp shade, it’s important to let it set to ensure that the color adheres well to the fabric. Follow these steps to allow the dye to set properly:
- Once you have finished applying the dye, cover the lamp shade with plastic wrap. This will help retain moisture and prevent the dye from drying too quickly.
- Leave the lamp shade undisturbed for the recommended amount of time. The dye manufacturer’s instructions should specify the required setting time. Typically, this can range from 1 to 24 hours, depending on the dye brand and desired color intensity.
- During the setting period, you should avoid moving or handling the lamp shade to ensure the dye properly penetrates the fabric. Keep it in a clean, dry location away from direct sunlight or excessive heat.
- For optimal results, you may consider placing a plastic bag or wrapping the lamp shade in a towel to trap in heat and help the dye set more effectively.
Allowing the dye to set is crucial as it allows the color to bond with the lamp shade fabric, resulting in long-lasting and vibrant results. It’s important to resist the temptation to remove the plastic wrap or disturb the lamp shade during this time, as it can disrupt the dyeing process and affect the final color outcome.
Once the designated setting time has passed, you can move on to the next step of rinsing and drying the lamp shade.
Step 7: Rinse and Dry the Lamp Shade
After the dye has set on the lamp shade, it’s time to rinse away any excess dye and prepare it for the drying process. Follow these steps to ensure a thorough rinse and proper drying:
- Carefully remove the plastic wrap from the lamp shade, being mindful not to smudge or drip any dye onto other surfaces.
- Hold the lamp shade under running water or place it in a basin filled with clean water. Gently agitate the fabric to loosen and rinse out any excess dye. Continue rinsing until the water runs clear and there are no visible traces of dye.
- If you are unsure about the dye’s colorfastness, you can add a small amount of a dye fixative recommended by the manufacturer to the final rinse. This can help set the color and prevent any future bleeding or fading.
- Once the lamp shade is thoroughly rinsed, gently squeeze out any excess water without wringing or twisting the fabric. Avoid any aggressive actions that may damage the shape or structure of the shade.
- Place the lamp shade on a clean and dry surface or a towel to absorb any remaining moisture. Smooth out any wrinkles or creases in the fabric.
- Allow the lamp shade to air dry completely. This can take several hours, depending on the fabric and environmental conditions. Avoid using direct heat sources or sunlight, as they can cause the fabric to shrink or fade.
Throughout the drying process, periodically check the lamp shade to ensure it is drying evenly and that there are no signs of color bleeding or fading. If necessary, gently reshape the shade while it is slightly damp to maintain its original form.
Once the lamp shade is completely dry, you can proceed to the optional finishing touches to add a personalized touch to your newly dyed lamp shade.
Step 8: Optional Finishing Touches
Once your dyed lamp shade is fully dry, you can take the opportunity to add some optional finishing touches to enhance its appearance. These extra steps can give your lamp shade a polished and customized look. Consider the following options:
- Trim or Embellishments: If you had previously removed any trims or embellishments from the lamp shade, now is the time to reattach them. Make sure to use appropriate adhesive or stitching methods to securely affix any trims or decorative elements back onto the shade.
- Fabric Paint or Stencils: If you want to add artistic details or patterns to your lamp shade, consider using fabric paint or stencils. This can allow you to create unique designs or highlight specific areas of the shade with complementary colors or patterns.
- Fringe or Tassels: Adding a fringe or tassels to the bottom edge of the lamp shade can bring a touch of elegance and texture to the overall look. Choose a fringe or tassels that match the color scheme or style of your space.
- Ribbon or Fabric Wrapping: Another option to enhance the appearance of your lamp shade is to wrap a decorative ribbon or fabric around the top or bottom edge. This can add a pop of color or create a coordinated look with other elements in the room.
- Contrasting Trim: Consider adding a contrasting trim along the top and bottom edges of the lamp shade. This can create a visually appealing border and draw attention to the unique shape and design of the shade.
Remember, the finishing touches are entirely optional and dependent on your personal preferences and the overall style you want to achieve. Take the time to experiment and explore different options to find the perfect finishing touches that will elevate the look of your newly dyed lamp shade.
Once you are satisfied with the finishing touches, it’s time to reattach the lamp shade to the lamp base and showcase your refreshed and beautifully dyed creation.
Step 9: Reattach the Lamp Shade to the Lamp Base
Now that your lamp shade is dyed, dried, and optionally adorned with finishing touches, it’s time to reattach it to the lamp base. Follow these steps to securely reattach the lamp shade:
- Ensure that the lamp base is disconnected from the power source to prevent any accidental electrical issues.
- If necessary, wipe the lamp base with a clean, dry cloth to remove any dust or debris.
- Position the lamp shade ring or spider fitting over the lamp base socket. Ensure that it is properly aligned with the socket before proceeding.
- Hold the lamp shade with both hands and carefully position it over the lamp base. Gently guide the lamp shade onto the ring or fitting, making sure it sits securely and evenly.
- Once the lamp shade is aligned and properly seated on the lamp base, tighten any screws or fasteners that secure the shade in place. Take care not to overtighten, as this can damage the shade or affect its stability.
- After securing the lamp shade, reconnect the lamp to the power source, ensuring that all electrical connections are properly fitted and secure.
- Switch on the lamp to admire your newly dyed and reattached lamp shade. Enjoy the transformed look and the ambiance it creates in your space.
During the reattachment process, it’s important to handle the lamp shade with care to avoid any unnecessary stress or damage. Take your time to ensure that the shade is properly aligned and securely fastened to the lamp base.
With the lamp shade successfully reattached, you can now enjoy the renewed beauty of your lamp and the stunning impact of the dyed shade.