
Empty and Unplug the Refrigerator
Keeping your refrigerator’s water dispenser tray clean is essential for maintaining the hygiene and quality of the water you drink. Over time, dirt and bacteria can accumulate in the tray, which can affect the taste and safety of the water. By regularly cleaning the water dispenser tray, you ensure that you and your family are enjoying clean and refreshing water.
To begin the cleaning process, the first step is to empty and unplug the refrigerator. This is necessary to ensure your safety and prevent any accidental leaks or electrical mishaps. Start by removing any food items or drinks from the refrigerator. Dispose of any expired or spoiled items and transfer any remaining items to a cooler or another fridge to keep them fresh.
Once the refrigerator is empty, locate the power cord and unplug it from the electrical outlet. This step is crucial to prevent any potential electrical shock during the cleaning process. Safety should always be a top priority when working with electrical appliances.
Taking the time to empty and unplug the refrigerator before cleaning the water dispenser tray ensures that you can access the tray easily and clean it thoroughly. It is a simple but essential step in keeping your refrigerator water dispenser in good working condition.
Remove the Water Dispenser Tray
With the refrigerator empty and unplugged, you are now ready to remove the water dispenser tray. The tray is usually located at the bottom of the refrigerator’s water dispenser area, beneath the spout where water is dispensed. Removing the tray will allow you to clean it thoroughly and remove any accumulated dirt or residue.
Start by carefully examining the water dispenser area to locate any screws or clips holding the tray in place. Use a screwdriver or your hands to remove any screws or release any clips. Gently slide the tray out from its position, taking care not to damage any surrounding components or the tray itself.
Once the tray is free, inspect it for any visible dirt or grime. If you notice any solid residue or debris, use a soft cloth or paper towel to wipe it away. Be gentle to avoid scratching the surface of the tray or damaging any interior parts of the refrigerator.
Some water dispenser trays may have additional components, such as a grille or drip grate. These can be removed separately for better access and cleaning. Follow the manufacturer’s instructions or refer to the refrigerator’s user manual to ensure safe removal and cleaning of these additional parts.
Once the water dispenser tray and any accompanying components are removed, proceed to the next step of cleaning. Properly cleaning and maintaining the tray is essential for ensuring the cleanliness and functionality of your refrigerator’s water dispenser.
Clean the Water Dispenser Tray with Warm Soapy Water
Now that you have successfully removed the water dispenser tray from your refrigerator, it’s time to clean it thoroughly. Using warm soapy water is an effective and safe method to remove any dirt, stains, or bacteria that may have accumulated in the tray.
Start by filling a sink or basin with warm water. Add a small amount of mild dish soap and mix it with the water to create a soapy solution. Make sure the water is not too hot, as it may warp or damage the plastic tray.
Submerge the water dispenser tray into the soapy water and let it soak for a few minutes. This will help to loosen any stubborn stains or residue. If the tray has smaller compartments or crevices, use a soft-bristled brush or a toothbrush to gently scrub away any dirt or grime.
Pay special attention to the corners and edges of the tray, as these areas tend to accumulate the most debris. Use gentle circular motions to dislodge any stubborn dirt. Be careful not to scrub too harshly, as this can cause scratches or damage to the tray’s surface.
Once you have thoroughly cleaned the tray, rinse it with clean water to remove any remaining soap residue. Ensure that all soap is completely rinsed off to prevent any unpleasant taste or smell transferring to the water dispenser. A thorough rinse is essential for maintaining the hygiene and freshness of the water.
After rinsing, inspect the tray to ensure that all dirt and stains have been removed. If necessary, repeat the cleaning process or target specific areas that require additional attention. It is important to take the time to clean the water dispenser tray effectively to ensure the best possible drinking experience.
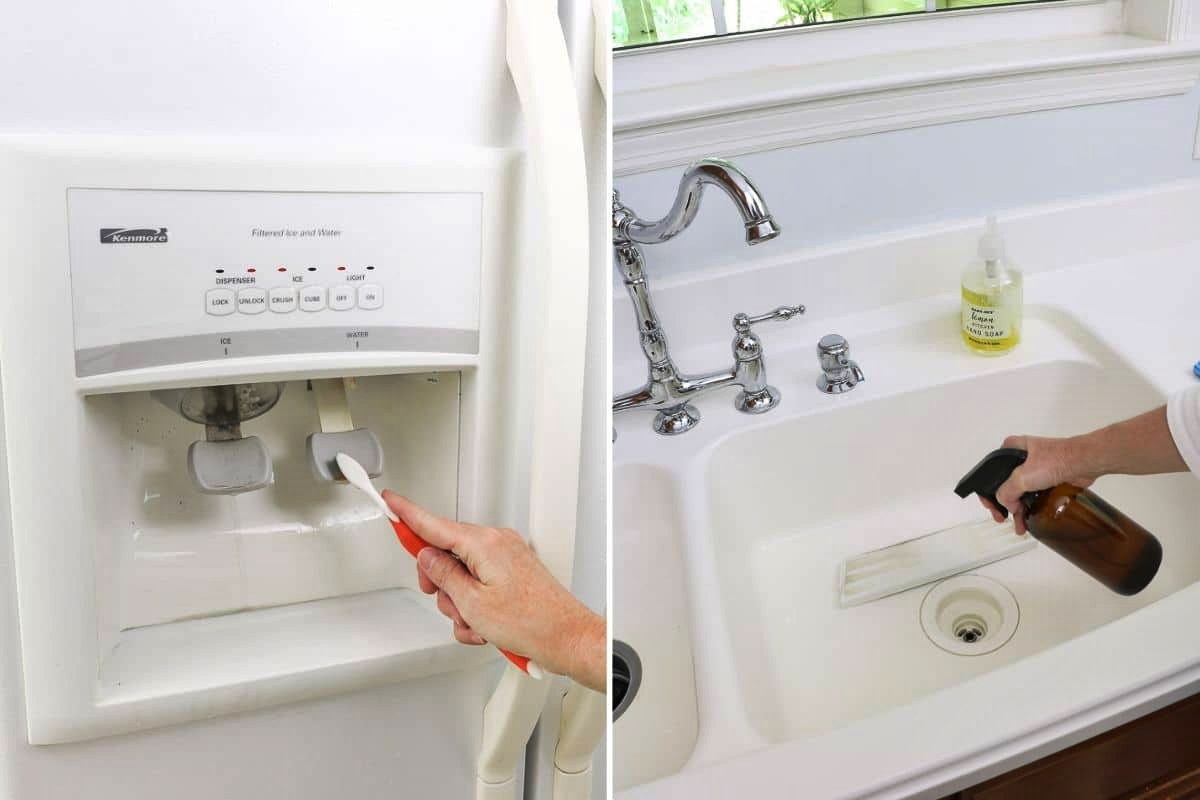
Use a Toothbrush to Scrub Away any Dirt or Grime
Sometimes, a gentle soak in warm soapy water may not be enough to remove stubborn dirt or grime from the water dispenser tray. In such cases, using a toothbrush can provide the necessary scrubbing power to effectively clean those hard-to-reach areas.
Choose a soft-bristled toothbrush that is in good condition. Wet the toothbrush with warm water to soften the bristles and make them more effective at loosening dirt. You can also apply a small amount of dish soap to the toothbrush for extra cleansing power.
Starting with the inside of the water dispenser tray, use the toothbrush to scrub away any visible dirt or grime. Pay close attention to the corners, edges, and any crevices where dirt tends to accumulate. Use gentle circular motions and apply slight pressure to dislodge the debris without causing any damage to the tray.
If you notice any stubborn stains or residue, you can apply a baking soda paste to the toothbrush. Mix a small amount of baking soda with water to create a thick paste. Gently scrub the stained areas with the baking soda paste, allowing it to sit for a few minutes to help lift the stains. Rinse the tray thoroughly after scrubbing to remove any traces of baking soda.
Remember to clean the underside of the water dispenser tray as well. Flip the tray over and use the toothbrush to scrub away any dirt or residue on the bottom surface. This step is important as any accumulated dirt or grime here can contaminate the water as it flows through the dispenser.
Once you have finished scrubbing the water dispenser tray with the toothbrush, rinse it thoroughly with clean water. Ensure that all soap or baking soda residue is removed before reattaching the tray to the refrigerator. The toothbrush scrubbing method helps to ensure a deep and thorough cleaning of the water dispenser tray, leaving it fresh and ready for use.
Rinse the Tray Thoroughly with Clean Water
After scrubbing away any dirt or grime from the water dispenser tray, it is crucial to rinse it thoroughly with clean water. Rinsing helps to remove any remaining soap residue, baking soda, or loosened debris, ensuring that the tray is completely clean and ready for use.
Begin by placing the water dispenser tray under a running faucet or use a pitcher of clean water to rinse it. Allow the water to flow over the tray, ensuring that all surfaces, corners, and crevices are thoroughly rinsed. This step helps to wash away any residual cleaning agents and any loosened particles.
While rinsing, it is important to check the water coming out of the tray for any signs of dirt or debris. If you notice any other particles in the water, continue rinsing until it runs clear. This ensures that the tray is free from any remaining contaminants that may affect the cleanliness and quality of the dispensed water.
If necessary, use your hands or a soft cloth to gently rub the tray while rinsing. This can help dislodge any stubborn residue that may still be clinging to the tray’s surfaces. By thoroughly rinsing the tray, you can ensure that it is completely clean and ready to be reattached to the refrigerator.
Once you are confident that the tray has been rinsed thoroughly, shake off any excess water and inspect it again. Ensure that there are no visible traces of soap, baking soda, or debris. If needed, repeat the rinsing process until the tray is completely clean and free from any residue.
Properly rinsing the water dispenser tray is an essential step towards maintaining a clean and hygienic refrigerator water dispenser. By ensuring that the tray is free from any remaining cleaning agents or debris, you can enjoy fresh and contaminant-free water every time you use the dispenser.
Dry the Tray Completely before Reattaching it to the Refrigerator
Once the water dispenser tray has been thoroughly rinsed, the next crucial step is to ensure that it is dried completely before reattaching it to the refrigerator. Proper drying prevents any moisture buildup, which can lead to the growth of mold or bacteria in the tray and affect the cleanliness of the dispensed water.
To begin, use a soft and absorbent cloth or paper towel to gently pat dry the water dispenser tray. Start by drying the exterior of the tray, removing any water droplets or excess moisture. Pay attention to the corners and crevices, ensuring that all areas are thoroughly dried.
Next, move to the interior of the tray and continue patting it dry. Be thorough and ensure that all surfaces, including the bottom, are completely dry. Absorb any remaining moisture to prevent any potential mold or bacteria growth.
If you’re short on time or as an added measure, you can use a hairdryer on a low or cool setting to gently blow dry the tray. Keep the hairdryer at a safe distance to avoid melting or warping the tray. Make sure to move the hairdryer around to evenly distribute the airflow and dry the tray completely.
Allow the water dispenser tray to air dry for a few minutes after patting it dry or blow drying it. This additional drying time ensures that any residual moisture evaporates completely. Properly drying the tray is crucial to maintain the cleanliness and functionality of the water dispenser.
Before reattaching the tray to the refrigerator, double-check that it is completely dry. Inspect the tray carefully for any remaining moisture or dampness. If you notice any, repeat the drying process to ensure that the tray is fully dry.
By thoroughly drying the water dispenser tray before reattaching it to the refrigerator, you help prevent the growth of mold or bacteria. This step contributes to maintaining a clean and healthy water dispenser, ensuring that you and your family can enjoy refreshing and bacteria-free water every time.
Clean the Area around the Water Dispenser
As part of maintaining a clean and hygienic refrigerator water dispenser, it’s important not to overlook the surrounding area. Over time, spills, splashes, and general use can lead to dirt and grime buildup. Cleaning the area around the water dispenser ensures a thorough and comprehensive cleaning process.
To start cleaning the area, you’ll need a clean cloth or sponge and a mild cleaning solution. A mixture of warm water and mild dish soap works well for this purpose. Wet the cloth or sponge with the cleaning solution and gently wipe down the area around the water dispenser, including the surrounding surface and any buttons or controls.
Pay special attention to any visible stains or sticky residue. Use gentle motions to avoid scratching the surface or damaging any components. For stubborn stains, you can apply a small amount of cleaning solution directly onto the cloth or sponge and focus on those areas.
If you notice any grime or buildup in the crevices or corners around the water dispenser, use a soft, damp toothbrush to gently scrub those areas. This will help to dislodge any dirt or debris that may be hiding in these hard-to-reach spots. Be careful not to use excessive force, as it can damage the surrounding surfaces.
After cleaning, rinse the cloth or sponge with clean water and go over the cleaned area to remove any remaining residue from the cleaning solution. Thoroughly wring out the cloth or sponge to ensure that no excess water drips onto the refrigerator.
Lastly, use a dry cloth or paper towel to ensure that the cleaned area is left completely dry. This step helps to prevent any moisture accumulation that can lead to the growth of mold or bacteria.
By regularly cleaning the area around the water dispenser, you maintain a clean and inviting space for accessing fresh water. It not only contributes to the overall cleanliness of your refrigerator but also enhances the visual appeal of the water dispenser area.
Wipe Down the Exterior of the Refrigerator
In addition to cleaning the water dispenser and the surrounding area, it’s important to also give attention to the exterior of the refrigerator. Regularly wiping down the exterior helps to maintain its cleanliness, remove any fingerprints, smudges, or spills, and keep it looking fresh and presentable.
To get started, gather a soft, microfiber cloth or a sponge and a mild cleaning solution. You can use a mixture of warm water and a mild dish soap or a specialized refrigerator cleaner. Ensure that the cleaning solution is suitable for the material of your refrigerator’s exterior to avoid any damage.
Dampen the cloth or sponge with the cleaning solution and gently wipe down the entire exterior surface of the refrigerator. Start from the top and work your way down, covering all sides, the front, and the back. Pay attention to the handles, control panel, and any other areas that may accumulate dirt or marks.
For stubborn stains or sticky residues, you may need to apply a bit more pressure or allow the cleaning solution to sit on the affected area for a few minutes. Avoid using abrasive or harsh cleaning tools or substances, as they can scratch or damage the surface of the refrigerator.
If your refrigerator has a stainless steel exterior, use a specialized stainless steel cleaner or a mixture of vinegar and water to wipe down and remove any streaks or fingerprints. Remember to follow the manufacturer’s instructions for cleaning stainless steel surfaces.
After wiping down the entire exterior surface, go over the cleaned areas with a clean, damp cloth or sponge to remove any remaining cleaning solution. Make sure to rinse the cloth or sponge frequently to avoid spreading dirt or residue back onto the refrigerator.
To finish, use a dry cloth or towel to thoroughly dry the exterior of the refrigerator. This step helps to prevent any water spots or streaks and leaves the surface looking clean and polished.
By regularly wiping down the exterior of the refrigerator, you not only maintain its cleanliness but also contribute to its longevity and overall aesthetic appeal. Keeping the exterior clean adds a touch of freshness to your kitchen and makes your refrigerator look well-maintained and inviting.
Plug the Refrigerator Back In and Refill the Water Dispenser
After successfully cleaning the water dispenser tray, the surrounding area, and the exterior of the refrigerator, it’s time to plug the refrigerator back in and refill the water dispenser. This final step ensures that your refrigerator is fully functional, and you can once again enjoy refreshing water at your convenience.
Locate the power cord of the refrigerator and plug it securely into the electrical outlet. Ensure that the cord is properly connected and that there are no loose connections. This step is essential to restore power to the refrigerator and allow the water dispenser to operate effectively.
Once the refrigerator is plugged in, give it a few moments to start up and reach the optimal temperature. This may take a few minutes, depending on the model of your refrigerator. It’s important to wait for it to fully power on before proceeding to the next step.
Now, it’s time to refill the water dispenser. Locate the water source or the designated water reservoir of your refrigerator. Depending on your model, it may have a removable water tank or a direct water connection. Follow the manufacturer’s instructions to properly refill the water dispenser.
If your refrigerator has a removable water tank, carefully remove it from its housing and fill it with clean, fresh water. Use a container or a pitcher to pour the water into the tank, making sure not to overfill it. Once filled, securely reattach the water tank back into its designated spot.
If your refrigerator has a direct water connection, ensure that the water supply valve is properly turned on and that there are no leaks. Run the water dispenser for a few seconds to flush out any air or impurities from the water line before dispensing water for consumption.
Once the water dispenser is filled and ready to use, give it a quick test to ensure that water is flowing correctly and that there are no issues with the dispenser. Check for any leaks or unusual noises during the operation. If you notice any problems, consult your refrigerator’s user manual or contact the manufacturer for assistance.
By plugging the refrigerator back in and refilling the water dispenser, you complete the cleaning process and restore your refrigerator to its optimum functionality. Ensure that you properly maintain and clean the water dispenser tray regularly to prevent dirt or bacteria buildup, guaranteeing clean and refreshing water for you and your family.