
Materials Needed
Before you start building your cardboard box storage rack, gather the following materials:
- Cardboard Boxes: Select sturdy cardboard boxes of varying sizes. These will serve as the main components for your storage racks.
- Box Cutter or Scissors: You’ll need a sharp tool for cutting the cardboard boxes to the desired dimensions.
- Ruler or Measuring Tape: Accurate measurements are crucial for ensuring that your storage rack is sturdy and functional.
- Glue or Tape: Choose a strong adhesive, such as hot glue or heavy-duty tape, to secure the cardboard pieces together.
- Paint and Paintbrush (Optional): If you want to enhance the aesthetic appeal of your storage rack, consider using paint to give it a personal touch.
- Marker or Pen: This will be useful for marking measurements and guidelines on the cardboard.
- Level: To ensure that your storage rack is straight and level, a small level can come in handy during the assembly process.
- Protective Gear (Optional): If you’re using power tools or working in a dusty area, wearing safety goggles, gloves, and a dust mask is recommended.
Ensure you have all the necessary materials on hand before you begin building your cardboard box storage rack. This will make the process smoother and more efficient. You may also want to set up a designated work area where you have enough space to spread out the materials and work comfortably.
Step 1: Planning and Designing
Before diving into the construction process, it’s important to take the time to plan and design your cardboard box storage rack. This will ensure that it meets your specific needs and fits well in the intended space. Here are a few steps to consider for the planning and designing phase:
- Identify the Purpose: Determine what you will be using the storage rack for—whether it’s for storing books, toys, household items, or other belongings. This will help you determine the size and number of shelves needed.
- Measure the Space: Take precise measurements of the area where you plan to place the storage rack. Consider the height, width, and depth available, as well as any obstructions or limitations.
- Sketch a Design: Using rough measurements, create a simple sketch of how you envision the storage rack. Include the number of shelves, their placements, and any additional features, such as dividers or compartments.
- Consider Accessibility: Think about how easily you want to access the items on the shelves. If you have specific items that you need to reach often, plan for them to be placed at a convenient height within the storage rack.
- Maximize Space: Explore different ways to optimize the available space. For example, you could incorporate adjustable shelves or utilize the vertical height by adding an extra tier.
- Research Design Ideas: Look for inspiration online or in home improvement magazines for creative cardboard box storage rack designs. Gathering ideas will help you refine your own design and make it more visually appealing.
Remember, the planning and designing phase allows you to visualize your project and make necessary adjustments before you start construction. Taking the time to plan ahead will save you potential frustrations and ensure a more successful outcome.
Step 2: Gathering Materials
Once you have a clear plan and design for your cardboard box storage rack, it’s time to gather the materials you’ll need for the construction process. Here’s what you need to do in this step:
- Cardboard Boxes: Select sturdy cardboard boxes of varying sizes for your storage rack. Make sure they are in good condition and free from any damage or moisture.
- Box Cutter or Scissors: Obtain a sharp box cutter or a pair of scissors to cut the cardboard boxes to the desired dimensions. Ensure that the cutting tool is easily maneuverable and in good working condition.
- Ruler or Measuring Tape: Have a ruler or measuring tape on hand to accurately measure the dimensions of the cardboard pieces. This will help you achieve precision in your construction.
- Glue or Tape: Choose a strong adhesive such as hot glue or heavy-duty tape to secure the cardboard pieces together. Make sure you have enough of it to complete the construction process.
- Paint and Paintbrush (Optional): If you want to add a touch of personalization or enhance the appearance of your storage rack, gather the desired paint colors and brushes.
- Marker or Pen: Grab a marker or pen to mark the measurements, guidelines, and any other important annotations on the cardboard.
- Level: To ensure that your storage rack is straight and level, have a small level available during the assembly process. This will help you achieve a sturdy and stable structure.
- Protective Gear (Optional): If you’re working with power tools or in a dusty area, consider wearing safety goggles, gloves, and a dust mask to protect yourself.
Make sure you have all the necessary materials before starting the construction process. Double-check your list to ensure you haven’t missed anything. Having everything within reach will make the assembly smoother and more efficient. Once you have gathered all the materials, you’re ready to move on to the next step: measuring and cutting the cardboard pieces.
Step 3: Measuring and Cutting
Now that you have gathered all the necessary materials, it’s time to move on to measuring and cutting the cardboard pieces for your storage rack. This step is crucial for achieving the desired dimensions and ensuring a precise fit. Here’s what you need to do:
- Measurements: Take the measurements according to your design plan. Use a ruler or measuring tape to measure the heights, widths, and depths of the cardboard pieces you need for the base and shelves of your storage rack.
- Marking: Use a marker or pen to mark the measurements directly on the cardboard. This will serve as your cutting guide and help you maintain accuracy throughout the process.
- Cutting: Carefully cut along the marked lines using a box cutter or a pair of scissors. Make sure to follow the lines as accurately as possible to achieve clean and precise cuts.
- Repeat: Repeat the measuring and cutting process for each cardboard piece required for the base and shelves. Double-check the measurements to ensure consistency and uniformity.
- Smooth Edges: After cutting, inspect the edges of the cardboard pieces. If any edges are rough or uneven, use sandpaper or a file to smooth them out. This will help prevent any accidental cuts or injuries during assembly.
Remember to exercise caution while using cutting tools and make sure to keep your hands and fingers away from the blade. It’s also a good idea to work on a safe and stable surface to avoid accidents. Once you have finished measuring and cutting all the cardboard pieces, you’re ready to proceed to the next step: assembling the base of your storage rack.
Step 4: Assembling the Base
With the cardboard pieces measured and cut to their proper dimensions, it’s time to start assembling the base of your storage rack. The base provides stability and support for the shelves, so it’s important to ensure a sturdy construction. Follow these steps to assemble the base:
- Lay out the cardboard pieces: Arrange the cut cardboard pieces according to the design plan you created earlier. This will help you visualize the positioning and ensure a seamless assembly process.
- Apply adhesive: Choose a strong adhesive such as hot glue or heavy-duty tape. Apply the adhesive along the edges of the cardboard pieces that will be joined together. Make sure the adhesive is evenly distributed to ensure a secure bond.
- Join the pieces: Carefully align the edges of the cardboard pieces that need to be joined and firmly press them together. Hold the pieces in place for a few moments to allow the adhesive to set. Ensure that the base is level and square during the assembly process.
- Reinforce if necessary: If desired, add additional adhesive or tape to reinforce the joints for added stability. This will help ensure that the base can support the weight of the shelves and the items to be stored.
As you assemble the base, pay attention to the alignment and stability of the cardboard pieces. This will help create a solid foundation for your storage rack. Keep in mind that precision and careful handling are key in this step to ensure a well-constructed base. Once the base is sturdy and secure, you’re ready to move on to the next step: adding the shelves to your storage rack.
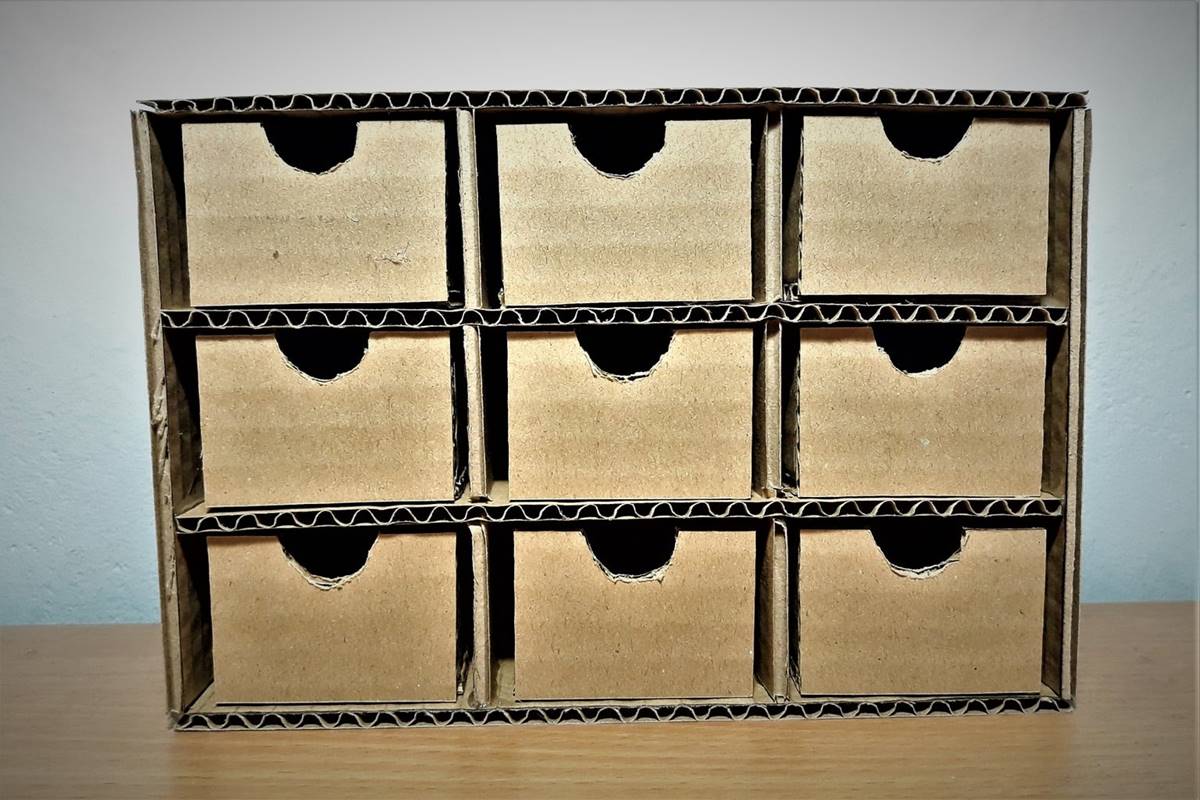
Step 5: Adding the Shelves
Now that the base of your cardboard box storage rack is complete, it’s time to add the shelves. The shelves will provide the necessary compartments for organizing and storing your belongings. Follow these steps to add the shelves:
- Measurements and Marking: Determine the desired height and spacing between the shelves. Use a ruler or measuring tape to mark these measurements on the inside walls of the cardboard box.
- Cutting: Carefully cut along the marked lines on the box walls using a box cutter or scissors. Ensure that the cuts are straight and aligned with the markings.
- Reinforcement: To add extra support, cut additional strips of cardboard to serve as braces for each shelf. Measure and cut these braces to match the width of the box and glue them in place along the cut edges of the box walls.
- Placement: Insert the shelves into the designated slots created by the cut box walls. Ensure that they fit snugly and are level. Adjust their position if necessary.
- Secure: Apply adhesive, such as hot glue or tape, to strengthen the connections between the shelves and the box walls. This will provide stability and prevent the shelves from shifting or falling out.
During the process of adding the shelves, make sure to double-check the measurements and alignment. This will help create a sturdy and well-balanced storage rack. Consider the weight-bearing capacity of the cardboard boxes and adjust accordingly if you plan on storing heavier items. With the shelves securely in place, your cardboard box storage rack is taking shape. Next, we’ll move on to step 6: reinforcing the rack for added durability.
Step 6: Reinforcing the Rack
After adding the shelves to your cardboard box storage rack, it’s important to reinforce the structure to ensure durability and stability. By reinforcing the rack, you’ll be able to confidently store your items without worrying about the integrity of the construction. Follow these steps to reinforce your storage rack:
- Brace the corners: Cut additional strips of cardboard and glue them to the inner corners of the storage rack. This will provide extra support and prevent the corners from becoming weak or compromised.
- Add diagonal braces: To further strengthen the rack, cut diagonal braces from cardboard and attach them to the corners. This will help distribute the weight evenly and minimize the chances of the rack sagging under heavy loads.
- Reinforce the shelves: Apply adhesive or tape along the seams where the shelves meet the box walls. This will reinforce the connection and prevent the shelves from drooping or coming loose over time.
- Strengthen the base: Consider adding additional cardboard strips or panels to the underside of the base to further stabilize the rack. This will provide added support and prevent the rack from wobbling or tipping.
- Inspect and make adjustments: Once you’ve completed the reinforcement process, inspect the entire rack for any weak spots or areas that may need additional reinforcement. Make any necessary adjustments to ensure the rack is strong and sturdy.
Reinforcing your storage rack will add longevity to its lifespan and provide peace of mind when storing your items. Taking the time to strengthen the structure will result in a more robust and reliable storage solution. With the rack reinforced and ready, we can move on to step 7: painting or decorating the rack to enhance its aesthetics (optional).
Step 7: Painting or Decorating (Optional)
If you want to add a personal touch and enhance the aesthetics of your cardboard box storage rack, this is the step where you can get creative with painting or decorating. While optional, painting or decorating your rack can make it visually appealing and seamlessly blend with your home decor. Follow these steps to paint or decorate your storage rack:
- Preparation: Prepare your workspace by laying down a drop cloth or old newspapers to protect the surrounding area from paint or any other decorating materials.
- Cleaning: Clean the surface of the cardboard rack, ensuring it is free from dust, dirt, or any other debris. This will help the paint adhere better to the surface.
- Priming (optional): If desired, apply a coat of primer to the cardboard surface. Priming helps create a smooth and even base for the paint, improves its adhesion, and prevents the cardboard from absorbing too much paint.
- Painting: Use acrylic or latex paint to paint the cardboard rack. Apply thin and even coats, allowing each coat to dry completely before applying the next. You can use a brush, sponge, or even spray paint for a more even application.
- Decorating: If painting is not your preference, consider using decorative techniques such as decoupage, stenciling, or applying contact paper to add patterns, textures, or designs to the cardboard rack. Get creative and let your imagination run wild!
- Finishing touches: Once the paint or decorations have dried, consider applying a clear sealant or varnish to protect the surface and give it a polished look.
Remember to allow adequate drying time between each step and follow the instructions on the paint or decorating materials you are using. By painting or decorating your cardboard box storage rack, you can transform it into a stylish and eye-catching storage solution that complements your personal taste and home decor.
Step 8: Organizing and Storing Items
With your cardboard box storage rack built and potentially painted or decorated, it’s time to organize and store your items effectively. A well-organized storage rack will not only maximize space but also make it easier to find and access your belongings. Here are some steps to consider when organizing and storing items in your storage rack:
- Categorize belongings: Sort your belongings into categories such as books, toys, electronics, or seasonal items. This will help you determine how to allocate space on the shelves.
- Arrange by priority: Place frequently used items within easy reach and less frequently used items towards the back or higher shelves. This will ensure that the items you need are readily accessible.
- Use storage containers: Consider using storage containers or bins to further organize and protect your items. Label the containers to easily identify their contents.
- Utilize vertical space: Make use of the vertical height by stacking or layering smaller boxes or containers on top of each other. This will help maximize the storage capacity of your rack.
- Utilize dividers or compartments: If desired, create dividers or compartments within the cardboard boxes to further separate and organize smaller items.
- Leave space for growth: Allow room for future growth or additions to your belongings. Leave some empty space on the shelves to accommodate new items that you may acquire over time.
- Maintain order: Regularly declutter and reorganize your storage rack to keep it neat and maintain its functionality. Remove any items that are no longer needed or have become damaged.
By following these steps, you’ll be able to create a well-organized and efficient storage solution. Remember to regularly evaluate and adjust your storage system as your needs change. Keeping your items organized not only makes it easier to find them but also helps maintain the integrity of your cardboard box storage rack. With your items neatly stored, you’ve successfully completed the organization process.
Step 9: Maintenance and Care Tips
To ensure the longevity and functionality of your cardboard box storage rack, it’s essential to implement proper maintenance and care practices. By following these tips, you can keep your storage rack in excellent condition for years to come:
- Avoid excessive weight: Be mindful of the weight limit of your storage rack and avoid overloading it with heavy items. This will prevent the cardboard from becoming weakened or damaged.
- Keep in a dry area: Moisture can weaken the cardboard and lead to mold or structural issues. Keep your storage rack in a dry area to preserve its integrity.
- Inspect for damage: Regularly inspect your storage rack for any signs of wear or damage. Address any issues promptly by reinforcing or repairing damaged areas to prevent further deterioration.
- Protect from pests: Take precautions to protect your storage rack from pests such as insects or rodents. Keep the area around the rack clean and use pest control measures if necessary.
- Reinforce as needed: Over time, the connections and joints of your storage rack may need reinforcing. Periodically inspect and reinforce any weak spots or areas that show signs of wear to keep the structure sturdy.
- Avoid excessive moisture: Avoid exposing your storage rack to excessive moisture or direct contact with water. Moisture can weaken the cardboard and compromise the structural integrity.
- Handle with care: When moving or adjusting your storage rack, handle it with care to prevent any unnecessary strain or damage to the cardboard. Lift and carry it properly, being mindful of its weight and size.
- Regularly clean: Dust and debris can accumulate on the surface of your storage rack over time. Regularly clean it with a soft cloth or a brush to keep it looking tidy and prevent the accumulation of dirt.
- Make necessary repairs: If you notice any tears, holes, or weak areas on the cardboard, make timely repairs using glue or tape. This will help ensure the continued stability and functionality of your storage rack.
By implementing these maintenance and care tips, you can extend the lifespan of your cardboard box storage rack and keep it in excellent condition. Regular inspections and minor repairs will minimize the chances of any major issues arising. With proper care, your storage rack will continue to serve as an efficient and reliable storage solution for your belongings.