
Tools and Materials Needed
Before you begin assembling your Whalen storage rack, make sure you have the following tools and materials on hand:
- Phillips screwdriver
- Adjustable wrench
- Rubber mallet
- Tape measure
- Particle board shelves (included with the rack)
It’s important to note that these instructions are specific to the Whalen storage rack model. Different models may require different tools and materials, so be sure to check the instruction manual that came with your specific model.
Additionally, having a clean and organized workspace will make the assembly process much smoother. Clear any clutter and ensure you have enough room to lay out the parts and move around comfortably.
With the necessary tools and materials at your fingertips, you’re ready to move on to the next step: unpacking the Whalen storage rack.
Step 1: Unpacking the Whalen Storage Rack
Before you can begin assembling the Whalen storage rack, you’ll need to unpack it carefully. Follow these steps to ensure a smooth and efficient unpacking process:
- Find a suitable area: Choose a spacious and flat area where you can unpack the storage rack. It’s ideal to have enough room to spread out the parts and packaging materials.
- Gather necessary tools: Before you start unpacking, make sure you have the tools mentioned in the previous section readily available. These tools will come in handy throughout the assembly process.
- Inspect the packaging: Carefully examine the packaging for any signs of damage. If you notice any visible damage, take pictures and document it immediately.
- Open the package: Using a utility knife or scissors, carefully cut open the packaging. Take caution and avoid accidentally damaging any parts inside.
- Remove protective foam and wrapping: Inside the package, you’ll likely find protective foam and wrapping around the various components. Remove these materials gently to unveil the parts.
- Check for all parts: Once you have removed the protective materials, take inventory of all the components. Refer to the instruction manual or parts list included to ensure that everything is accounted for.
By carefully unpacking the Whalen storage rack, you’ll have a clear overview of all the components, making it easier to proceed with the assembly process. Ensure that you have all the necessary parts before moving on to the next step.
Step 2: Identifying the Parts
Before you begin assembling the Whalen storage rack, it’s important to familiarize yourself with the various parts and components. This step will help you understand the different elements of the rack and ensure a smoother assembly process. Follow these guidelines to identify the parts:
- Refer to the instruction manual: The instruction manual provided with the Whalen storage rack will typically include a detailed diagram or a list of parts. Use this as a reference to identify the different components.
- Sort and group similar parts: Lay out all the parts in an orderly manner, grouping them by type or function. This will make it easier to identify and locate specific parts as you progress through the assembly process.
- Inspect labels or markings: Some parts may have labels or markings on them, indicating their purpose or specific instructions. Pay close attention to these labels as they can provide valuable information during assembly.
- Consult the manufacturer’s website: If you’re having difficulty identifying certain parts or are unsure about their purpose, visit the manufacturer’s website. They often provide detailed documentation and resources that can assist you in identifying the parts accurately.
Take your time in this step to ensure you have a clear understanding of each part. If any part appears to be missing or damaged, contact the manufacturer for assistance. Once you are confident in identifying the different components, you are ready to move on to the next step of the assembly process.
Step 3: Assembling the Uprights
Now that you have identified the parts, it’s time to start assembling the Whalen storage rack. The first step is to assemble the uprights, which form the vertical supports of the rack. Follow these instructions to successfully complete this step:
- Take two upright posts: Locate two upright posts from the parts you identified earlier. These posts are usually long and sturdy, serving as the main support pillars for the rack.
- Align the holes: Position the upright posts parallel to each other, ensuring the pre-drilled holes on one side of each post are facing inwards.
- Insert cross braces: Take the cross braces—metal bars with holes—and insert them into the pre-drilled holes on the upright posts. The cross braces should align with the holes and fit snugly into place.
- Secure with bolts: Once the cross braces are in position, use the provided bolts and a Phillips screwdriver to attach them securely to the upright posts. Tighten the bolts firmly, but be careful not to overtighten and strip the threads.
- Repeat for additional uprights: If your Whalen storage rack requires more than two uprights, repeat the process with the remaining upright posts and cross braces. Make sure all the uprights are assembled consistently.
Assembling the uprights is a crucial step in setting up the Whalen storage rack, as it establishes the foundational structure of the unit. Take your time to ensure that the cross braces are securely attached to the upright posts. Once you have successfully completed this step, you are ready to move on to the next stage of the assembly process.
Step 4: Attaching the Crossbeams
With the uprights assembled, it’s time to move on to the next step: attaching the crossbeams. The crossbeams provide horizontal support and stability to the Whalen storage rack. Follow these instructions to successfully attach the crossbeams:
- Take the crossbeam bars: Locate the crossbeam bars among the parts you identified earlier. These bars are typically made of metal and have holes at each end for attachment.
- Position the crossbeams: Place the crossbeam bars horizontally across the uprights, lining up the holes on the ends of the crossbeams with the corresponding holes on the uprights.
- Insert bolts: Insert the provided bolts through the holes, securing the crossbeams to the uprights. Use a Phillips screwdriver or an adjustable wrench to tighten the bolts securely.
- Repeat for additional crossbeams: If your Whalen storage rack requires multiple levels of crossbeams, repeat the process with the remaining crossbeam bars, ensuring the bars are evenly spaced and level.
Attaching the crossbeams is a critical step in the assembly process, as it adds structural integrity to the Whalen storage rack. Make sure the crossbeams are aligned properly and securely attached to the uprights. Double-check that all bolts are tightened to ensure stability. Once you have completed this step, you can proceed to the next stage of the assembly process.
Step 5: Installing the Particle Board Shelves
After attaching the crossbeams, it’s time to install the particle board shelves onto the Whalen storage rack. The shelves provide a sturdy platform for organizing and storing your belongings. Follow these instructions to successfully install the particle board shelves:
- Prepare the shelves: Take the particle board shelves that came with the Whalen storage rack. Ensure they are clean and free from any dirt or debris. If necessary, wipe them down with a damp cloth before proceeding.
- Position the first shelf: Place the first particle board shelf onto the crossbeams, making sure it rests evenly on top of them. Align the corners of the shelf with the edges of the rack for a neat and flush fit.
- Secure the shelf: Depending on your Whalen storage rack model, there may be different methods of securing the shelf. Some racks use locking clips, while others use screws. Refer to the instruction manual for your specific model to determine the appropriate method.
- Repeat for additional shelves: If your Whalen storage rack has multiple levels of shelves, repeat the process with the remaining particle board shelves, ensuring they are evenly spaced and aligned.
Installing the particle board shelves is an important step in completing the Whalen storage rack assembly. Take care to ensure the shelves are properly aligned and securely fastened to the crossbeams, as this will provide stability and support for your items. Once all the shelves are installed, you can continue to the next stage of the assembly process.
Step 6: Securing the Shelves
After installing the particle board shelves, it’s important to secure them in place to ensure stability and safety. Properly secured shelves will prevent them from shifting or falling off the Whalen storage rack. Follow these instructions to effectively secure the shelves:
- Check for locking mechanisms: Depending on the model of your Whalen storage rack, there may be built-in locking mechanisms specifically designed to secure the shelves in place. These mechanisms could be in the form of locking clips, pins, or other types of fasteners. Consult the instruction manual that came with your rack to identify and understand the specific method of securing the shelves.
- Align the locking mechanism: Once you have identified the locking mechanism, ensure it is properly aligned with the corresponding slots or holes on both the uprights and the shelf support brackets.
- Insert and fasten: Push the locking mechanism firmly into place, making sure it securely grasps the uprights and shelf support brackets. Follow the manufacturer’s instructions to properly fasten or lock the mechanism to ensure it is secure.
- Repeat for each shelf: If your Whalen storage rack has multiple shelves, repeat the process for each shelf, ensuring that all locking mechanisms are properly aligned and fastened.
Securing the shelves is a crucial step to ensure the overall stability of the Whalen storage rack. Always double-check that each shelf is securely locked in place before placing any items on them. This will minimize the risk of accidents or shelves becoming dislodged. Once all the shelves are securely fastened, you can proceed to the next stage of the assembly process.
Step 7: Adding Additional Accessories (if applicable)
In this step, you have the option to enhance the functionality and versatility of your Whalen storage rack by adding additional accessories. While not all Whalen storage racks come with additional accessories, some models offer accessories such as hooks, bins, or drawers that can be attached to the rack. Follow these instructions to add any additional accessories:
- Check for compatibility: Verify that the accessories you plan to add are compatible with your specific Whalen storage rack model. Consult the instruction manual or the manufacturer’s website to ensure proper compatibility.
- Position the accessories: Decide on the desired location for the accessories on your storage rack. Some accessories may attach to the upright posts or crossbeams, while others may hang from hooks or slots along the rack’s frame.
- Follow manufacturer instructions: Each accessory may have its own specific attachment method. Carefully follow the manufacturer’s instructions provided with the accessory to correctly install and secure it to the rack.
- Test stability and adjust: Once the accessory is attached, test its stability by gently shaking or applying slight pressure to ensure it is firmly secured. If necessary, make any necessary adjustments to ensure a stable and secure fit.
Adding additional accessories can expand the storage capacity and organization options of your Whalen storage rack. It’s a great opportunity to customize the rack to your specific needs. However, be mindful not to overload the rack or exceed its weight limits, as this can compromise stability and safety. Once all additional accessories, if applicable, are properly installed and secured, you are ready to move on to the next stage of the assembly process.
Step 8: Tips and Safety Precautions
As you proceed with the assembly of your Whalen storage rack, it’s important to keep in mind some helpful tips and safety precautions. Following these guidelines will ensure a smooth and safe assembly process:
- Read the instruction manual: Before you begin assembling the rack, thoroughly read and familiarize yourself with the instruction manual provided by Whalen. This will give you a clear understanding of the assembly steps and help you avoid any mistakes.
- Work in pairs if needed: Depending on the size and weight of the rack, it may be beneficial to have an extra set of hands to assist with the assembly process. This will make it easier to handle larger parts and ensure safety.
- Do not exceed weight limits: Pay attention to the weight limits specified by the manufacturer for your Whalen storage rack. Overloading the rack can lead to structural damage or accidents. Distribute the weight evenly across the shelves and avoid placing excessively heavy items on them.
- Wear protective gear: Consider wearing protective gloves and safety glasses during the assembly process. This will protect your hands from potential injuries and prevent any debris from getting into your eyes.
- Secure the rack properly: Once the assembly is complete, make sure to secure the storage rack to a wall or floor, especially if it is a taller or freestanding model. This will prevent it from tipping over and ensure stability.
- Regularly inspect the rack: Periodically check the tightness of the bolts and fasteners, as they may gradually loosen over time. Additionally, inspect the rack for any signs of damage or wear. Address any issues promptly to maintain the integrity and safety of the rack.
By following these tips and safety precautions, you can ensure a successful and safe assembly process for your Whalen storage rack. Take the necessary precautions, double-check your work, and maintain the rack regularly to ensure its longevity and safety. With these guidelines in mind, you are ready to proceed with the final steps of the assembly process.
Step 9: Frequently Asked Questions
During the assembly process of your Whalen storage rack, you may come across some common questions. This section addresses frequently asked questions to provide clarification and assistance:
- Q: Can I assemble the Whalen storage rack by myself?
A: Yes, the Whalen storage rack can typically be assembled by one person. However, having an extra set of hands may be helpful, especially for larger or taller models. - Q: How long does it take to assemble the Whalen storage rack?
A: The assembly time can vary depending on the model and your experience with this type of assembly. On average, it can take anywhere from 1 to 3 hours to complete the assembly process. - Q: Are the tools needed for assembly included with the Whalen storage rack?
A: Typically, the tools needed for assembly, such as bolts or screws, are included with the Whalen storage rack. However, you may need to provide your own basic tools, such as a Phillips screwdriver or an adjustable wrench. - Q: Can I disassemble the Whalen storage rack if needed?
A: Yes, the Whalen storage rack is designed to be disassembled if necessary. Refer to the instruction manual for guidance on how to disassemble the rack without causing any damage. - Q: What are the weight limits for the Whalen storage rack?
A: The weight limits can vary depending on the specific model of the Whalen storage rack. Consult the instruction manual or the manufacturer’s guidelines for the recommended weight limits for your rack.
These frequently asked questions provide helpful insights into some common concerns related to the assembly of Whalen storage racks. If you have any additional questions or concerns, be sure to consult the instruction manual or reach out to the manufacturer for further assistance.
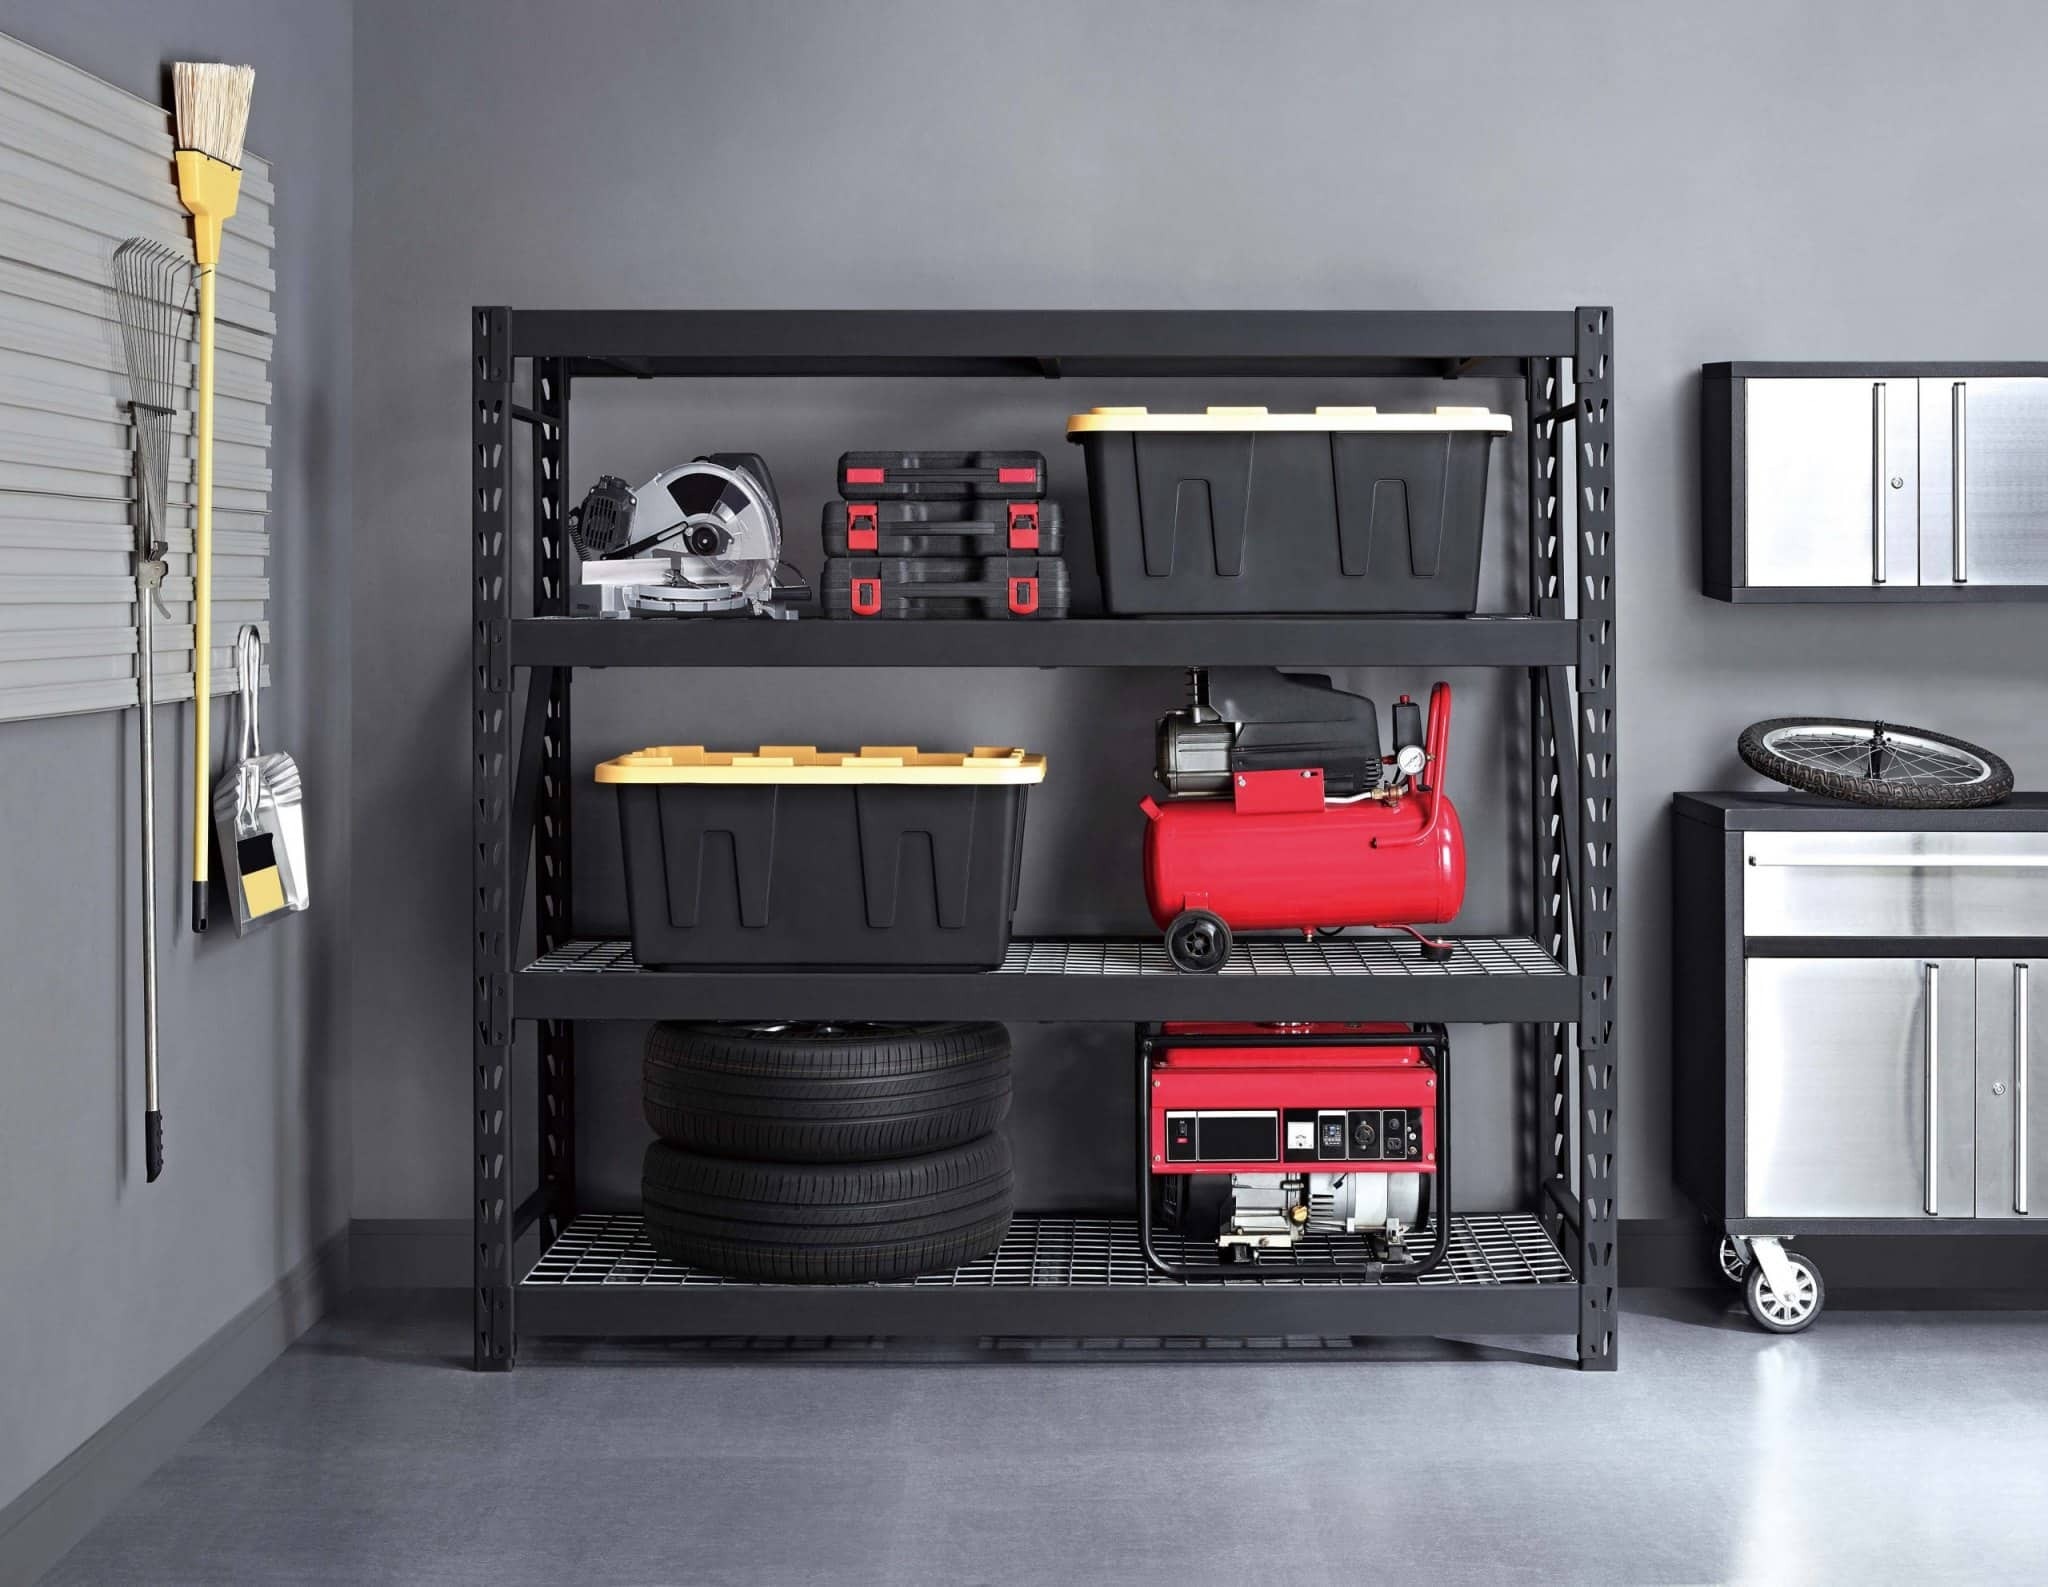
Step 10: Final Thoughts
Congratulations! You have successfully completed the assembly of your Whalen storage rack. By following the steps outlined in this guide, you have created a reliable and functional storage solution for your space. Here are a few final thoughts to consider:
- Organize your items: Take advantage of the newly assembled Whalen storage rack and organize your belongings in a systematic manner. Utilize the shelves, accessories, and any additional features to optimize storage space and keep everything tidy.
- Maintain the rack: Regularly inspect and maintain your Whalen storage rack to ensure its longevity. Check for loose bolts, clean the shelves, and address any issues promptly to keep the rack in optimal condition.
- Enjoy the benefits: Your Whalen storage rack provides easy access to your items and helps maximize the available space. Enjoy the convenience and efficiency it brings to your home, office, or garage.
- Share your experience: If you found this assembly guide helpful, consider sharing your experience with others. Leave reviews or provide feedback to assist future Whalen storage rack owners in their assembly process.
Remember, assembling the Whalen storage rack requires patience, attention to detail, and adherence to safety precautions. Take your time throughout the process to ensure a sturdy and secure final product. If you encounter any difficulties or have further questions, consult the instruction manual or reach out to the manufacturer for assistance.
Thank you for choosing Whalen and enjoy the enhanced organization and storage capabilities provided by your newly assembled Whalen storage rack!