
Overview of Wyze Cam
Wyze Cam is a popular and affordable home security camera that offers a wide range of features. It is a compact and versatile camera that allows you to monitor your home, office, or any other space remotely. With its easy installation process and user-friendly interface, Wyze Cam has gained a reputation as one of the top choices for budget-friendly security cameras.
Wyze Cam offers various models, including the Wyze Cam v2 and the Wyze Cam Pan. The v2 model is a stationary camera that provides a 1080p Full HD video feed with a wide viewing angle. On the other hand, the Wyze Cam Pan is a PTZ (pan-tilt-zoom) camera that allows you to control the camera’s movement remotely. Both models come with night vision capabilities, motion detection, and two-way audio, providing comprehensive monitoring options.
One of the key advantages of Wyze Cam is its affordability. Compared to other security camera brands, Wyze Cam offers similar features at a fraction of the cost. This makes it an ideal choice for users who are on a budget but still want reliable and high-quality surveillance for their homes or businesses.
In addition to its affordability, Wyze Cam also excels in terms of ease of use. The setup process is simple and can be completed within minutes. The cameras can be connected to your home Wi-Fi network, allowing you to access the live video feeds remotely using your smartphone or computer. The intuitive mobile app and web interface make it easy to navigate through the camera settings and customize your monitoring preferences.
Furthermore, Wyze Cam provides cloud storage options for video recordings. By subscribing to their cloud service, you can securely store footage and access it anytime from the app. This eliminates the need for physical storage devices and provides an added layer of security for your footage.
Overall, Wyze Cam is a reliable and affordable option for those seeking an efficient home security camera solution. With its easy setup process, excellent video quality, and user-friendly interface, it offers a satisfying experience for users of all technical backgrounds. Whether you want to keep an eye on your property, monitor your pets, or ensure the safety of your loved ones, Wyze Cam is a reliable companion that provides peace of mind.
Setting Up Wyze Cam
Setting up your Wyze Cam is a straightforward process that can be completed in a few simple steps. Follow the instructions below to get your Wyze Cam up and running:
1. Unbox the Wyze Cam: Start by unboxing your Wyze Cam and gathering all the necessary components. The packaging typically includes the camera, a USB cable, a power adapter, and any additional mounting accessories.
2. Connect the power cable: Connect the USB cable to the Wyze Cam and plug the other end into the power adapter. Make sure the camera is receiving power by checking that the LED indicator lights up.
3. Download the Wyze app: Open your smartphone’s app store (App Store for iOS or Google Play Store for Android) and search for the “Wyze” app. Download and install the app on your device.
4. Create a Wyze account: Open the Wyze app and sign up for a new account. Provide the required information, such as your email address and a secure password. Verify your account through the email confirmation sent by Wyze.
5. Add the camera: Launch the Wyze app and tap on the “+” icon to add a new device. Select the Wyze Cam model you have and follow the on-screen instructions to proceed.
6. Connect to Wi-Fi: During the setup process, you will be prompted to connect your Wyze Cam to your Wi-Fi network. Make sure you have the correct Wi-Fi credentials handy and follow the instructions to establish a connection between the camera and your home network.
7. Position the camera: Once the setup is complete, find an ideal location to position your Wyze Cam. You can choose to mount it on a wall or place it on a flat surface using the included mounting accessories. Ensure that the camera has a clear view of the area you want to monitor.
8. Customize settings: Open the Wyze app and access the camera settings to customize your preferences. You can enable motion detection, set up alerts, adjust camera sensitivity, and explore other features offered by the Wyze Cam.
By following these steps, you can successfully set up your Wyze Cam and begin enjoying its surveillance capabilities. The user-friendly interface of the Wyze app makes it easy to manage and control multiple cameras if you decide to expand your home security system. Experience peace of mind by having a reliable and affordable camera keeping an eye on what matters most to you.
Setting Up Roku TV
Setting up your Roku TV is a straightforward process that allows you to enjoy a wide range of streaming options on your television. Follow the steps below to set up your Roku TV:
1. Unbox and connect your Roku TV: Start by unboxing your Roku TV and gathering all the necessary components, including the power cord and remote control. Connect the power cord to your TV and plug it into an electrical outlet.
2. Turn on your Roku TV: Press the power button on your TV or use the power button on the remote control to turn on your Roku TV. Follow the on-screen instructions to select your language and country.
3. Connect to the internet: To access streaming services and content, you need to connect your Roku TV to the internet. Choose the wireless network you want to connect to and enter the password if prompted. Alternatively, you can use an Ethernet cable to connect your Roku TV directly to your router.
4. Update your Roku TV: During the initial setup, your Roku TV may check for software updates. If an update is available, allow your TV to download and install it. This ensures that you have the latest features and improvements for your Roku TV.
5. Create or link your Roku account: If this is your first time using a Roku device, you need to create a Roku account. Visit the Roku website and follow the instructions to set up an account. If you already have a Roku account, simply log in using your credentials.
6. Activate your Roku TV: Once you have set up your Roku account, your Roku TV will provide you with an activation code. Enter the code on the Roku website to activate your device.
7. Choose streaming channels: After activation, you can start adding your favorite streaming channels to your Roku TV. Access the Roku Channel Store from your TV’s home screen and browse through the wide range of free and paid channels available. Select the channels you want to install and follow the on-screen prompts to add them to your lineup.
8. Personalize your Roku TV: Customize your Roku TV by rearranging the channels on your home screen, changing the theme, or creating channel shortcuts. Use the Roku settings menu to adjust audio and display settings according to your preferences.
By following these steps, you can easily set up your Roku TV and start enjoying a vast selection of streaming content. From popular streaming services like Netflix and Hulu to free channels and specialized content, Roku TV provides a convenient and user-friendly way to stream your favorite shows and movies directly on your television.
Adding Wyze Cam App on Roku
If you want to view your Wyze Cam feeds directly on your Roku TV, you can do so by adding the Wyze Cam app. Follow the steps below to add the Wyze Cam app to your Roku:
1. Access the Roku Channel Store: From your Roku TV home screen, navigate to the Channel Store and select it.
2. Search for the Wyze Cam app: In the Channel Store, use the search function to find the Wyze Cam app. You can either type “Wyze Cam” in the search bar or browse through the available apps to locate it.
3. Select the Wyze Cam app: Once you have found the Wyze Cam app, select it from the search results or the available app options.
4. Install the Wyze Cam app: On the app details page, click on the “Add Channel” or “Install” button to download and install the Wyze Cam app on your Roku TV. The app will automatically be added to your list of installed channels.
5. Return to the Roku home screen: Press the “Home” button on your Roku remote to navigate back to the home screen of your Roku TV.
6. Launch the Wyze Cam app: Locate the newly installed Wyze Cam app on your Roku home screen. Select it by highlighting the app and pressing the “OK” or “Select” button on your remote.
7. Log in to your Wyze account: In the Wyze Cam app, you will be prompted to log in using your Wyze account credentials. Enter your email and password to access your Wyze Cam account.
8. Connect to your Wyze Cam: Once logged in, the Wyze Cam app on your Roku TV will display a list of the cameras associated with your Wyze account. Select the specific camera you want to view on your Roku TV.
9. View your Wyze Cam feeds on Roku: After selecting the camera, you will be able to view the live feed from your Wyze Cam directly on your Roku TV screen. Use the Roku remote to navigate through the Wyze Cam app and access additional features such as motion alerts, playback recordings, and camera settings.
By following these steps, you can easily add the Wyze Cam app to your Roku TV and conveniently view your Wyze Cam feeds on the big screen. Keep in mind that you need to have your Wyze Cam set up and connected to your Wyze account before adding the app to your Roku TV. Enjoy seamless monitoring of your Wyze Cam from the comfort of your living room with the Wyze Cam app on Roku.
Connecting Wyze Cam to Roku TV
In order to connect your Wyze Cam to your Roku TV and view the live feed on your television, you can use the casting feature available on the Wyze Cam mobile app. Follow the steps below to connect your Wyze Cam to your Roku TV:
1. Ensure your Wyze Cam is set up and connected to your Wi-Fi network. You should have the camera added to your Wyze Cam mobile app.
2. Make sure your Roku TV and your mobile device with the Wyze Cam app are connected to the same Wi-Fi network.
3. Open the Wyze Cam app on your mobile device and access the camera feed you want to display on your Roku TV.
4. Look for the casting icon: In the Wyze Cam app, locate the casting icon, which resembles a TV with waves coming out. This icon is usually located at the top-right corner of the screen.
5. Tap on the casting icon to initiate the connection process.
6. Select your Roku TV from the list of available devices: Your Wyze Cam mobile app will detect nearby devices that support casting. Choose your Roku TV from the list of available devices.
7. Confirm the connection on your Roku TV: Once you have selected your Roku TV from the list, you will see a prompt on your TV screen asking if you want to allow the connection. Use the Roku remote to navigate to the “Allow” option and press the OK button to confirm.
8. Display the Wyze Cam feed on your Roku TV: After confirming the connection, the live view from your Wyze Cam will be displayed on your Roku TV screen. Use your Roku remote to adjust the display settings, such as zoom and aspect ratio, if necessary.
9. Control the camera feed: While viewing the Wyze Cam feed on your Roku TV, you can still control the camera using the Wyze Cam mobile app. This includes panning, tilting, zooming, and enabling or disabling motion tracking.
By following these steps, you can easily connect your Wyze Cam to your Roku TV and enjoy the live feed from your camera on the big screen. This provides a convenient way to monitor your home or any other space directly from your television. Whether you want to keep an eye on your baby, check on your pets, or ensure the security of your property, connecting your Wyze Cam to your Roku TV allows for seamless surveillance.
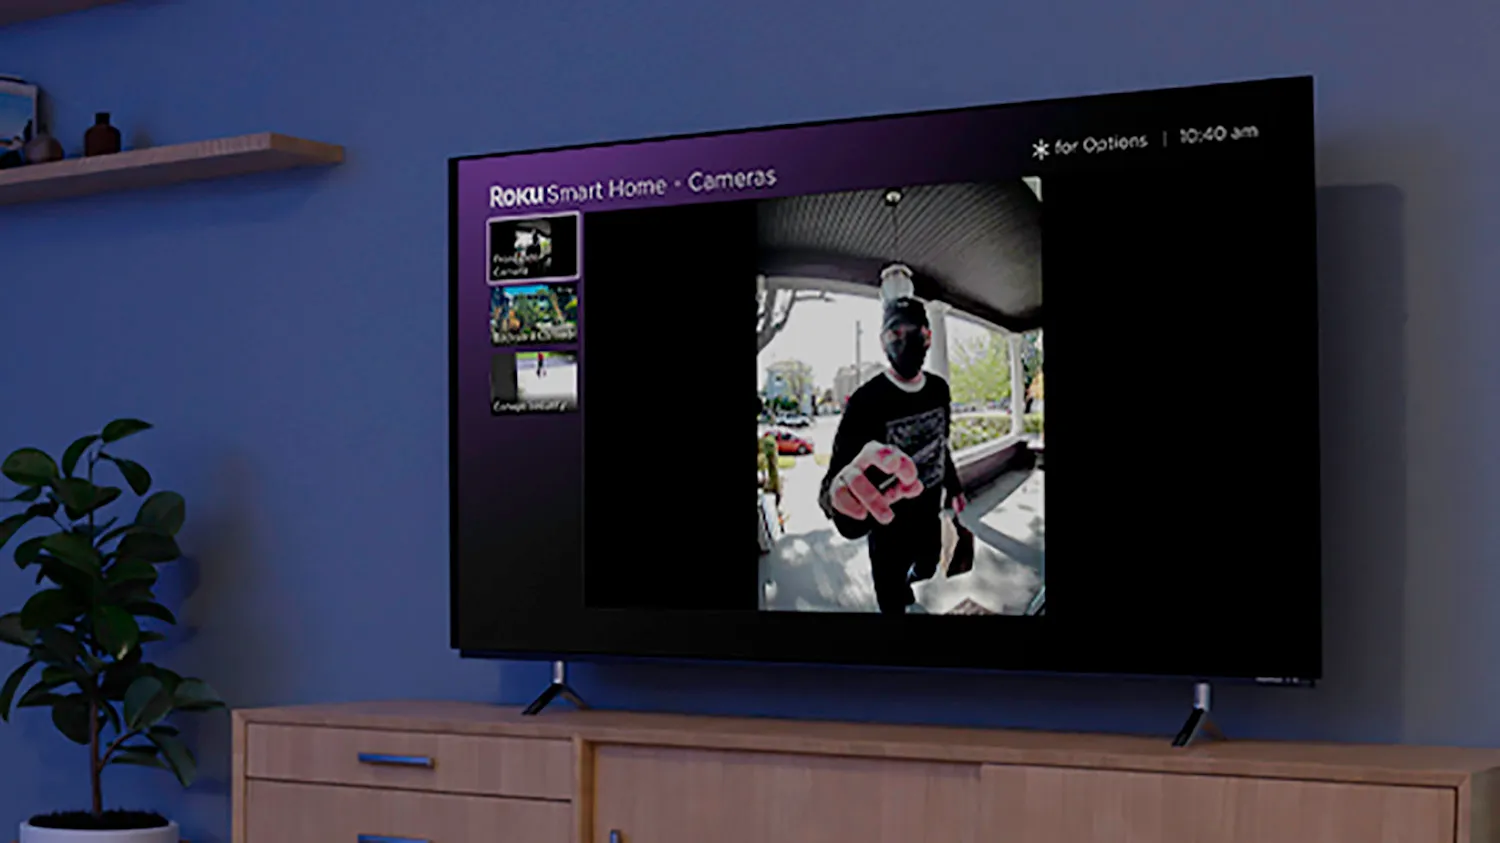
Viewing Wyze Cam on Roku TV
Once you have successfully connected your Wyze Cam to your Roku TV, you can easily view the live feed from your camera on your television screen. Here’s how you can enjoy viewing your Wyze Cam on your Roku TV:
1. Ensure your Wyze Cam and Roku TV are connected and set up properly. Both devices should be on the same Wi-Fi network.
2. Turn on your Roku TV and navigate to the home screen using your Roku remote.
3. Locate the Wyze Cam app icon on your Roku TV home screen. Use the navigation buttons on your remote to highlight it.
4. Press the “OK” button on your Roku remote to launch the Wyze Cam app.
5. You will see a list of the Wyze Cam cameras associated with your Wyze account. Select the camera you want to view by highlighting it and pressing the “OK” button on your remote.
6. The live feed from your selected Wyze Cam will now be displayed on your Roku TV screen. You can use the Roku remote to adjust the volume, zoom in or out, and navigate through any available camera settings.
7. To exit the Wyze Cam app and return to the Roku home screen, simply press the “Home” button on your Roku remote.
While viewing your Wyze Cam on your Roku TV, keep in mind that you may experience a slight delay in the live feed due to network latency. This delay is normal and should not cause any significant issues with monitoring your home or desired area.
Additionally, if you have multiple Wyze Cams set up, you can switch between cameras within the Wyze Cam app on your Roku TV. This allows you to monitor different areas without the need for additional screens or devices.
With the convenience of viewing your Wyze Cam on your Roku TV, you can easily keep an eye on your home, pets, or loved ones on the big screen. The seamless integration between Wyze Cam and Roku TV provides a user-friendly and immersive surveillance experience, ensuring you have peace of mind and enhanced security.
Troubleshooting Wyze Cam on Roku TV
If you encounter any issues while trying to view your Wyze Cam on your Roku TV, there are a few troubleshooting steps you can take to resolve the problem. Here are some common troubleshooting tips:
1. Check the network connection: Ensure that both your Wyze Cam and Roku TV are connected to the same Wi-Fi network. Verify that both devices have a stable internet connection and are within range of your Wi-Fi router.
2. Restart your devices: Sometimes, a simple reboot can resolve technical glitches. Turn off your Wyze Cam, Roku TV, and Wi-Fi router. Wait for a few seconds, then power them back on. Allow the devices to boot up and reconnect to the network.
3. Update firmware and app versions: Check for any available firmware updates for your Wyze Cam and ensure that you have the latest version of the Wyze Cam app installed on your Roku TV. Outdated firmware or app versions can cause compatibility issues.
4. Verify the Wyze Cam account login: Double-check that you have entered the correct Wyze account credentials in the Wyze Cam app on your Roku TV. Invalid login information can prevent the app from displaying the live feed properly.
5. Confirm camera visibility: In the Wyze Cam app, ensure that the camera you want to view is still added to your account. If it has been removed or disconnected, you will need to re-add the camera and follow the setup process again.
6. Check camera compatibility: Confirm that your specific Wyze Cam model is supported by the Wyze Cam app on Roku TV. Certain older or less common models may not be compatible with the app.
7. Adjust camera settings: Use the Wyze Cam app on your mobile device to adjust camera settings, such as resolution, frame rate, or night vision settings. Making changes to these settings may improve the performance and compatibility with your Roku TV.
8. Consult Wyze support: If you have tried the troubleshooting steps above and are still experiencing issues, reach out to Wyze support for further assistance. They can provide you with personalized troubleshooting advice or address any potential hardware or software issues.
By following these troubleshooting tips, you should be able to resolve most common issues when trying to view your Wyze Cam on your Roku TV. Enjoy the convenience of monitoring your home or desired area directly from your television screen with Wyze Cam and Roku TV.