
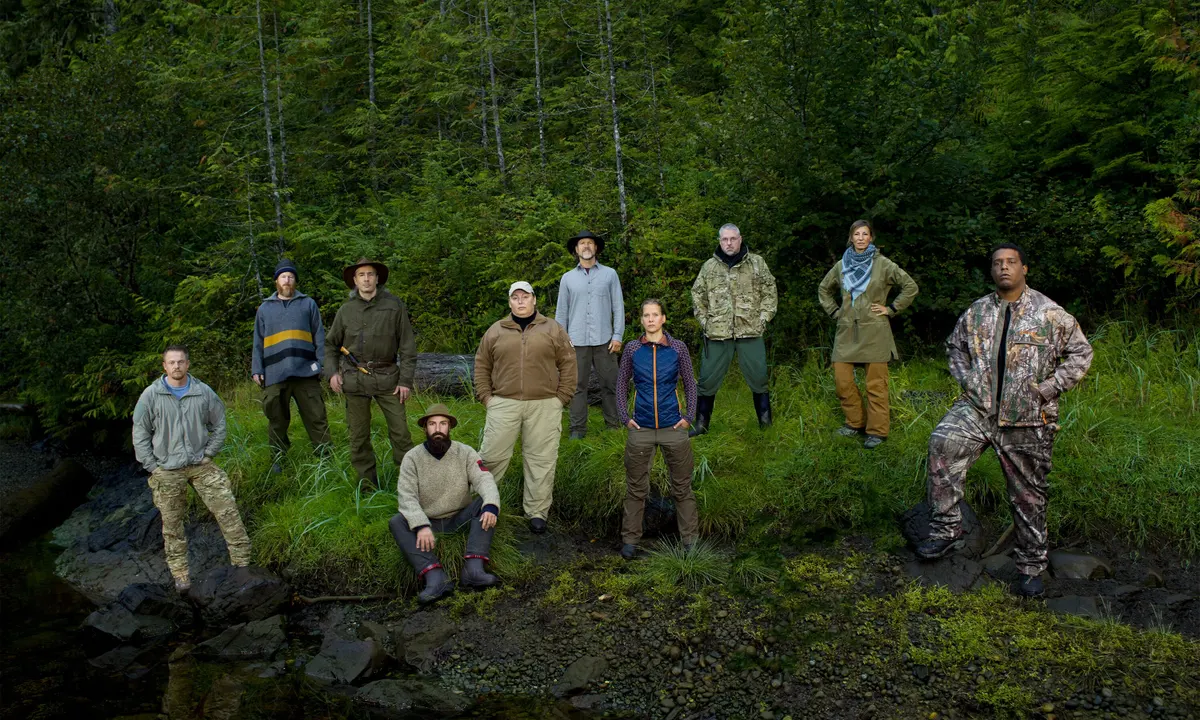
What is Alone Australia?
Alone Australia is a captivating reality TV show that puts contestants to the ultimate survival test. Based on the popular format of the “Alone” series, this Australian version takes a group of skilled and courageous individuals and drops them off in the remote wilderness, completely alone. Their mission? To survive for as long as possible using only their ingenuity and limited supplies.
The contestants on Alone Australia face a myriad of challenges, including harsh weather conditions, limited food resources, and constant isolation. With minimal equipment and the need to hunt, forage, and build their own shelter, each participant must tap into their inner resilience and adaptability to endure the unforgiving Australian wilderness.
Over the course of the series, viewers witness the physical and mental struggles that the contestants face. From battling hunger and exhaustion to overcoming feelings of loneliness and fear, the journey of the contestants on Alone Australia offers a gripping and thrilling viewing experience.
The show not only highlights the incredible survival skills of everyday people but also showcases the beauty and harshness of the Australian outback. Viewers are treated to stunning landscapes, diverse wildlife, and a glimpse into the raw power of nature.
Alone Australia is an immersive and compelling show that tests the limits of human endurance and showcases the triumph of the human spirit. Whether you’re a fan of survival shows or simply love exploring the vastness of the Australian wilderness, Alone Australia is bound to captivate and inspire viewers.
Why can’t I watch Alone Australia in the US?
As an avid fan of Alone Australia residing in the US, you may be disappointed to learn that accessing the show can be a challenging task. The primary reason why you can’t watch Alone Australia in the US is due to geographic restrictions imposed by streaming platforms and content licensing agreements.
Alone Australia is produced and aired by a specific streaming platform that has acquired the rights to broadcast the show exclusively in Australia. This means that the streaming service is legally bound to restrict access to viewers located outside of Australia. The purpose behind these restrictions is to protect the distribution rights and to ensure that the content remains exclusive to the intended audience.
Additionally, streaming platforms often employ geo-blocking technology, which detects a viewer’s location based on their IP address. When you access the streaming platform from the US, the technology detects that you are outside of the allowed region and blocks your access to the content. This is done to comply with international copyright laws and licensing agreements.
While it may be discouraging to encounter these regional limitations, it’s important to note that they are put in place to protect the rights and revenue of content creators and distributors.
However, all hope is not lost as there are ways to bypass these restrictions and enjoy watching Alone Australia in the US. Keep reading to discover a solution that will allow you to access the show and indulge in the thrilling adventures of the contestants in the Australian wilderness.
Using a VPN to watch Alone Australia in the US
If you’re determined to watch Alone Australia in the US, one effective solution is to use a Virtual Private Network (VPN). A VPN allows you to bypass geographic restrictions by masking your IP address and making it appear as though you are accessing the internet from a different location.
Here are the steps you can follow to watch Alone Australia in the US using a VPN:
Step 1: Choose a reliable VPN service
Start by selecting a reputable VPN service that offers servers in Australia. Look for a VPN provider that has a track record of reliable connections, fast speeds, and robust encryption to ensure a secure and smooth streaming experience.
Step 2: Install the VPN on your device
Download and install the VPN software or app on the device you plan to use for streaming. Most VPN providers offer applications for various devices, including computers, smartphones, and tablets.
Step 3: Connect to a server in Australia
Launch the VPN app and connect to a server located in Australia. This will assign you an Australian IP address, fooling the streaming platform into believing you are accessing it from within the country.
Step 4: Clear your browser cookies and cache
Before accessing the streaming platform, clear your browser cookies and cache to ensure a fresh start.
Step 5: Visit the streaming platform and sign up/log in
Head to the streaming platform’s website and sign up for an account if you don’t already have one. If you have an existing account, log in using your credentials.
Step 6: Start streaming Alone Australia in the US
Once you’re logged in with the VPN connected, you should now have unrestricted access to watch Alone Australia in the US. Sit back, relax, and enjoy the thrilling survival adventures!
Using a VPN is a reliable and effective method to bypass the geo-blocking restrictions and access geo-restricted content like Alone Australia. However, it’s important to note that the legality of using a VPN to circumvent regional restrictions may vary in different countries, so it’s important to familiarize yourself with your local laws.
Step 1: Choose a reliable VPN service
When it comes to accessing geo-restricted content like Alone Australia in the US, choosing the right VPN service is crucial. With numerous options available in the market, it’s important to select a reliable VPN provider that meets your needs and ensures a seamless streaming experience.
Here are some factors to consider when choosing a VPN service:
1. Reputation and Reviews
Start by researching the reputation of different VPN providers. Look for providers that have positive reviews and a track record of delivering reliable and secure connections. Reading user experiences and expert reviews can help you narrow down your options.
2. Server Locations
Check if the VPN service has servers located in Australia. Having servers in the desired country ensures that you can connect to an Australian server and obtain an Australian IP address, enabling access to Alone Australia.
3. Connection Speed and Bandwidth
Streaming requires a stable and high-speed internet connection. Look for VPN services that offer fast speeds and sufficient bandwidth to ensure smooth streaming without buffering or lagging.
4. Device Compatibility
Consider the devices you plan to use for streaming Alone Australia. Ensure that the VPN service supports your devices, whether it’s a computer, smartphone, tablet, or Smart TV.
5. Security and Privacy Features
Opt for a VPN provider that offers robust security features, such as strong encryption protocols, a strict no-logs policy, and a kill switch that ensures your connection remains secure even if the VPN connection drops.
6. User-Friendly Interface
A user-friendly VPN interface makes it easier for you to connect and switch between servers. Look for providers that offer intuitive apps or software with a simple and straightforward interface.
By considering these factors and reading through user reviews and expert recommendations, you can choose a reliable VPN service that ticks all the boxes. Remember, the right VPN service will provide you with the necessary tools to watch Alone Australia in the US and unlock a world of exciting survival adventures.
Step 2: Install the VPN on your device
After selecting a reliable VPN service to watch Alone Australia in the US, the next step is to install the VPN software or app on your device. Whether you plan to stream on a computer, smartphone, or tablet, installing the VPN is a straightforward process.
Follow these steps to install the VPN on your device:
1. Choose the compatible VPN app/software:
Check the VPN provider’s website to determine which app or software is compatible with your device. Most VPN providers offer applications for various operating systems, such as Windows, macOS, iOS, and Android. Download the appropriate software for your device.
2. Download and install the VPN software:
Once you have chosen the correct software, click on the download link provided on the VPN provider’s website. The software should start downloading automatically. After the download is complete, run the installer to initiate the installation process. Follow the on-screen instructions to complete the installation.
3. Launch the VPN app/software:
After the installation is complete, locate the VPN app/software on your device. Launch the application by double-clicking the icon or tapping on the app’s icon on your home screen. The VPN app/software interface should open, ready for you to connect to a server.
4. Log in or sign up for the VPN:
When you open the VPN app/software for the first time, you will typically be prompted to log in with your VPN account credentials. If you haven’t already created an account, follow the sign-up process provided by the VPN provider to register for an account.
5. Connect to a server:
Once you are logged in, you will be presented with a list of available servers. Choose a server located in Australia to obtain an Australian IP address. Click or tap on the server to initiate the connection.
6. Verify the connection:
After a few seconds, the VPN app/software should establish a connection to the chosen server. You can verify the successful connection by checking the VPN application/interface, where it will display your new IP address and the connected server’s location.
Congratulations! You have now successfully installed the VPN on your device and established a connection to an Australian server. You are one step closer to watching Alone Australia in the US. Proceed to the next step to learn how to access the show and start streaming!
Step 3: Connect to a server in Australia
Now that you have installed the VPN software or app on your device, it’s time to connect to a server located in Australia. By doing so, you will acquire an Australian IP address, tricking the streaming platform into thinking you are accessing it from within the country. This step is crucial to unlock access to Alone Australia in the US.
Follow these steps to connect to a server in Australia:
1. Launch the VPN app/software:
Locate the VPN app/software on your device and open it. You will be presented with the VPN interface, where you can manage your connection and server selection.
2. Choose a server in Australia:
Within the VPN interface, look for the option to select a server. Depending on the VPN app/software you are using, this option may be represented by a dropdown menu or a list of available server locations. Search for a server located in Australia and select it.
3. Initiate the connection:
Once you have selected a server in Australia, click or tap on the connect button to initiate the connection. The VPN app/software will establish a secure and encrypted connection with the selected server.
4. Verify the connection:
After a few moments, the VPN app/software should display a notification or indicator signaling a successful connection to the server in Australia. This indicates that you now have an Australian IP address.
5. Check your IP address:
To ensure that your IP address has changed to an Australian one, you can visit a website that displays your current IP address. Use a search engine to find a reliable IP address checking website, and verify that your IP address is now associated with Australia.
6. Run a test:
To ensure a stable connection and optimal streaming experience, it is recommended to run a quick speed test. There are several online speed testing tools available that can help you assess the connection speed and latency of your VPN server in Australia.
Congratulations! You have successfully connected to a server in Australia using your VPN, and now possess an Australian IP address. You are now ready to access the streaming platform and indulge in the exhilarating survival adventures of Alone Australia in the US. Proceed to the next step to learn how to clear your browser’s cookies and cache for a fresh streaming experience.
Step 4: Clear your browser cookies and cache
Before accessing the streaming platform to watch Alone Australia in the US, it’s essential to clear your browser’s cookies and cache. This step ensures that you have a fresh start and reduces the chances of encountering any compatibility issues or conflicts with the streaming platform.
Follow these steps to clear cookies and cache in your browser:
1. Open your browser’s settings:
Launch your preferred web browser and click on the menu icon located in the top-right or top-left corner. From the dropdown menu, select the “Settings” or “Preferences” option.
2. Access the privacy and security settings:
Within the settings menu, locate the section related to privacy or security. Depending on the browser you are using, this section may have different names, such as “Privacy,” “Security,” or “Clear Browsing Data.”
3. Clear browsing data:
Under the privacy or security settings, you should find an option to clear browsing data. Click or tap on this option to continue.
4. Select the desired data to clear:
A new window or tab will open, presenting you with various options for clearing browsing data. Make sure to select the checkboxes next to “Cookies” and “Cached images and files.” You can also choose to clear other data if desired.
5. Clear the selected data:
Once you have chosen the desired data to clear, click or tap on the “Clear” or “Delete” button. The browser will start clearing the selected data.
6. Restart your browser:
After the data has been cleared, close and reopen your browser to ensure that the changes take effect.
By clearing your browser’s cookies and cache, you eliminate any stored data that might interfere with your streaming experience. This step provides a fresh start, allowing you to access the streaming platform and watch Alone Australia in the US without any potential complications arising from cached data or conflicting settings.
You’re now ready to move on to the next step, where you’ll learn how to visit the streaming platform and sign up/log in to access the show. Keep following the steps to unlock the thrilling survival adventures of Alone Australia!
Step 5: Visit the streaming platform and sign up/log in
With your VPN connected, server in Australia selected, and your browser’s cookies and cache cleared, it’s time to visit the streaming platform where Alone Australia is hosted. Follow these steps to access the platform, sign up if necessary, or log in to your existing account and get ready to start streaming.
Follow these steps to visit the streaming platform and sign up/log in:
1. Open your web browser:
Launch your preferred web browser that you cleared the cookies and cache for in the previous step.
2. Enter the streaming platform’s website URL:
Type in the URL of the streaming platform where Alone Australia is hosted. If you are unsure of the exact URL, you can search for it using a search engine. Make sure to select the official website of the streaming platform to ensure a safe and secure viewing experience.
3. Access the sign-up or log-in page:
Once you land on the streaming platform’s website, look for options to sign up or log in. If you don’t have an account, click on the sign-up option and follow the prompts to create a new account. If you already have an account, click on the log-in option and enter your credentials to access your existing account.
4. Provide the required information:
During the sign-up process, you may be asked to provide certain information such as your name, email address, and a secure password. Follow the provided instructions and enter the required information accurately.
5. Verify your account (if necessary):
Depending on the streaming platform, you may need to verify your account through a verification email that is sent to the email address you provided during sign-up. Follow the instructions in the email to complete the verification process.
6. Log in to your account:
If you already have an account, enter your login credentials (username/email and password) to access your account on the streaming platform.
Once you have signed up or logged in successfully, you are now ready to explore the streaming platform’s library and start watching Alone Australia in the US. Enjoy the thrilling adventures of the contestants as they navigate the Australian wilderness and put their survival skills to the test!
Step 6: Start streaming Alone Australia in the US
Now that you have successfully logged in to the streaming platform, it’s time to begin streaming Alone Australia in the US. With your VPN connected to a server in Australia and your account ready, follow these steps to access the show and start enjoying the thrilling survival adventures:
Follow these steps to start streaming Alone Australia:
1. Browse the available content:
Explore the streaming platform’s interface and navigate to the section that displays available TV shows or search for Alone Australia specifically using the platform’s search feature.
2. Select Alone Australia:
Once you have located Alone Australia, click on its title or image to access the show’s dedicated page.
3. Check streaming options:
On the show’s page, you may find different streaming options available, such as selecting a specific season or episode. Choose the desired option to begin streaming.
4. Click on the play button:
After selecting the desired season or episode, click on the play button to start streaming Alone Australia in the US.
5. Enjoy the show:
Sit back, relax, and immerse yourself in the exciting survival adventures of Alone Australia. Witness the contestants’ determination, resourcefulness, and resilience as they face the challenges posed by the Australian wilderness.
6. Adjust the video quality (optional):
If you experience any buffering or playback issues, you can adjust the video quality settings within the streaming platform’s player. Lowering the video quality can help improve the streaming experience on slower internet connections.
7. Keep the VPN connected:
While streaming Alone Australia, ensure that your VPN connection remains active and connected to the server in Australia. Disconnecting from the VPN may result in the streaming platform detecting your actual location and restricting access to the content.
Congratulations! You have successfully started streaming Alone Australia in the US. Sit back, relax, and enjoy the thrilling and suspenseful journeys of the contestants as they push themselves to the limits to survive in the Australian wilderness.
Other options to watch Alone Australia in the US
If using a VPN to watch Alone Australia in the US is not a viable option for you, there are alternative methods to access the show and enjoy the gripping survival adventures of Alone Australia. Here are a few other options you can explore:
Option 1: Use a Smart DNS proxy
A Smart DNS proxy is another tool that can help bypass geographic restrictions. This method doesn’t encrypt your internet traffic like a VPN does, but it allows you to alter your DNS settings to make it appear as though you’re accessing the streaming platform from a different location. Look for reputable Smart DNS proxy providers that offer access to Australian servers to watch Alone Australia in the US.
Option 2: Find alternative streaming platforms
If the streaming platform that exclusively hosts Alone Australia is not accessible in the US, consider looking for alternative platforms that may have acquired the rights to the show in your region. Research different streaming services and check if they offer Alone Australia as part of their content library. Keep in mind that availability may vary depending on licensing agreements and regional restrictions.
Option 3: Look for unofficial streaming sources
While not recommended, there may be unofficial streaming sources where you can find episodes of Alone Australia. These sources may not be legal or reliable, so exercise caution when using them. Be aware that unofficial sources may have poor video quality, contain malware or adware, and violate copyright laws. It is always best to rely on legal streaming platforms to support the creators and ensure a safe and high-quality viewing experience.
Remember to research and assess the risks associated with any alternative methods you choose to use. Be cautious of potential scams, malware, and copyright infringement issues. It’s important to prioritize your online security and respect intellectual property rights while trying to access Alone Australia or any other geo-blocked content.
By exploring these options, you may find a solution that allows you to watch Alone Australia in the US and embark on a thrilling journey into the Australian outback alongside the courageous contestants.
Option 1: Use a Smart DNS proxy
If using a VPN is not the right solution for you to watch Alone Australia in the US, an alternative method to consider is using a Smart DNS proxy. A Smart DNS proxy allows you to bypass geographic restrictions by altering your DNS settings, making it appear as though you’re accessing the streaming platform from a different location. Here’s how you can use a Smart DNS proxy to access Alone Australia in the US:
1. Find a reputable Smart DNS proxy provider:
Start by researching and selecting a reliable Smart DNS proxy provider that supports bypassing regional restrictions for streaming platforms. Look for providers that offer access to Australian servers, as you’ll need to make it seem like you’re accessing the streaming platform from within Australia.
2. Set up the Smart DNS proxy:
Once you’ve chosen a Smart DNS proxy provider, follow their instructions to set up the proxy on your device. This usually involves changing the DNS settings on your device or router. Detailed setup guides are usually provided by the proxy provider to assist you through the process.
3. Configure your device’s DNS settings:
Access the network settings on your device and locate the DNS settings. Replace the default DNS server addresses with the DNS server addresses provided by the Smart DNS proxy provider.
4. Restart your device:
After configuring the DNS settings, restart your device. This will ensure that the changes take effect and activate the Smart DNS proxy.
5. Access the streaming platform:
With the Smart DNS proxy configured and activated on your device, visit the streaming platform’s website. It should now recognize your device as accessing it from within Australia, allowing you to watch Alone Australia in the US without any geographic restrictions.
Using a Smart DNS proxy can be a convenient and straightforward method to access geo-blocked content, including Alone Australia. However, it’s important to note that this method doesn’t provide the same level of security and privacy as a VPN. Furthermore, not all streaming platforms may be compatible with Smart DNS proxies, so it’s essential to check compatibility before proceeding.
By following these steps and using a reliable Smart DNS proxy provider, you can potentially enjoy watching Alone Australia in the US, immersing yourself in the thrilling survival challenges faced by the contestants Down Under!
Option 2: Find alternative streaming platforms
If the streaming platform exclusively hosting Alone Australia is inaccessible in the US, another option to consider is finding alternative streaming platforms that may have acquired the rights to the show in your region. Here are some steps to help you explore alternative platforms and potentially watch Alone Australia in the US:
1. Research streaming services:
Start by researching different streaming services available in your region. Look for platforms that offer a wide range of TV shows and documentaries, especially those focused on survival, adventure, or reality TV genres. Take note of the platforms that are known for acquiring international content.
2. Check content libraries:
Once you have identified potential streaming platforms, browse through their content libraries or use the search function to see if Alone Australia is listed. Check for any available seasons or episodes of the show in their catalogue. Some platforms may have exclusive streaming rights for different regions.
3. Consider subscription requirements:
Before signing up for any streaming service, take into account any subscription fees or membership requirements. Compare pricing plans, available trial periods, and cancellation policies to find the best value and flexibility.
4. Read user and expert reviews:
It’s helpful to read reviews and ratings of the streaming platforms you’ve shortlisted. Look for feedback on the platform’s user interface, streaming quality, and content selection. User reviews can provide insights into user experiences, while expert reviews can offer a more in-depth analysis of the platform’s features and performance.
5. Take advantage of free trials:
If the streaming platform offers a free trial period, make sure to take advantage of it. Use this opportunity to explore the platform’s content library and determine if Alone Australia is available for streaming. Be aware of the trial duration and cancellation requirements to avoid unnecessary charges.
6. Subscribe and start streaming:
If you find a streaming platform that offers Alone Australia in the US, and it meets your preferences and requirements, go ahead and subscribe to the service. Follow the registration process, provide any necessary payment details, and start streaming the show as per their available options.
By exploring alternative streaming platforms, you may discover a platform that has obtained the rights to stream Alone Australia in your region. Keep in mind that availability may vary depending on licensing agreements, so some platforms may have exclusive rights to the show in certain countries.
Enjoy your quest to find and watch Alone Australia in the US on alternative streaming platforms, and immerse yourself in the captivating survival challenges faced by the contestants!
Option 3: Look for unofficial streaming sources
Please note that engaging with unofficial streaming sources may pose risks, including malware, poor video quality, and legal consequences due to copyright infringement. It is recommended to use legal and legitimate sources to support the creators and ensure a safe and high-quality viewing experience. However, if you still choose to proceed with unofficial streaming sources, here are some steps to consider:
1. Exercise caution:
Looking for unofficial streaming sources comes with inherent risks. Be cautious and aware that these sources are not authorized and may engage in illegal activities. Proceed at your own risk and take precautions to protect your device and personal information.
2. Research sources:
Before exploring unofficial streaming sources, do thorough research. Read reviews or seek recommendations from trusted sources to identify potentially reliable sources. Look for feedback on the streaming quality, reliability, and safety of the platforms you come across.
3. Verify legitimacy:
Be cautious of fraudulent streaming sources that mimic legitimate platforms. Verify the legitimacy of a streaming source before accessing or providing any personal information. Look for signs of reliability, such as clear contact information, secure payment options, and positive user reviews.
4. Consider ad-blockers and anti-malware software:
Unofficial streaming sources are often associated with intrusive ads and malicious software. Protect your device by installing ad-blockers and anti-malware software, ensuring a safer browsing experience and reducing the risk of malware infections.
5. Be prepared for poor quality:
Unofficial streaming sources may offer lower video quality compared to legitimate platforms. Brace yourself for potential buffering, pixelation, or audio/video synchronization issues that may detract from your viewing experience.
6. Understand the legal implications:
Unofficial streaming sources often infringe on copyright laws, putting you at risk of legal consequences. It is important to understand that accessing and utilizing these sources is against the law in many jurisdictions. Familiarize yourself with the copyright laws in your country and consider the potential consequences before proceeding.
While unofficial streaming sources may provide access to content like Alone Australia, it is always recommended to support content creators and access shows through legal channels. Streaming options such as VPNs or alternative platforms offer a safer, more reliable, and legal method to enjoy your favorite TV shows.
Remember, the choice to use unofficial streaming sources is made at your own risk, and it is important to prioritize your online safety and comply with copyright laws to protect yourself and the content creators.
![How Does Disney + Works and How Much It Cost [Explained]](https://citizenside.com/wp-content/uploads/2020/05/disney-plus-300x200.jpg)