
Supplies Needed
Before you begin cleaning your leather watch band, it’s important to gather all the necessary supplies. Having everything at hand will make the process smooth and efficient. Here are the essential items you will need:
- A soft-bristled brush or toothbrush
- A clean microfiber cloth
- Mild dish soap or leather cleaner
- A small bowl or container
- Warm water
- A soft towel
- Leather conditioner (optional)
The soft-bristled brush or toothbrush will be used to remove any surface debris or dirt from the leather strap. Make sure it is clean and free from any residues.
A clean microfiber cloth will come in handy for wiping off excess moisture, cleaning solutions, and for gently buffing the strap.
Mild dish soap or a specific leather cleaner is crucial for cleaning the strap effectively. These products are gentle enough to not damage the leather while effectively removing dirt and stains.
The small bowl or container will be used to prepare the cleaning solution. Make sure it is large enough to accommodate the strap.
Warm water is needed to create the cleaning solution and rinse off the strap. Ensure that the water is not too hot, as it may damage the leather.
A soft towel will be useful for drying the strap after cleaning. Make sure it is clean and absorbent.
Lastly, leather conditioner is optional but highly recommended. It helps restore any lost moisture and suppleness to the strap, keeping it looking and feeling its best.
By gathering these supplies beforehand, you’ll be well-equipped to clean your leather watch band effectively and efficiently.
Step 1: Prep
Before diving into the cleaning process, it’s important to properly prepare both yourself and your leather watch band. This step sets the foundation for a successful cleaning session. Here’s what you need to do:
Start by finding a clean and well-lit workspace. Cleaning your leather watch band in an area with good lighting will help you identify any stains or areas that require extra attention.
Next, remove the watch from the band if possible. This will allow you to clean the strap more effectively and prevent any damage to the watch itself. If the watch cannot be removed, take extra care to avoid getting it wet or exposing it to cleaning products.
Ensure that your hands are clean and dry before handling the strap. This prevents any dirt or oils from transferring onto the leather.
Take a moment to assess your leather watch band. Look for any major stains, scratches, or areas of concern. This will help you determine the best course of action for cleaning and any specific attention those areas may require.
If your leather strap is excessively dirty or has stubborn stains, it’s a good idea to test the cleaning solution on a small, inconspicuous area of the strap first. This will help ensure that the solution doesn’t cause any adverse reactions or damage the leather.
Lastly, gather all the supplies you’ll need for the cleaning process. Having everything within reach will make the cleaning process more efficient, preventing any disruptions as you work.
By taking the time to properly prep, you’re setting yourself up for success in cleaning your leather watch band. It’s always better to be prepared and have a clear plan before starting any task.
Step 2: Remove the Strap
Once you have prepped your workspace and assessed the condition of your leather watch band, it’s time to remove the strap. This step allows for thorough cleaning without the risk of damaging the watch. Here’s how to remove the strap:
Start by flipping the watch over and looking for the spring bars that attach the strap to the watch case. These metal bars hold the strap in place and can be released with a little pressure.
Locate the small indentations on each side of the watch lugs where the spring bars are inserted. Use a spring bar tool or a small, flat-tipped screwdriver to carefully push down on the spring bar. Apply gentle pressure until the spring bar disengages from the lug. Repeat the process for the other side of the strap.
Once both spring bars have been released, you’ll be able to easily slide the strap off the watch case.
Be mindful of the spring bars as you remove the strap, as they can sometimes be spring-loaded and shoot out unexpectedly. To prevent loss or damage, place your hand over the strap as you slide it off the case.
Set the watch aside in a safe place, away from any cleaning solutions or water.
If your strap has a deployment clasp or buckle, there may be additional steps required to remove it. Consult the manufacturer’s instructions or refer to online resources for specific guidance on removing these types of clasps.
By taking the time to remove the strap properly, you’ll ensure that both the strap and the watch remain undamaged during the cleaning process. This step allows for a more thorough and effective cleaning, ensuring a beautifully refreshed leather watch band.
Step 3: Brushing Off Debris
Before immersing your leather watch band in any cleaning solution, it’s important to remove any surface debris or dirt. This step will help prevent further scratching or damage to the leather during the cleaning process. Here’s how to brush off debris from your strap:
Start by holding the leather watch band securely in one hand, ensuring a firm grip.
Take a soft-bristled brush or a toothbrush specifically designated for cleaning purposes. The bristles should be gentle enough to avoid scratching the leather but firm enough to effectively remove debris.
Gently brush the entire surface of the strap, paying close attention to any crevices or textures. Use gentle, controlled strokes to remove any dust, dirt, or other particles from the leather.
Be careful not to brush too vigorously, as excessive force can cause the bristles to scratch or damage the leather. A light touch is all that’s needed to dislodge debris without harming the strap.
For stubborn debris or dirt in hard-to-reach areas, such as between the stitching or around the buckle, use a toothpick or a soft, lint-free cloth to carefully remove it.
If your leather watch band has a suede or nubuck finish, avoid using a brush and instead, lightly rub the strap with a soft cloth.
Once you have thoroughly brushed off all debris from the strap, inspect it to ensure it is clean and ready for the next step in the cleaning process.
By taking the time to brush off debris, you’re ensuring that the cleaning solution can work more effectively and that you’re not unintentionally rubbing dirt into the leather. This step sets the stage for a thorough and successful cleaning of your leather watch band.
Step 4: Cleaning Solution
Now that you have successfully brushed off debris from your leather watch band, it’s time to prepare a suitable cleaning solution. This solution will help remove stains, dirt, and oils that may have accumulated on the strap over time. Follow these steps to create a gentle yet effective cleaning solution:
Start by filling a small bowl or container with warm water. The water should be warm to the touch but not too hot, as excessive heat can damage the leather.
Add a small amount of mild dish soap or a specific leather cleaner to the water. Be cautious not to use too much soap, as it may leave a residue on the strap. Follow the manufacturer’s instructions for the appropriate ratio of soap to water.
Gently swirl the water to create a soapy mixture, ensuring that the soap is thoroughly dissolved.
Test the cleaning solution on a small, inconspicuous area of the strap to check for any adverse reactions. Apply a tiny amount of the solution and gently rub it into the leather with a clean cloth. If there are no negative effects, you can proceed with confidence.
If you don’t have a specific leather cleaner, mild dish soap can be used as an alternative. However, be aware that not all dish soaps are suitable for leather, so it’s important to choose a mild and gentle variety without any harsh chemicals.
Remember that different types of leather may react differently to cleaning solutions. It’s always best to consult the manufacturer’s recommendations or seek guidance from a professional if you have any concerns.
By creating a suitable cleaning solution and testing it on a small area of the strap, you’re ensuring that the cleaning process will be safe and effective for your leather watch band. This step sets the stage for a thorough and successful cleaning.
Step 5: Soaking the Strap
After preparing the cleaning solution, it’s time to immerse the leather watch band in it. By soaking the strap, the cleaning solution can penetrate the leather and break down any stubborn dirt or stains. Follow these steps to properly soak the strap:
Submerge the leather watch band in the prepared cleaning solution. Ensure that the entire strap is fully submerged, allowing the solution to reach all areas.
Gently agitate the strap in the solution, moving it around to help dislodge dirt and stains. Avoid harsh scrubbing or twisting, as this can cause unnecessary stress on the leather.
Allow the strap to soak in the cleaning solution for around 10-15 minutes. This duration will give the solution enough time to work its magic without drying out the leather.
During the soaking process, periodically check the condition of the strap. If you notice any discoloration or adverse reactions, immediately remove the strap from the solution. It’s better to be cautious and prevent any potential damage.
If you come across any stubborn stains or areas of heavy soiling, you can gently scrub them with a soft-bristled brush or toothbrush while the strap is still submerged. Use light pressure and circular motions to avoid causing any damage.
While the strap is soaking, take this opportunity to clean the watch case as well. Wipe it with a damp cloth and mild soap to remove any dirt or grime that may have accumulated.
Once the strap has soaked for the appropriate time, carefully remove it from the cleaning solution. Hold the strap over the container to allow any excess solution to drip off.
By properly soaking the strap, you’re maximizing the effectiveness of the cleaning solution and ensuring that every part of the leather is thoroughly cleaned. This step contributes to the overall success of your leather watch band cleaning process.
Step 6: Scrubbing
Once the leather watch band has soaked in the cleaning solution, it’s time to give it a gentle scrub to further remove any dirt, stains, or grime that may be trapped within the leather. Follow these steps to scrub the strap effectively:
Start by wetting a soft-bristled brush or toothbrush with clean water. Make sure the bristles are damp but not dripping wet.
Gently scrub the entire surface of the strap, focusing on areas with visible stains or heavy soiling. Use small circular motions and light pressure to avoid damaging the leather.
Pay extra attention to any crevices, stitching, or textured areas of the strap. These areas are more prone to accumulating dirt and require a bit more scrubbing to remove stubborn particles.
Continue scrubbing until you feel satisfied that you have thoroughly cleaned the strap. If necessary, dip the brush back into clean water to rinse off any dirt or cleaning solution that may have accumulated on the bristles.
As you scrub, periodically check the condition of the strap to ensure that it’s not being overly stressed or damaged. If you notice any signs of excessive drying or discoloration, adjust the pressure or stop scrubbing altogether.
If there are still stubborn stains or grime that remain after scrubbing, repeat the soaking and scrubbing process until the strap looks clean and refreshed.
Once you feel confident that the strap is clean, rinse it thoroughly with clean water to remove any residual cleaning solution or soap. Ensure that all traces of cleaning products are completely removed.
By gently scrubbing the leather watch band, you’re further loosening and removing any dirt or stains that may have been trapped within the leather. This step enhances the overall cleanliness and appearance of your leather watch band.
Step 7: Rinsing
After scrubbing the leather watch band, it’s crucial to thoroughly rinse it to remove any residual cleaning solution or soap. This step ensures that no harmful substances remain on the strap that could potentially damage the leather or cause discomfort when wearing the watch. Here’s how to properly rinse the strap:
Hold the strap under clean, running water. Ensure that the water is at a lukewarm temperature to avoid causing any harm to the leather.
Gently massage the strap with your fingers while rinsing to help dislodge any remaining cleaning solution or soap. Pay specific attention to any areas that were heavily scrubbed to ensure that all residue is removed.
Continue rinsing until the water runs clear and there are no more visible traces of cleaning product on the strap. The rinse should be thorough to ensure that no residue is left behind, which could potentially cause damage or discomfort.
Periodically flex and bend the strap as you rinse to ensure that every part is exposed to the water. This helps to remove any trapped dirt or residue from within the folds and crevices of the leather.
Once you are confident that the strap is thoroughly rinsed, gently squeeze out any excess water. Be careful not to wring or twist the strap, as this can lead to deformation or damage.
Inspect the strap after rinsing to ensure that all traces of cleaning solution or soap have been successfully removed. If there are any visible residue or areas that still feel slippery, repeat the rinsing process until the strap feels clean and free from any cleaning product.
By properly rinsing the strap, you’re eliminating any leftover cleaning solution or soap that could potentially harm the leather or cause discomfort. This step ensures that your leather watch band is thoroughly cleaned and ready for the next phase of the cleaning process.
Step 8: Drying
Once you have finished rinsing the leather watch band, it’s essential to properly dry it. This step ensures that the strap retains its shape, prevents moisture damage, and prepares it for the conditioning process. Follow these steps to effectively dry the strap:
Start by gently patting the strap with a soft towel to remove excess water. Avoid rubbing or applying excessive pressure, as this can cause unnecessary stress to the leather.
Ensure that both the outer surface and the inner lining of the strap are dried. Pay attention to any areas that may have absorbed more water, such as near the buckle or between stitching.
Allow the strap to air dry naturally in a well-ventilated area. Avoid using direct heat sources such as hair dryers or heaters, as the excessive heat can damage the leather.
During the drying process, make sure the strap is laid flat or hung up to retain its shape. Avoid folding or creasing the strap, as this can lead to permanent damage or deformation.
Depending on the thickness and type of leather, the drying process may take several hours or even overnight. Be patient and allow the strap ample time to dry completely before moving on to the next step.
Every so often, check the strap to ensure that it is drying evenly and that there are no signs of discoloration or damage. If you notice any abnormalities, address the issue promptly or seek professional assistance if needed.
Once the strap is fully dried, it should feel cool to the touch and no longer damp. There should be no visible moisture or dampness on the surface of the leather.
By properly drying the strap, you’re preserving its shape and preventing any moisture-related damage. This step ensures that your leather watch band is ready for the next phase of the cleaning process with optimal results.
Step 9: Conditioning the Leather
After the leather watch band has been thoroughly cleaned and dried, it’s time to condition the leather to restore its natural moisture and suppleness. This step is essential for maintaining the longevity and appearance of the strap. Follow these steps to effectively condition the leather:
Start by choosing a suitable leather conditioner. Look for a high-quality conditioner specifically designed for use on leather watch straps. Avoid using products that contain harsh chemicals or oils that may harm the leather.
Apply a small amount of the leather conditioner onto a clean microfiber cloth. A little goes a long way, so start with a small dab and add more if needed.
Gently rub the conditioner onto the entire surface of the strap, ensuring that you cover all areas evenly. Use circular motions and apply light pressure to allow the conditioner to penetrate the leather.
Pay extra attention to any areas that may have dried out or appear to be more worn. These areas may require a bit more conditioner to restore their natural luster and flexibility.
Allow the conditioner to sit on the strap for the recommended amount of time specified by the product manufacturer. This could range from a few minutes to several hours, depending on the conditioner.
Once the recommended time has elapsed, use a clean portion of the microfiber cloth to gently buff the strap, removing any excess conditioner. The strap should feel slightly moisturized but not oily to the touch.
Inspect the strap to ensure that the conditioner has been evenly distributed and absorbed into the leather. There should be no visible residue or streaks.
Allow the conditioned strap to air dry for a short period before proceeding to the next step. This ensures that the leather fully absorbs the conditioner and any excess is properly absorbed or evaporated.
By conditioning the leather, you’re nourishing and replenishing its natural oils, keeping it soft and supple while preventing it from drying out or cracking. This step contributes to maintaining the overall health and appearance of your leather watch band.
Step 10: Reattach the Strap
Now that you have cleaned, dried, and conditioned the leather watch band, it’s time to reattach it to the watch case. Follow these steps to securely and properly reattach the strap:
Start by locating the spring bars on the watch case. These are the metal bars that hold the strap in place.
Align one end of the strap with the lug of the watch case, making sure that the holes in the strap align with the spring bar holes on the case.
Slide one end of the spring bar into the lug hole, holding it in place as you repeat the process for the opposite end of the strap.
Apply gentle pressure to compress the spring bar and slide it into the lug hole until it snaps into place. You should feel a slight click or resistance when the spring bar is securely in position.
Repeat the process for the other end of the strap, ensuring that both spring bars are firmly attached to the watch case.
Once the strap is securely attached, give it a gentle tug to check for any signs of movement or looseness. The strap should feel snug and secure on the watch case.
Inspect the strap to ensure that it is properly aligned and centered on the watch case. Adjust if necessary to achieve a balanced and symmetrical appearance.
If your leather watch band has a deployment clasp or buckle, follow the manufacturer’s instructions or refer to online resources for specific guidance on reattaching these types of clasps.
Take a moment to admire your newly cleaned and revitalized leather watch band. Now it’s ready to be worn with confidence and style!
By reattaching the strap securely and properly aligning it with the watch case, you’re ensuring that your leather watch band stays in place and provides a comfortable fit. This step completes the cleaning process and prepares your watch for use.
Step 11: Final Touches
After reattaching your freshly cleaned leather watch band, there are a few final touches you can apply to ensure it looks its best and is well-maintained. Follow these steps to add those finishing touches:
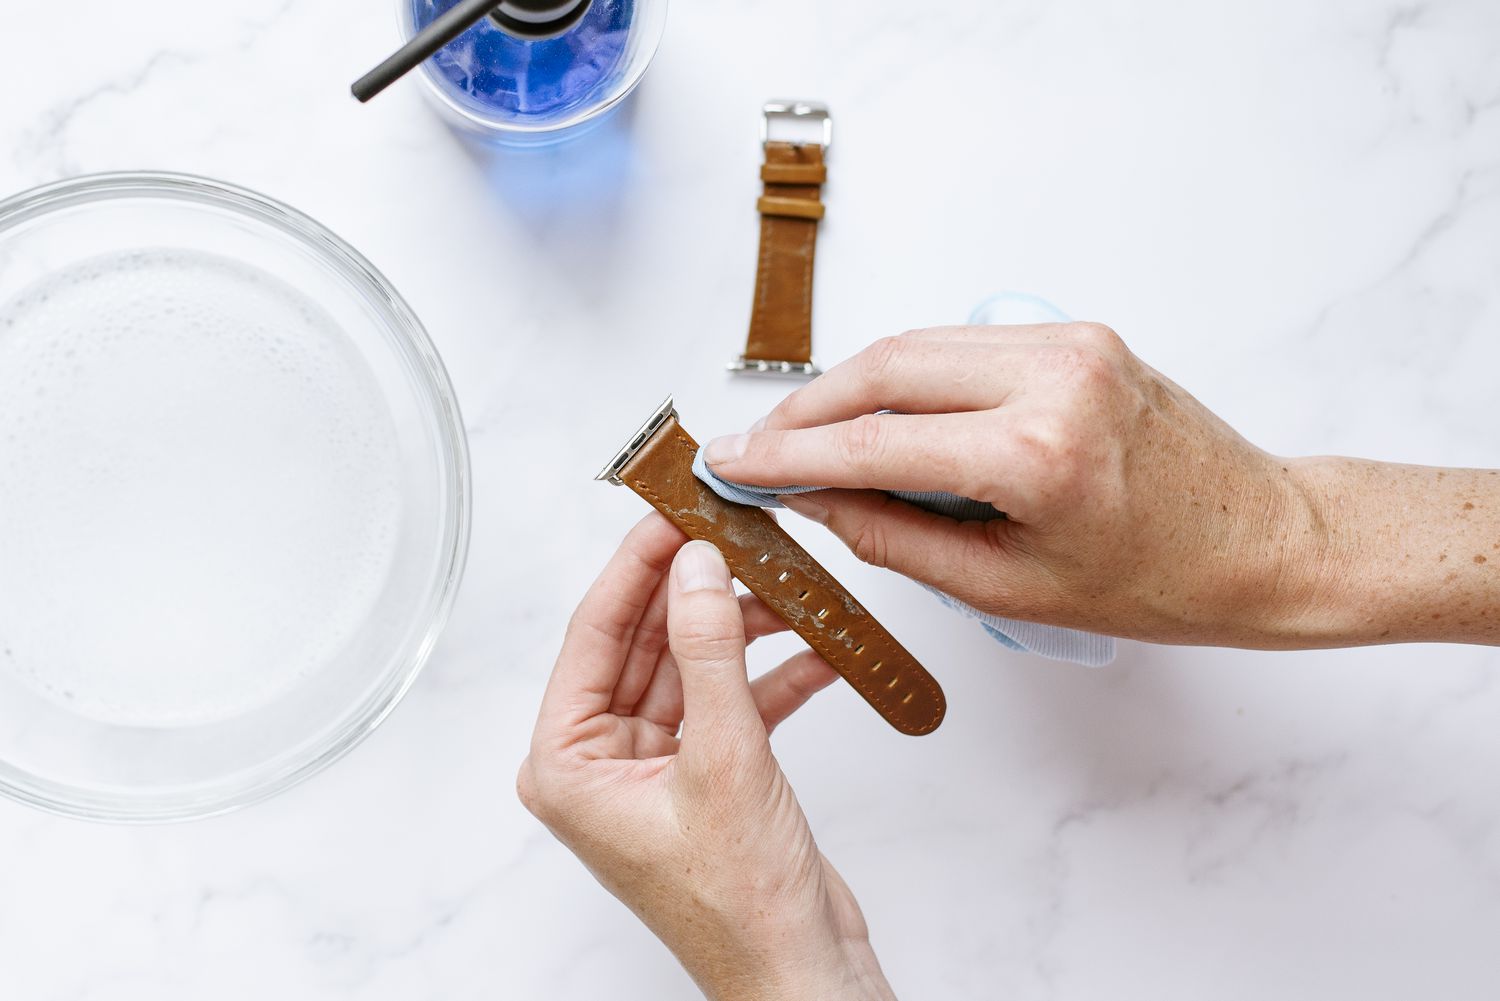
Take a clean microfiber cloth and gently buff the entire surface of the strap. This helps to remove any remaining residue and gives the leather a nice polished look.
If your leather watch band has a glossy finish, you can use a specialized leather polish or shine enhancer to further enhance its luster. Apply a small amount of the product to a clean cloth and carefully rub it onto the strap in circular motions.
Inspect the strap for any scratches or scuffs that may have occurred during the cleaning process. If you notice any imperfections, you can use a leather conditioner or specific leather repair product to address them. Follow the instructions provided with the product for best results.
For additional protection, consider applying a leather protector or waterproofing spray to the strap. This can help prevent future stains or damage from moisture or daily wear.
Finally, make it a habit to regularly clean and maintain your leather watch band to keep it in optimal condition. Regular cleaning and conditioning will help extend the lifespan of the strap and keep it looking its best for years to come.
With these final touches and ongoing maintenance, your leather watch band is now ready to be showcased on your wrist. Enjoy the refreshed and renewed look of your watch, knowing that you’ve taken the necessary steps to care for your leather strap.
By buffing, polishing, and applying protective measures, you’re ensuring that your leather watch band remains in excellent condition and maintains its aesthetic appeal. These final touches complete the cleaning process and leave you with a pristine and well-maintained leather strap.